5.4. Visual Inspector
Visual inspector is a tool that helps you find CSS selectors of elements in target web page by clicking on them. The visual inspector can be shown by clicking to button available for the settings that require a CSS selector.
How to close Visual Inspector
You can close the visual inspector by clicking outside of the visual inspector or hitting the
escape button in your keyboard.
Following figure displays the visual inspector. Features of the visual inspector that are available
in the figure are numbered. Each numbered feature is explained in a subsection whose last number
matches the number of the feature. The title in the figure displays Category Post URL Selectors
because the visual inspector is opened by clicking to button of Category Post
URL Selectors setting.
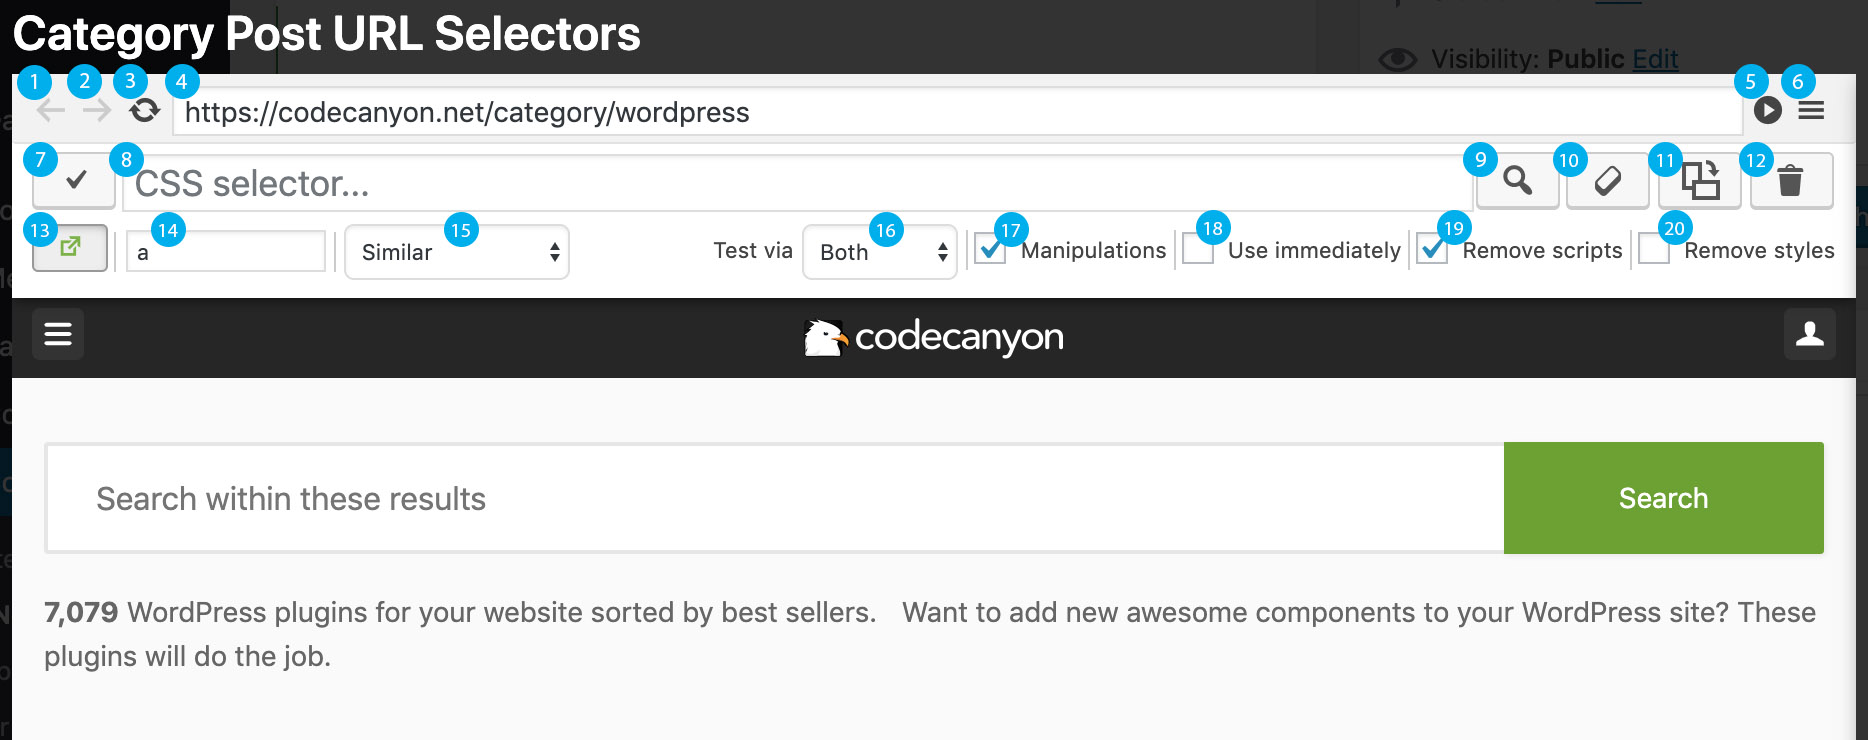
Fig. 5.23 Visual inspector. Each feature is numbered. Open the image in a new tab for a bigger version.
This figure contains numbers 1 - 20.
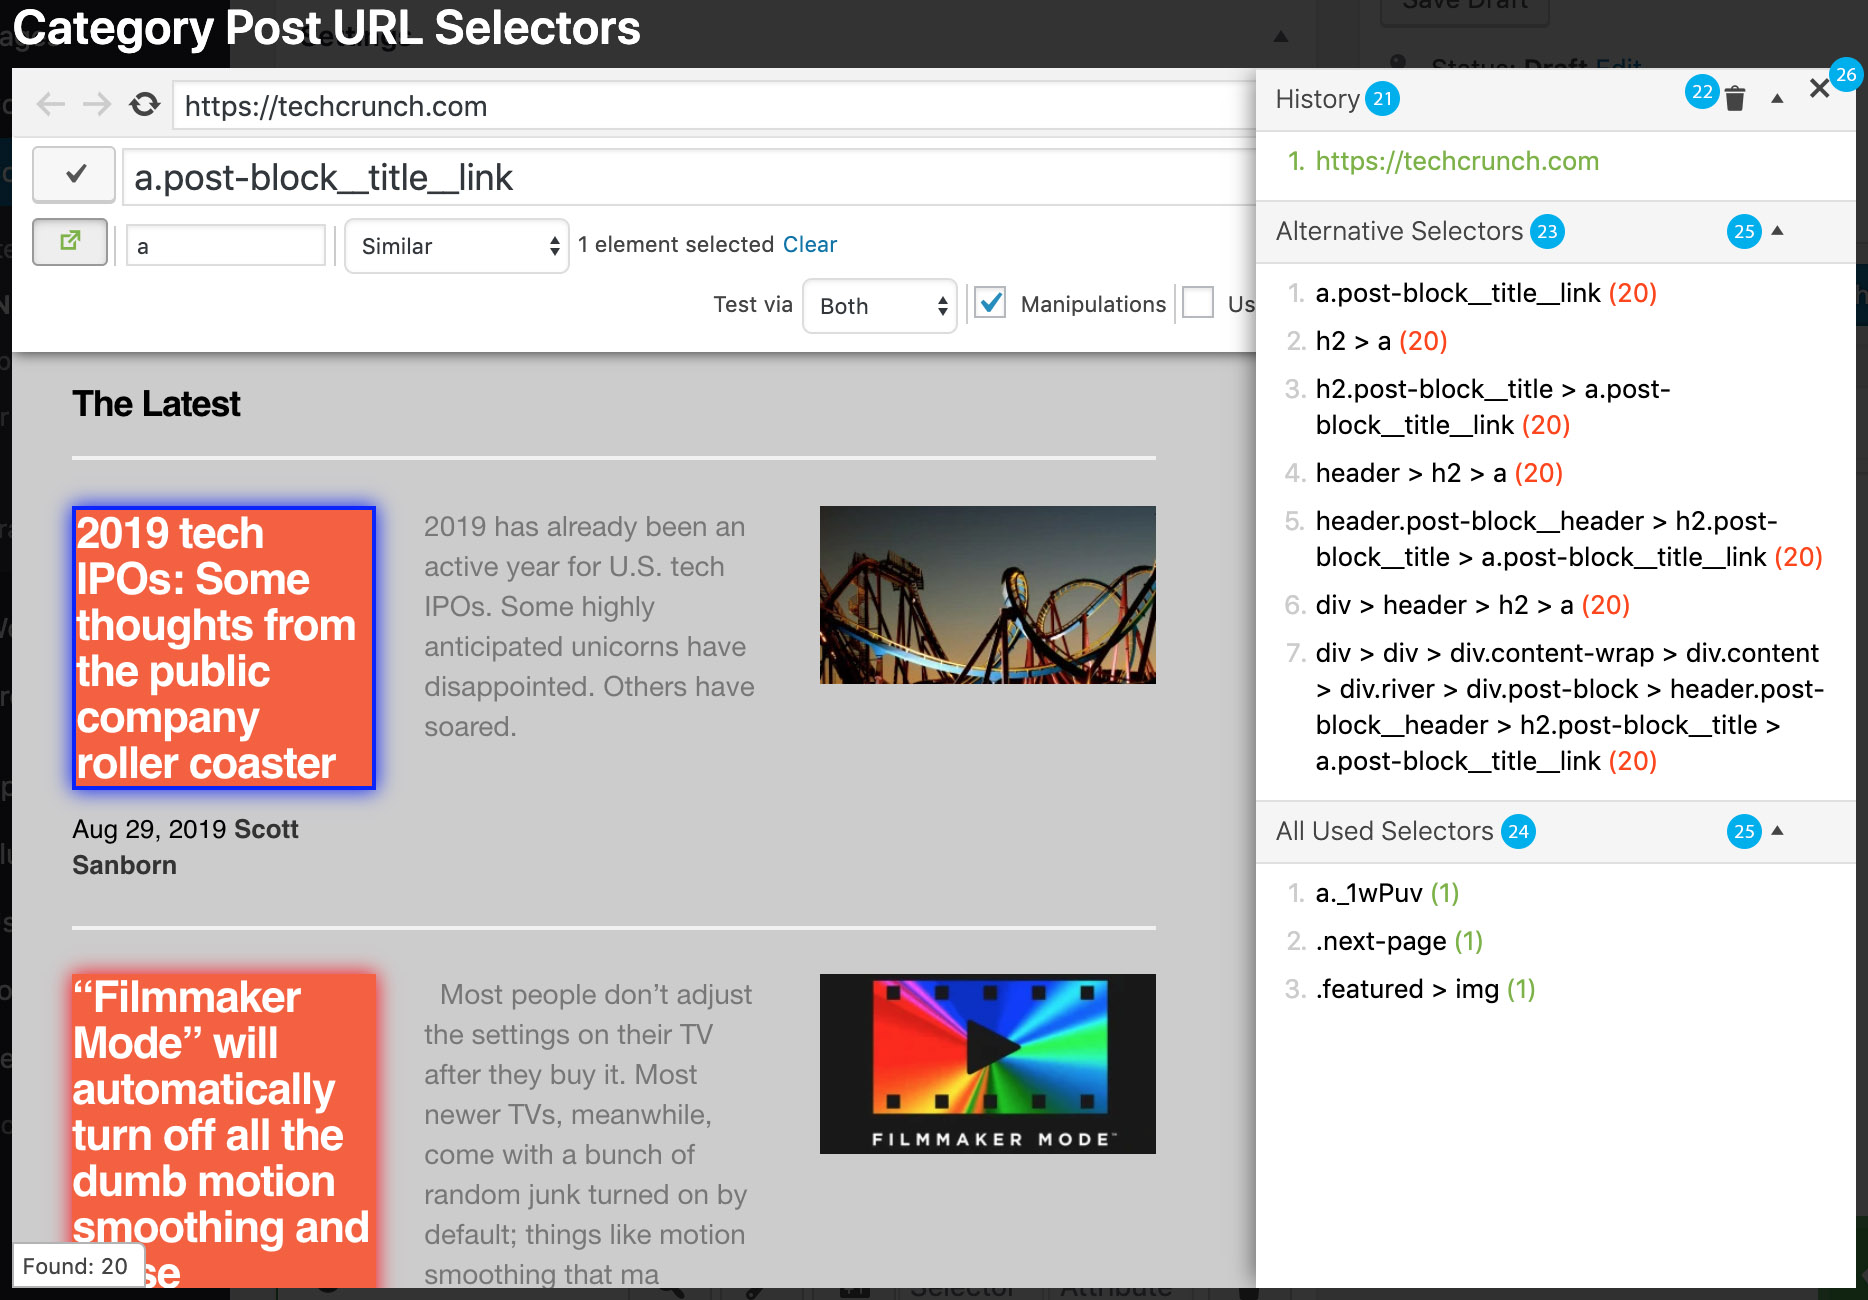
Fig. 5.24 Visual inspector’s sidebar. Opened by clicking to Show sidebar button. Each feature is
numbered. Open the image in a new tab for a bigger version. This figure contains numbers 21
- 26.
5.4.1. Back
- This is just like the back button of your browser. When you click this button, previous URL loaded in the visual inspector will be loaded. This button is active only if there is a previously loaded URL.
5.4.2. Forward
- This is just like the forward button of your browser. When you click this button, next URL loaded in the visual inspector will be loaded. This button is active only if there is a next URL. In other words, you should have clicked the back button for this button to be active.
5.4.3. Refresh
- This is just like the refresh button of your browser. When you click this button, the URL that is currently loaded in the visual inspector will be reloaded by making a request to the target page. A fresh source code will be loaded.
5.4.4. Address bar
This is just like the address bar of your browser. You enter full URL of the target page to load
it into the visual inspector. After you enter the URL, you can either hit enter key of your
keyboard or click to Go button.
Note
The URL must be a full URL. In other words, it must start with http.
5.4.5. Go
This button loads the source code of the URL entered into Address bar. If the URL was previously loaded, the source code will be used from cache to quickly display the requested page. In other words, a request will not be made to the target site if the URL’s source code is already cached. If you want to bypass or invalidate the cache, you can click Refresh button.
5.4.7. Use CSS selector
When clicked, this button copies the CSS selector in CSS selector input into the CSS
selector input of the setting for which the visual inspector is opened and closes the visual
inspector. For this example, the CSS selector will be copied into the CSS selector input of
Category Post
URL Selectors
setting. If there is no CSS selector in the CSS selector
input, the button will not do anything.
5.4.8. CSS selector
When there is a CSS selector in this input, the elements found by the CSS selector will be highlighted. You can manually enter a CSS selector into this input. Also, when a CSS selector is found by the visual inspector, it will be displayed in this input. You can modify the automatically-found CSS selector, as well. When the CSS selector is changed, the visual inspector immediately updates the highlights by finding matching elements.
When you open the visual inspector of a setting, if there is CSS selector already available for that setting, it will be displayed in this input and the elements found by that CSS selector will be highlighted.
5.4.9. Test CSS selector
When clicked, this button tests the CSS selector in the CSS selector input. What type of test should be performed is defined in Test type setting.
5.4.10. Clear highlights
When clicked, highlights in the current page will be removed. The highlighted elements will not be removed. They will not be highlighted anymore.
5.4.11. Show alternative CSS selectors
When clicked, this button calculates alternative versions of the CSS selector inside CSS selector input, updates the alternative selectors in the sidebar, and opens the sidebar for you to see the alternatives and select one that suites your needs. If there is no CSS selector in the CSS selector input, this button does nothing.
5.4.12. Remove elements
When clicked, this button removes the elements found by the CSS selector that is in the CSS selector input. Sometimes, web pages display an element that is not visible and that prevents clicking the elements behind it. In such cases, you can select that element and click this button to remove it from the page so that you can click other elements and find CSS selectors for them.
If there is no CSS selector in the CSS selector input, this button does nothing.
Note
The elements will be removed temporarily. When you reload the page, they will be there
again. If you want to remove certain elements completely, you can use Unnecessary
Element Selectors setting.
5.4.13. Toggle hover select
This button enables or disables hover select. If hover select is already enabled, clicking this button will disable it. If hover select is already disabled, clicking this button will enable it.
When hover select is enabled, you can hover over the elements in the page and click to them to find their CSS selector. When hover select is disabled, you cannot select the elements and, hence, their CSS selectors will not be found. However, when hover select is disabled, you can click to links to load them into the visual inspector. For example, after you find a CSS selector for an element, you may want to load a different page into the visual inspector to test if your CSS selector works in that page too. When hover select is active, you cannot click to the links. In that case, you can disable hover select temporarily, click to the link to load its source code, and then enable the hover select again.
5.4.14. Target HTML tag
You can enter the tag name of an element for which you want to find a CSS selector. The tag
name is basically name of the HTML element. To name a few examples, a few of the tag names
can be listed as div, iframe, p, ul, img, and meta.
For example, if you want to find a CSS selector for an img element, you can write img
into this input so that the visual inspector finds a CSS selector for the img element
that is closest to the element you select by clicking.
This input is automatically populated for certain settings. For instance, when you open the
visual inspector for Featured Image Selectors setting, this input will be automatically
changed to img.
You can always change the value of this input. The changes will be applied as soon as you change the value of this input.
Note
You do not have to enter a value into this input. However, you may want to target a specific type of an element in certain cases. In that case, you can enter the target element’s tag name to find a CSS selector more easily.
5.4.15. Selection behavior
This setting allows you to define how the visual inspector finds CSS selectors. This setting has four options. These are explained below.
- Unique
When this behavior is selected, the visual inspector finds a CSS selector for the element such that the CSS selector finds only that element. In other words, the found CSS selector will match only the selected element. The result will always be one element.
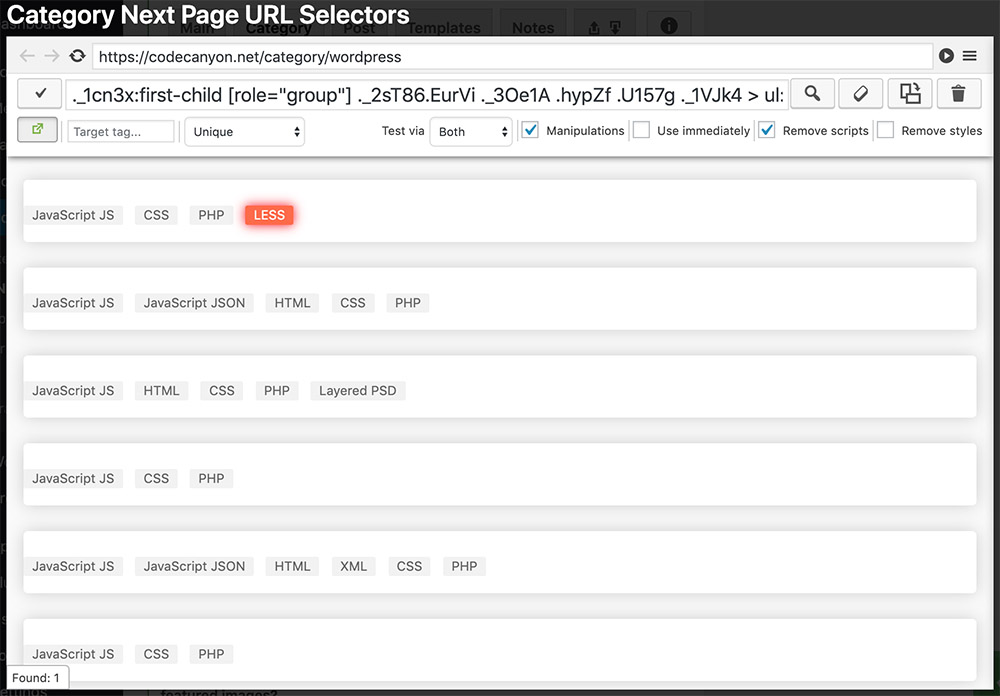
Fig. 5.25 Found element with
uniquebehavior. The highlighted item was clicked.- Similar
With this behavior, the visual inspector will try to find a CSS selector that matches elements that are similar to the element you select. For example, if there is category page that displays 10 post headings, clicking one of the elements will make the visual inspector try to find a single CSS selector that matches all 10 post headings. You can select more than one element to make the visual inspector try to be more specific.
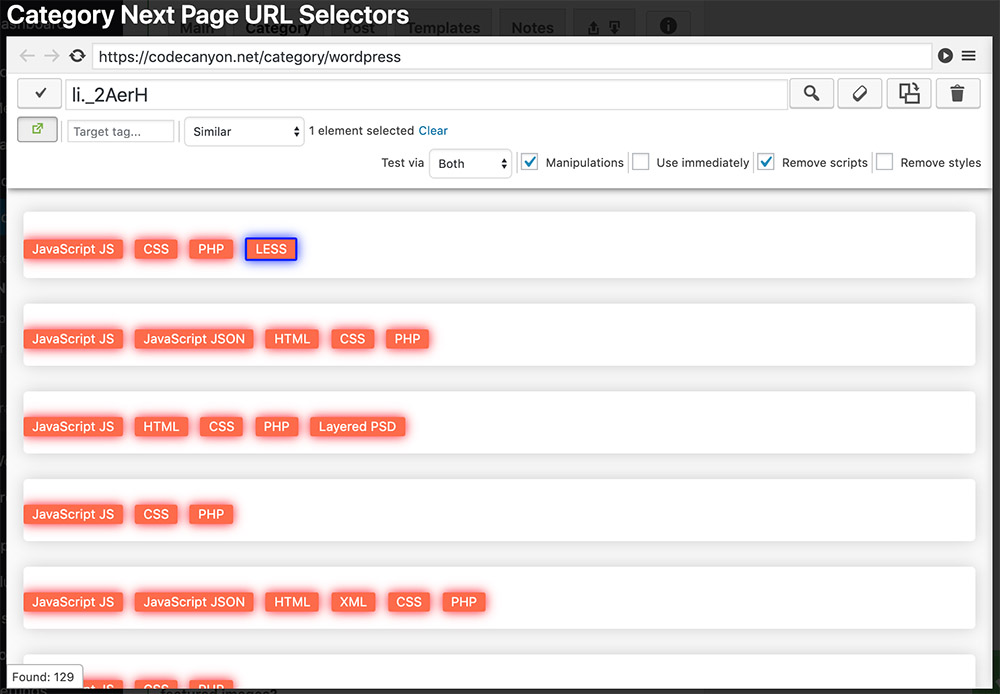
Fig. 5.26 Found elements with
similarbehavior. The element highlighted with a blue border was clicked.- Similar (Specific)
This behavior is almost the same as the
similarbehavior. What is different is that this will make the visual inspector be more specific when finding similar elements. For example, this behavior will try to consider the position of the element in its container. This will result in mostlynth-childselectors where possible. If the visual inspector cannot find a specific CSS selector, it behaves likesimilar. You can select more than one element to make the visual inspector try to be more specific.
Fig. 5.27 Found elements with
similar (specific)behavior. The element highlighted with a blue border was clicked.- Contains
When this is selected, the visual inspector will find a CSS selector that matches the common parent element of the selected elements.

Fig. 5.28 Found element with
containsbehavior. The element highlighted with a blue border was clicked.
Tip
When a behavior that allows multiple elements to be selected is chosen, the selected elements will be highlighted with a blue border. You can click a selected element again to unselect it.
Tip
There will be a clear button shown next to the selection behavior setting when there
is at least one element selected. You can click the clear button to unselect all selected
elements at once.
The following video demonstrates the usage of these behaviors.
5.4.16. Test type
This setting defines which test(s) to be performed when Test CSS selector button is clicked. There are three different testing methods available. These are explained below.
- PHP
- When this type is selected, the test button sends the source code of the page to your server and performs the test using the plugin’s PHP codes. This is the recommended test type to be used because your CSS selectors will be tested by using the PHP code that will also crawl the target page. The purpose of testing is to make sure the plugin will find the target elements as intended. This test does not highlight the found elements. Instead, it shows the HTML codes of the found elements.
- JavaScript
When this type is selected, the test will be performed in your browser, by running JavaScript. The results of this test do not guarantee that the plugin will find the same results, because the plugin does not run JavaScript in the server. However, there should not be any difference in the results. This test highlights the found elements.
Tip
You can see how many elements are found in the bottom left corner of the visual inspector after a JavaScript test is done.
- Both
- When this is selected, both the PHP and the JavaScript tests will be performed. Most of the time, this is the test type you will go on with.
5.4.17. Manipulations
When this is checked, the HTML manipulations defined in the settings, such as removing unnecessary elements (See: Unnecessary Elements Section) and HTML manipulation options (See: Manipulate HTML Section), will be applied to the source code retrieved from the target page before displaying it in the visual inspector. When the plugin crawls the pages, it applies the manipulation options. Therefore, it is recommended that this setting is checked. Otherwise, you will not be able to locate the cause of any unwanted result caused by the manipulation options defined in the settings. However, you can temporarily uncheck this setting to see how the target page looks like when no manipulation options are applied. By this way, you can detect an unwanted behavior more easily.
5.4.18. Use immediately
If this is checked, when you select an element, its CSS selector will be immediately copied to the CSS selector input of the setting for which the visual inspector is opened. Normally, you use Use CSS selector button to use the CSS selector. When this setting is enabled, it will be just like you select an element in the target page and immediately click to Use CSS selector button. Although it is not recommended to enable this option, you might be comfortable using it. You can test it out and decide whether you want to enable it or not.
5.4.19. Remove scripts
When this is checked, all the script codes available in the target page’s source code will be cleared out before showing the page in the visual inspector. It is recommended that you keep this setting checked.
Danger
When you uncheck this setting, you allow any unknown JavaScript code to be run inside your admin panel, while you are logged in as an admin. This makes your website vulnerable in terms of security. If you do not trust the target site completely, it is recommended that you do not allow scripts.
Important
When scripts are enabled, the target page might redirect your browser to a different page.
If this happens, you will lose your unsaved settings. If you have unsaved settings, it is
recommended that you save them before enabling scripts. Moreover, if this happens, you might
not be able to use the visual inspector even after you reload the settings page due to the fact
that whenever you load the target site in the visual inspector, your browser will be redirected
since the visual inspector saves its settings. If this happens, try to check remove
scripts checkbox immediately after the visual inspector is opened, before the target page is
loaded.
5.4.20. Remove styles
When this is checked, all the stylesheets and the style attributes of the elements will be removed from the source code of the target page before it is displayed in the visual inspector.
5.4.21. URL History
Each URL loaded in the visual inspector will be added to history. It is like the history of your browser. You can click any of the links shown in this section to load them in the visual inspector.
5.4.22. Delete URL history
- When clicked, this button deletes all URLs in URL History. Back and Forward buttons work using the history. Hence, if you delete the history, the buttons will be disabled until there is a URL in the history.
5.4.23. Alternative CSS selectors
This section shows CSS selectors alternative to the current CSS selector. When you select an element in the target page, its alternative CSS selectors are calculated as well. You can see those CSS selectors in this section. The alternative selectors can be created by clicking to Show alternative CSS selectors button as well.
The alternative selectors include CSS selectors that find the same elements found by the original CSS selector and/or CSS selectors that match at least the elements found by the original CSS selector. The number shown next to each CSS selector is the number of elements found by that CSS selector. When you hover over a CSS selector in this section, the matching elements will be highlighted immediately. When you click a CSS selector in this section, it is copied into CSS selector input and tested immediately.
The visual inspector tries to find the shortest and the most effective CSS selector that is less prone to be affected by the changes in the target web page by default. However, you might not like the found CSS selector and might want to come up with an alternative. The alternative selectors are computed just for this purpose, to show you alternatives. Since the alternative selectors might contain a selector that matches the intended element and the ones that are similar to that element, this section is also useful to find a CSS selector that matches similar elements.
5.4.24. All used selectors
This section contains the CSS selectors that are used in the site settings. In other words, it contains the CSS selectors that are entered into a setting’s CSS selector input. The numbers next to each selector indicate how many times that selector is used in the settings. When you hover over the CSS selectors, the matching elements are highlighted immediately. When you click a CSS selector in this section, it is copied into CSS selector input and tested immediately.
5.4.25. Show/hide section
This button toggles the visibility of the section’s content.