12.1. Filter Setting
A filter setting allows you to do things conditionally. By configuring these settings, you can say “if this happens, then do this”. It is not mandatory to define a condition. For example, you can do things like these:
- If the post title contains
Teslain it, and the post content’s character count is at least100, then addSee moreat the end of the post’s content. - If there is an error while crawling a post, notify me with an email.
- If the post does not have at least
3tags, set the status of the post aspendingand notify me with an email. - If there is a
divelement whosedata-priceattribute’s value is greater than25and less than50, then add5.99to the regular price of the WooCommerce product, put it underPremiumcategory, and addsaletag to it. - If the post content has less than
250words, stop saving the post and delete it if it exists (Fig. 12.1). - If the post content has less than
250words or less than1600characters, stop saving the post and delete it if it exists.
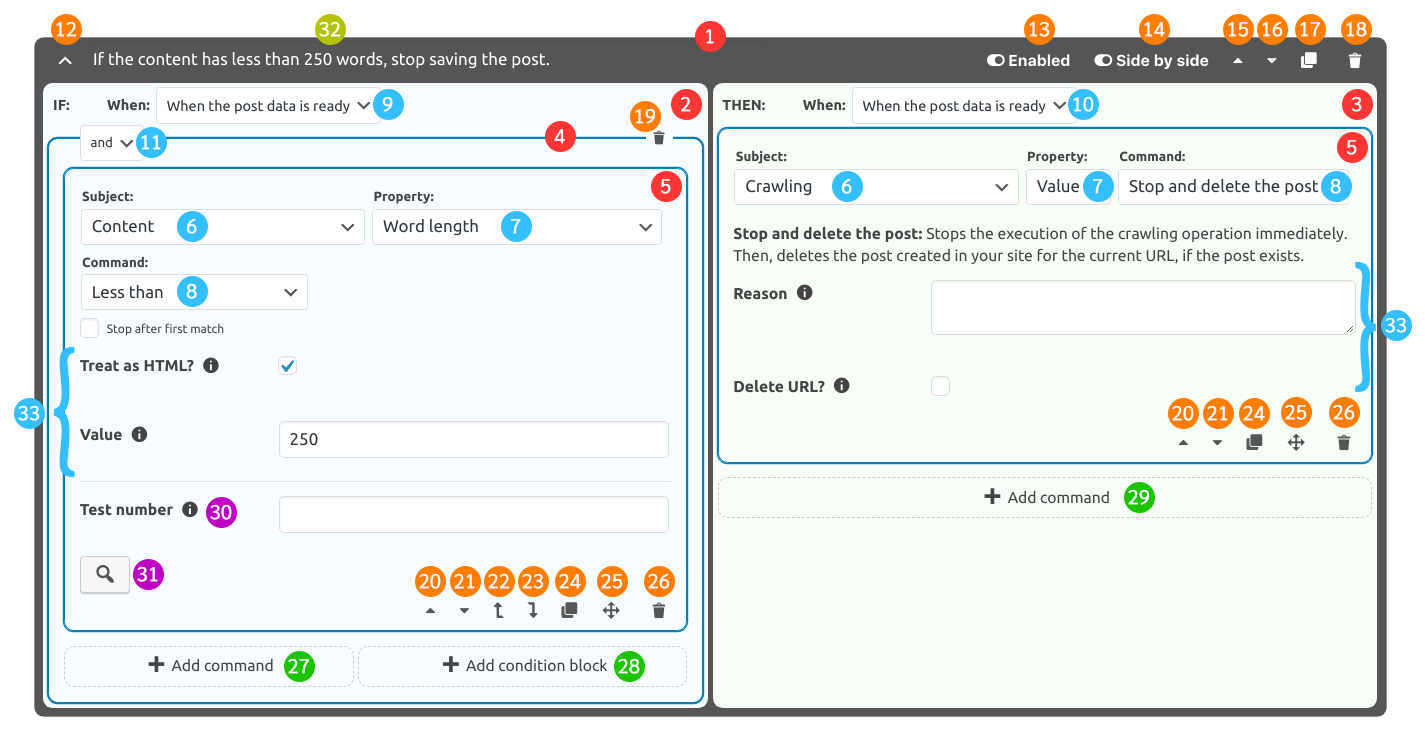
Fig. 12.1 A filter that stops saving the post if the post content has less than 250 words. Open the
image in a new tab for a bigger version. This figure contains numbers 1 - 33.

Fig. 12.2 The filter shown in Fig. 12.1 is collapsed. Open the image in a new tab for a
bigger version. This figure contains numbers 34 - 37.
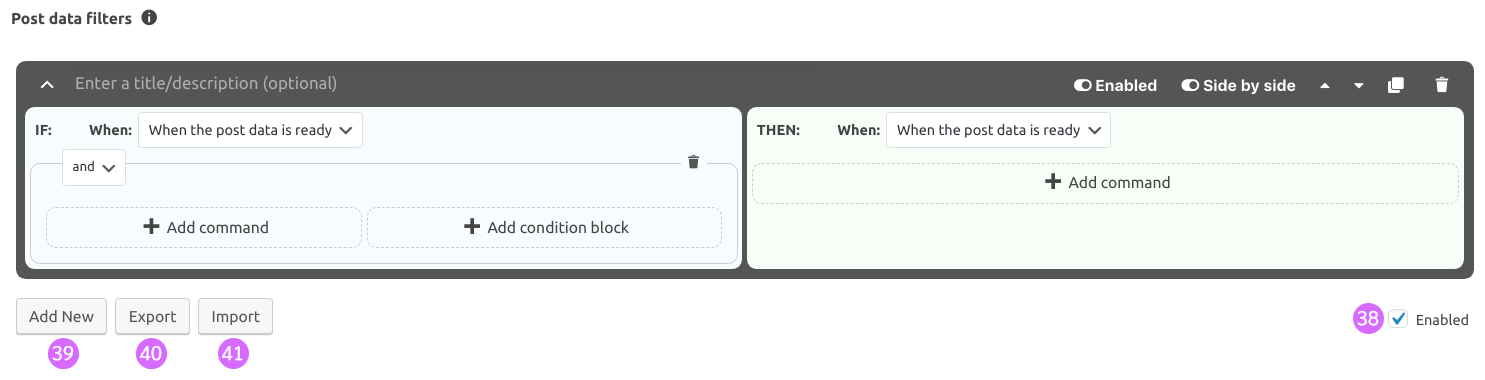
Fig. 12.3 A filter setting with a single filter in it. Open the image in a new tab for a bigger version.
This figure contains numbers 38 - 41.
The numbered items shown in Fig. 12.1, Fig. 12.2, and
Fig. 12.3 are explained below. The numbers on the figures match the last
parts of the section numbers below. For example, Section 12.1.4 explains the part
tagged with the number 4 on Fig. 12.1, while Section 12.1.13
explains the number 13.
The following video tutorial explains what the filters are and how they are used.
12.1.1. Filter
A filter is composed of two parts, if part (or condition part) that contains condition commands and then part (or action part) that contains action commands. Using these commands, a filter checks if a condition is met. If it is met, then it executes the action commands. If a filter does not have a condition command, then the action commands are definitely executed. Each filter setting can have many filters.
With a filter, you simply say “if this happens, then do this”. This is also called as “if this, then that” or, in short, IFTTT.
12.1.2. if part (or condition part)
This is the if part of the filter. This part contains the condition blocks
(Condition block) and condition commands (Command container). This part is where you
define your conditions.
12.1.3. then part (or action part)
This is the then part of the filter. This part contains action commands. This part will be
executed only if the conditions defined in the if part (or condition part) are met or there are no
condition commands in the if part (or condition part).
12.1.4. Condition block
A condition block can have multiple condition commands and condition blocks. The purpose of a
condition block is to group several condition commands and/or blocks with a
Condition operator. If the condition defined in the main (i.e. the outer-most) condition
block results in true (i.e. if it is met), this means that the commands in the
then part (or action part) must be executed.
12.1.5. Command container
This contains a single command’s definition. A command is used to instruct the plugin about what it should do. There are two types of commands in a filter, a condition command and an action command.
A condition command results in true or false. For example, Less than command results in
true only if a number is less than the specified number. If it results in true, then we say
that the condition is met. If it results in false, we say that the condition is not met.
An action command does something. For example, it changes the post title, sends an email or makes the plugin stop saving the post. There are many commands in the plugin.
You can see Filter Commands for more information about the commands.
12.1.6. Subject
The subject select defines the subject that the command will work with. In other words, it defines
what you want to do something with. For example, if you select content as the subject, then you
say that you want to do something with the post’s content. If you select product price, then
you want to do something with the price of the product. You get the idea. You can see
Command Subjects to see all the available subjects.
12.1.7. Property
The property select defines what property of the selected Subject you want to work
with. There are many properties in the plugin. The available properties change according to the
selected Subject. For example, if you select content as the subject, then
properties that are suitable for the content will be available for selection, such as
word length and character length. You can see Subject Properties to see all the
available properties.
12.1.8. Command
The command select defines what you want to do with the selected Subject’s
selected Property. The commands that are suitable for the selected
Property will be available for selection. There are many commands in the plugin.
For example, if the selected property is Word length, then the commands that
can be used with a number will be available for selection, since the length of the words is a
number. If the selected property is Value when the subject is content, then
the commands that can work with a text will be available for selection, since the post’s content is
a text. You can see Filter Commands to see all the available Condition Commands and
Action Commands.
12.1.9. Event of the if part
This defines when the if part (or condition part) must be executed. In Fig. 12.1, you
see that it is selected as when the post data is ready. There are also two other options,
after translation and after spinning. So, you can make the if part of the filter be
executed after the post is translated or spun. For example, you can check if a specific word exists
in the post’s content after it is translated to a different language, and then do something about it
in the then part (or action part). Different filter settings have different events available. See
Lifecycle of Events to learn when the events are executed.
12.1.10. Event of the then part
This defines when the then part (or action part) must be executed. The options existing for the
Event of the if part exist in this select element as well. For example, by configuring this event
as after translation and the Event of the if part as when the post data is ready, you can
check the condition before the translation and execute the actions after the translation. Different
filter settings have different events available. See Lifecycle of Events to learn when the
events are executed.
12.1.11. Condition operator
This defines how the results of the condition commands should be used to decide whether or not the
main condition is met. There are two operators available, and and or. When a
Condition block has and operator, it is considered as met only if all the condition
commands and blocks inside it are met. When it has or operator, it is enough that only one of
the condition commands or blocks inside it is met to say that the condition block is met. For
example, you can make the then part (or action part) execute if the title or the content has a specific
word in it, when you select or. If you want both the title and the content to have a specific
word to execute the actions, you select and operator.
12.1.12. Collapse filter
This toggle button expands or collapses the filter. When the filter is expanded, it collapses it. When it is collapsed, it expands it. When the filter is expanded, the if part (or condition part) and the then part (or action part) can be edited. When the filter is collapsed, they cannot be edited. A summary of the conditions and commands are shown instead. When you add many commands into a filter, it can become hard to understand. In that case, you can simply collapse the filter to see a summary of it. Also, since it is not possible to edit the filter’s parts when it is collapsed, collapsing a filter prevents accidental changes. You can see the collapsed version of the filter shown in Fig. 12.1 in Fig. 12.2.
12.1.13. Enable/disable filter
This toggle button switches the filter’s state between enabled and disabled. When you add a
filter to a filter setting, the filter is enabled by default. However, you might want to disable a
filter temporarily to see what happens without it. For example, you can disable a filter, then go to
the Tester Page, and test the site settings to check what happens without
that filter, for debugging purposes. Maybe there is an unexpected behavior, and you are suspicious
of a single filter. Disabling a filter helps you resolve this type of issues.
Fig. 12.4 shows the disabled version of the filter shown in
Fig. 12.1. When the filter is disabled, its container’s background color is
changed to red, so that you can easily differentiate them from the enabled filters.
12.1.14. Side-by-side view
This toggle button enables or disables the side-by-side view. In Fig. 12.1, the
filter is in side-by-side mode. When this mode is enabled, the if part (or condition part) and the
if part (or condition part) are shown side-by-side. When this mode is disabled, the if part takes the
entire width of the filter container, while the then part is placed under the if part.
Fig. 12.4 shows the filter shown in Fig. 12.1
with its side-by-side mode disabled.
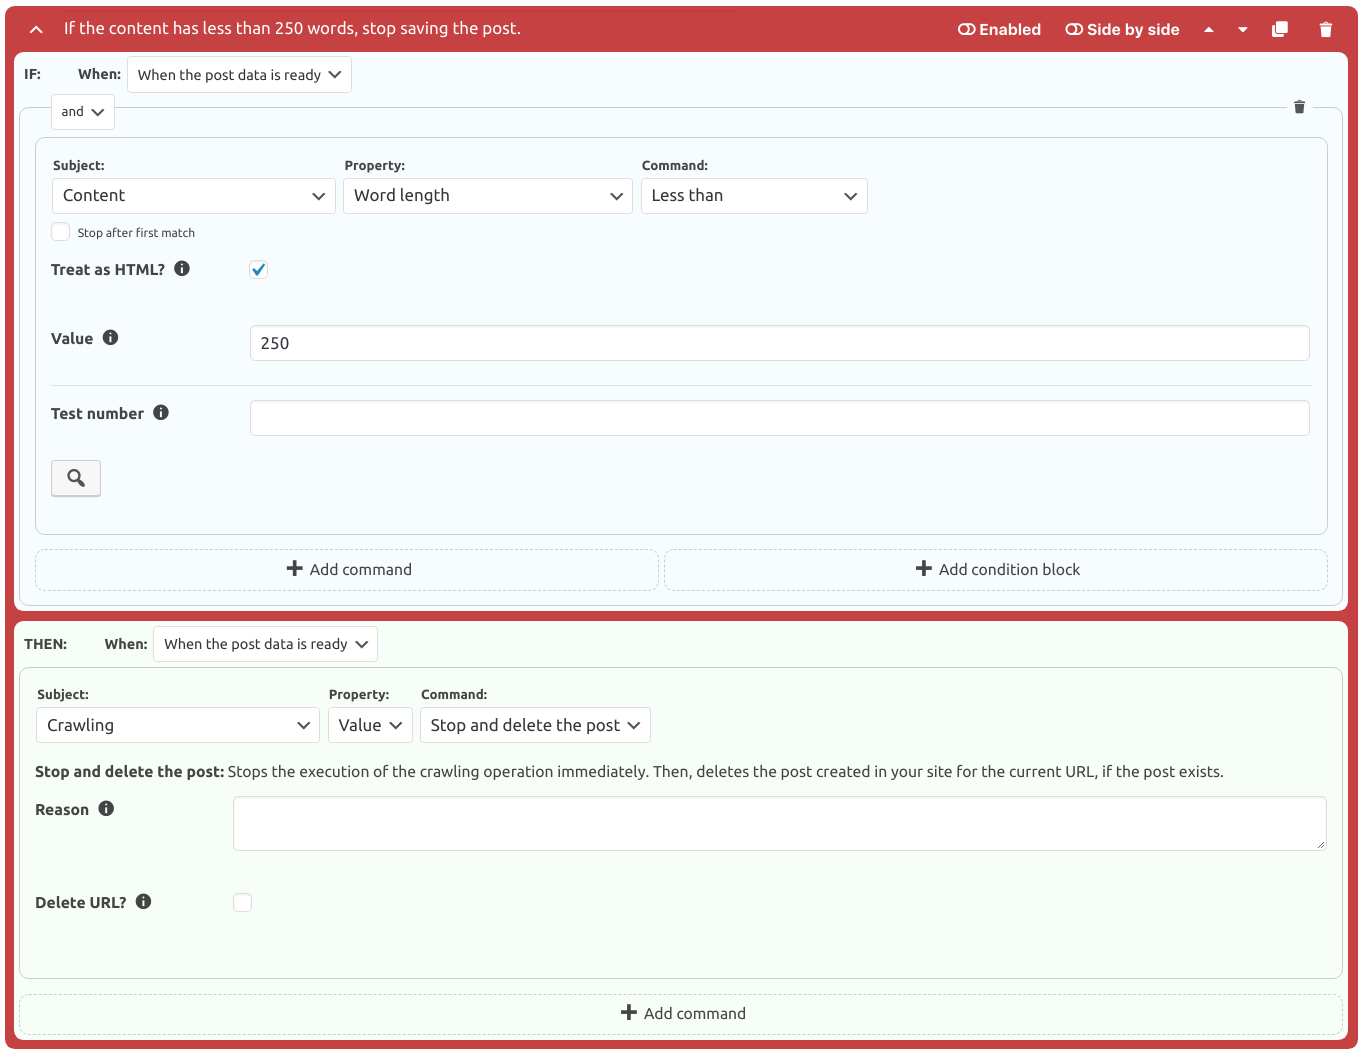
Fig. 12.4 The filter shown in Fig. 12.1 and its side-by-side mode are disabled.
12.1.15. Move filter up
This button switches the places of the filter with one above it. Because the filters are executed in the order they are defined, you might sometimes want to change the orders of the filters. This button becomes useful in this case.
12.1.16. Move filter down
This button switches the places of the filter with one below it. Because the filters are executed in the order they are defined, you might sometimes want to change the orders of the filters. This button becomes useful in this case.
12.1.17. Clone filter
This button creates a clone of the filter and places it under the filter.
12.1.18. Delete filter
This button deletes the filter. If the filter is the last one in the filter setting, then its commands and condition blocks are deleted.
12.1.19. Delete condition block
This button deletes the condition block and all the condition commands and condition blocks inside it. If the condition block is the main condition block, while the block’s contents are deleted, the block itself is not deleted.
12.1.20. Move command up
This button switches the places of the command with one above it. If it is a condition command, then there might be a condition block above it. In that case, the command switches places with the condition block above it. If the command is in a condition block, and it is the top-most command in the condition block, then the command is moved outside of the condition block, if there is a condition block outside.
12.1.21. Move command down
This button switches the places of the command with one below it. If it is a condition command, then there might be a condition block below it. In that case, the command switches places with the condition block below it. If the command is in a condition block, and it is the bottom-most command in the condition block, then the command is moved outside of the condition block, if there is a condition block outside.
12.1.22. Move command out
If the command is in a condition block that is not the main condition block, then this button moves the command outside of the current condition block, into the outer condition block.
12.1.23. Move command in
If there is a condition block below the command, then this button moves the condition command into the condition block below.
12.1.24. Clone command
This button creates a clone of the command and places it just under the command.
12.1.25. Move command
When you click this button, hold it, and move it, you can move the command, doing what Move command up, Move command down, Move command in, and Move command out buttons do by moving the command.
12.1.26. Delete command
This button deletes the command.
12.1.27. Add condition command
This button creates a new condition command in the condition block whose add condition command
button is clicked.
12.1.28. Add condition block
This button creates a new condition block in the condition block whose add condition block
button is clicked.
12.1.29. Add action command
This button creates a new action command.
12.1.30. Test subject input
This is used as the subject value when Test command is clicked.
12.1.31. Test command
This button is used to test the Command’s options. You should fill the
Test subject input for this button to be able to do its job. Not all commands have
this button. Please note that this button does not consider the options of Subject
and Property. Only the Command’s options are considered when
testing. You can see which options belong to the command by hovering over the select element of the
Command. Fig. 12.5 shows an example of testing the less than
command. We want to test if 30 is less than 250. So, we enter 30 into the
Test subject input, which is named as Test number for this command, and then
click to button. The result shown below the says that the condition is met,
meaning that 30 is less than 250.

Fig. 12.5 Testing if the number 30 is less than the number 250.
12.1.32. Filter title/description
You can enter a descriptive text into this input. When you have many filters, it might be hard to figure out what each filter’s purpose is just by glancing at it. In those cases, writing a brief description for the filter will help you understand why you created the filter. Filling this is optional.
12.1.33. Command options
This area contains the options of the command. Also, subjects and properties can have options too. All those options are shown in this area. You should configure each command’s options for the command to be able to do its job. Not all of the options are mandatory to fill, of course. You can read the descriptions of the options by clicking to the information button shown next to the options’ labels to understand what an option’s purpose is. Each subject, property, and command may have different options. Typically, you configure the options, save the site settings, and use the Tester Page to see if the command works as expected. The Tester Page also explains if a command is executed, what a command did, and many other things about the filters, to make it easier to debug.
12.1.34. Summary of the if part
This area displays the summary of the if part (or condition part), when the filter is collapsed. The summary includes the Event of the if part and summaries of the condition blocks and commands.
12.1.35. Summary of the then part
This area displays the summary of the then part (or action part), when the filter is collapsed. The summary includes the Event of the then part and summaries of the action commands.
12.1.36. Expand/collapse command option summaries
This toggle button shows or hides the summaries of the options of all the commands. The options summary is shown just under the names of the selected subject, property, and command.
12.1.37. Command summary
This area shows the summary of a command. It contains the names of the selected subject, property, and command, as well as their options and the values assigned to them. You can click the names of the selected subject, property or command to show/hide the options summary.
12.1.38. Enable/disable filter setting
When you uncheck this checkbox, the filter setting is disabled, meaning that the filters defined in the filter setting will not be executed. For the filters of a filter setting to be executed, this checkbox must be checked. Disabling a filter setting is useful when debugging your site settings. If you are suspicious that an unexpected behavior is caused by the filters defined in a filter setting, then you can temporarily disable the filter setting, go to Tester Page, and test the site settings to check what happens without the filter setting, for debugging purposes.
You can see a disabled filter setting in Fig. 12.6. When a filter setting is disabled, the background color of the filter containers becomes red to indicate that the filters will not be executed.
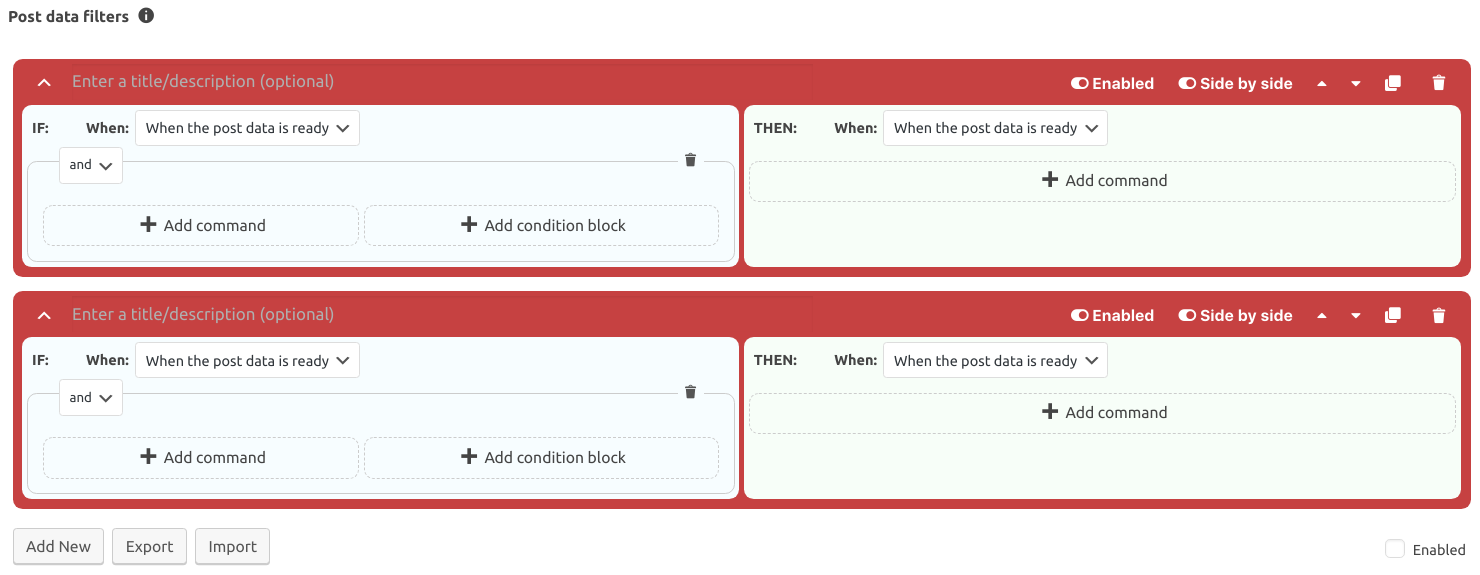
Fig. 12.6 A disabled filter setting with two filters in it
12.1.39. Add new
When you click this button, a new filter will be added to the filter setting.
12.1.40. Export
When you click this button, a new area will be displayed under it. In this area, there is a code that you can copy with the purpose of importing all the filters defined in the filter setting into another filter setting. For example, you may want to create the same filter setting in another site. In that case, you can simply copy the code and use the Import button of the other site’s same filter setting to create the same filters in it. Fig. 12.7 shows an active “export” button. You can see the code in the gray textarea.
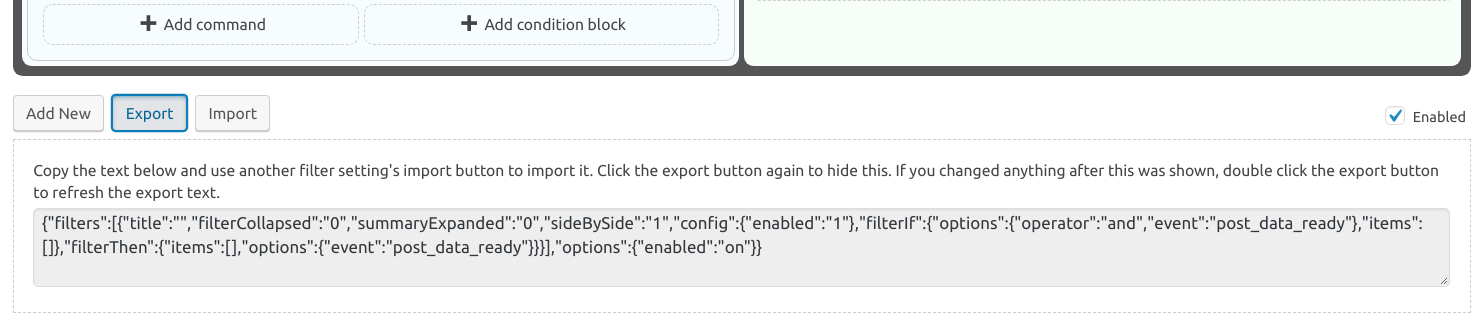
Fig. 12.7 An active “export” button
12.1.41. Import
When you click this button, a new area will be displayed under it. In this area, there is a textarea. You must paste the code that you copied from the textarea of the Export button into this textarea. Then, you must click the “import” button again to import the filters. The imported filters will be added to the top of the existing filters. Your existing filters will not be removed. Fig. 12.8 shows an active “import” button. You can see the textarea into which you should paste the code you copied from the Export’s textarea.
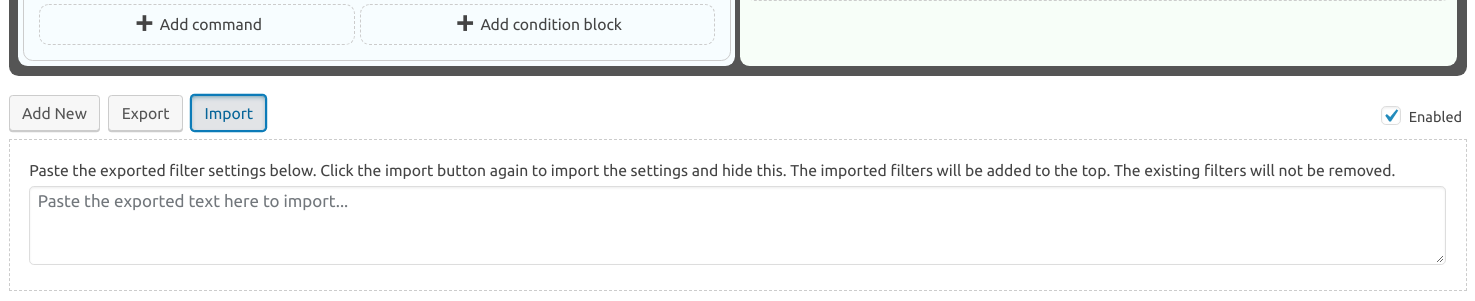
Fig. 12.8 An active “import” button