6.3.1.1. Main
6.3.1.1.1. Site URL
Write the base URL of the site.
- Base URL
- Target site’s URL that consists of its domain. E.g.
https://wordpress.org/. Do not include the parts other than the domain. For example, instead ofhttps://wordpress.org/plugins/, writehttps://wordpress.org/. The URL must start withhttp.
Important
You must fill this field.
Important
The value entered here will be used to make relative URLs full URLs when there is a need. Therefore, if this URL is not the base URL, then your relative URLs defined throughout the settings will not work.
6.3.1.1.2. Active for scheduling?
Check this setting’s checkbox if you want to enable automatic URL collection and post crawling for this site. For automatic crawling to be enabled, you must also enable scheduling under the general settings of the plugin (See: Scheduling is active?).
6.3.1.1.3. Active for recrawling?
Check this setting’s checkbox if you want the posts that are saved by using this site’s settings to be updated. For automatic recrawling to be enabled, you must also enable recrawling under the general settings of the plugin (See: Recrawling is active?).
6.3.1.1.4. Active for post deleting?
Check this setting’s checkbox if you want the posts that are saved by using this site’s settings to be deleted. For automatic deleting to be enabled, you must also enable deleting under the general settings of the plugin (See Deleting is active?).
6.3.1.1.5. Active for post translation?
Check this setting’s checkbox if you want the posts that are saved by using this site’s settings to be translated. For automatic translation to be enabled, you must also enable translation under the general settings of the plugin (See Translation is active?) and configure translation settings.
6.3.1.1.6. Translatable Fields
You can select which fields should be translated. If you select none, it means all fields are translatable. The list of translatable fields can be seen in Transformable Fields.
Note
This setting is visible only if Active for post translation? setting is enabled.
Important
The fields are translated after the templates are prepared. So, if a translatable field is used in a non-translatable field via short codes, value of the translatable field is included into the non-translatable field without translation.
6.3.1.1.7. Active for post spinning?
Check this setting’s checkbox if you want the posts that are saved by using this site’s settings to be spun. For automatic spinning to be enabled, you must also enable spinning under the general settings of the plugin (See Spinning is active?) and configure spinning settings.
6.3.1.1.8. Spinnable Fields
You can select which fields should be spun. If you select none, it means all fields are spinnable. The list of spinnable fields can be seen in Transformable Fields.
Note
This setting is visible only if Active for post spinning? setting is enabled.
Important
The fields are spun after the templates are prepared. So, if a spinnable field is used in a non-spinnable field via short codes, value of the spinnable field is included into the non-spinnable field without spinning.
6.3.1.1.9. Check duplicate posts via
Set how the plugin should decide if whether a post is duplicate or not. Duplicate checking will be performed in this order: URL, title, content. If one of them is found, the post is considered as duplicate.
The duplicate check types are as follows.
- URL
If the same URL already exists in the database, then the post is duplicate. Do not save it.
Note
The same URL cannot be inserted into the database, by design. So, no matter you select this or not, the same URL will not be crawled again.
- Title
- If a post, that was saved by the plugin, with the same title exists, then the post is duplicate. Do not save it.
- Content
- If a post, that was saved by the plugin, with the same content exists, then the post is duplicate. Do not save it.
6.3.1.1.10. Use custom general settings?
Check this setting to override general settings. When this checkbox is checked, Settings tab
will become visible. You can override the general settings from Settings Tab.
Important
When this checkbox is checked, all of the general settings will be overridden, except for
certain few settings (See: Settings Tab). Hence, if you leave a setting that
is under Settings tab empty, it is still overridden. In other words, leaving a setting
empty does not mean “do not override”.
6.3.1.1.11. Cookies
You can provide cookies [1] that will be attached to every request that is sent to the target site. For example, you can provide a session cookie to crawl a site by a logged-in user. Each cookie should have two values:
- Cookie name
- Name of the cookie.
- Cookie content
- Value of the cookie.
Note
The cookies will be added to every request sent to the target site, including the requests sent by clicking to button and by Visual Inspector.
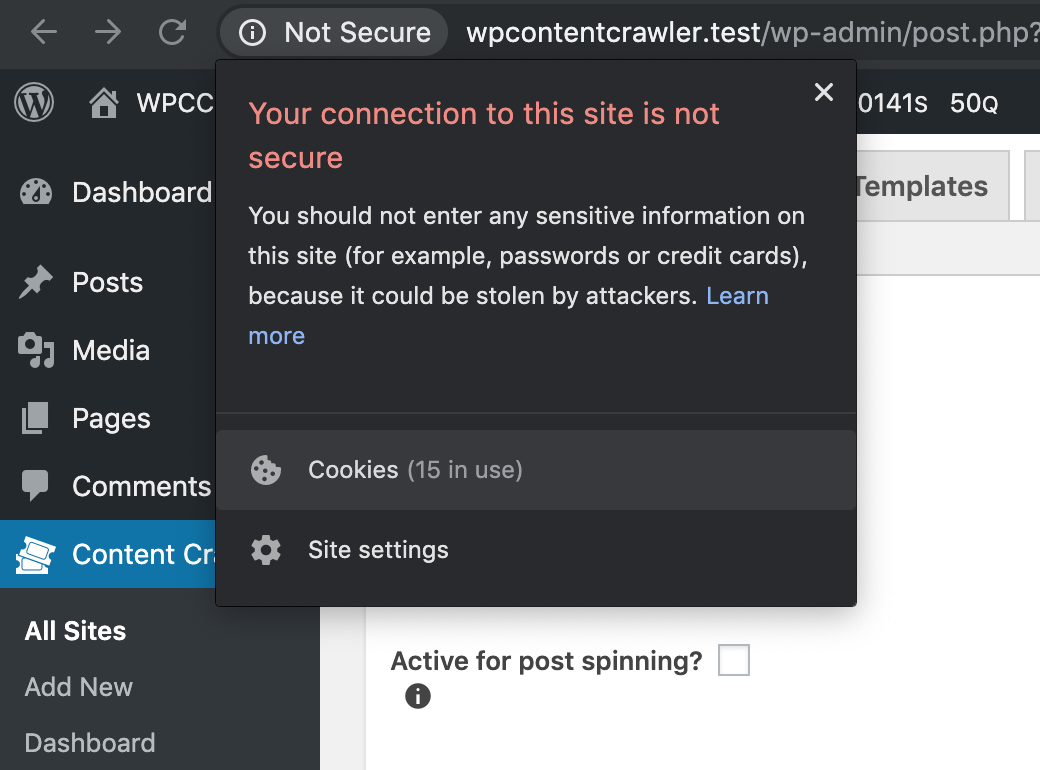
The cookies stored by a website in your computer can be seen by using your Internet browser. For
example, in Chrome, you can click the lock button that is located on the left of your address bar
and then click Cookies (See: Fig. 6.5) to see all of the cookies stored by
that web site in your computer.
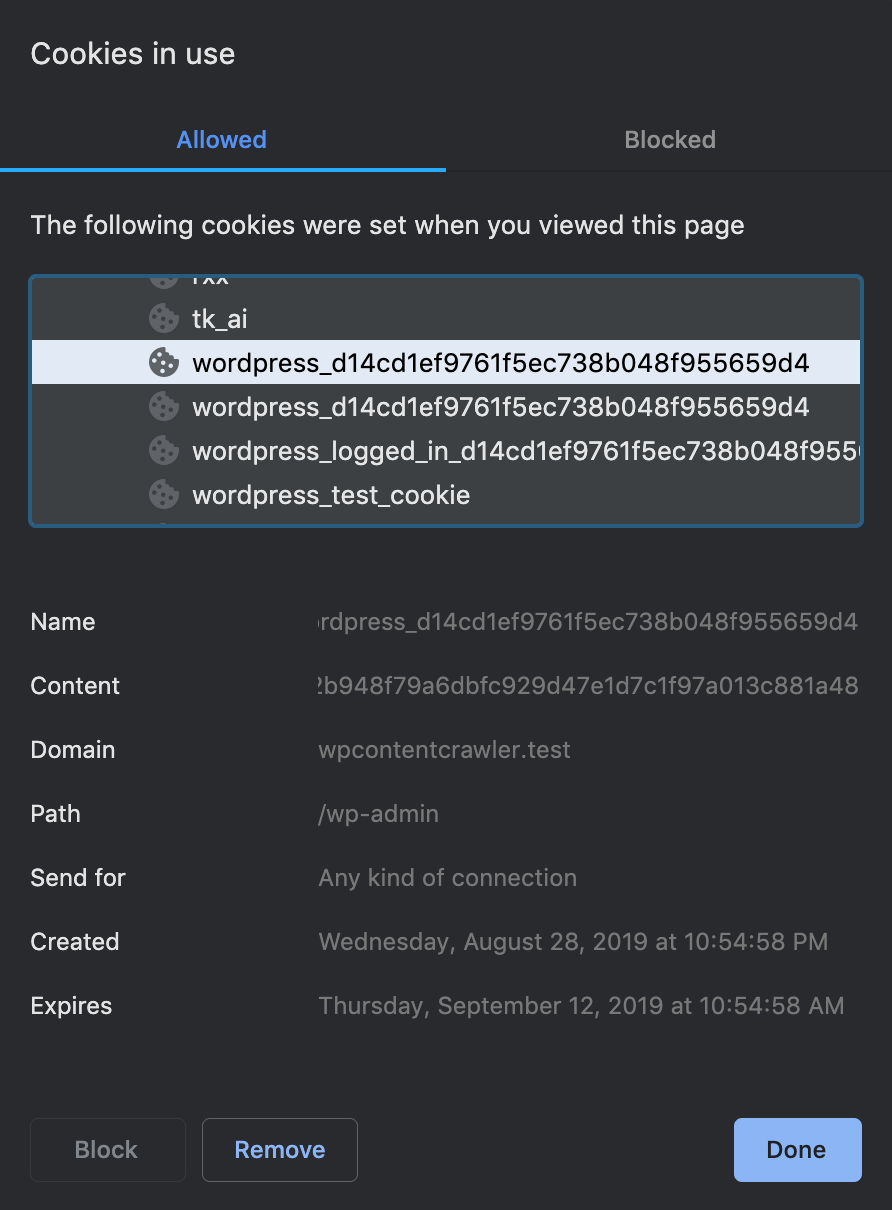
Next, you can see all of the cookies and their details by just selecting them.
Fig. 6.6 shows the details of a cookie whose name starts with
wordpress_. When that cookie is selected, its details are displayed at the bottom of the
window. Among the details, you only need Name and Content. You can enter these values
into Cookie name and Cookie content inputs of this setting, respectively.
Tip
If you use a browser other than Chrome, you can easily find how to display cookies in your
browser just by searching how to see cookies in X by using your favorite search engine,
where X should be replaced with your browser’s name, e.g. how to see cookies in Firefox.
6.3.1.1.11.1. Importing all cookies
You can import all cookies used by a site. Simply, follow these steps:
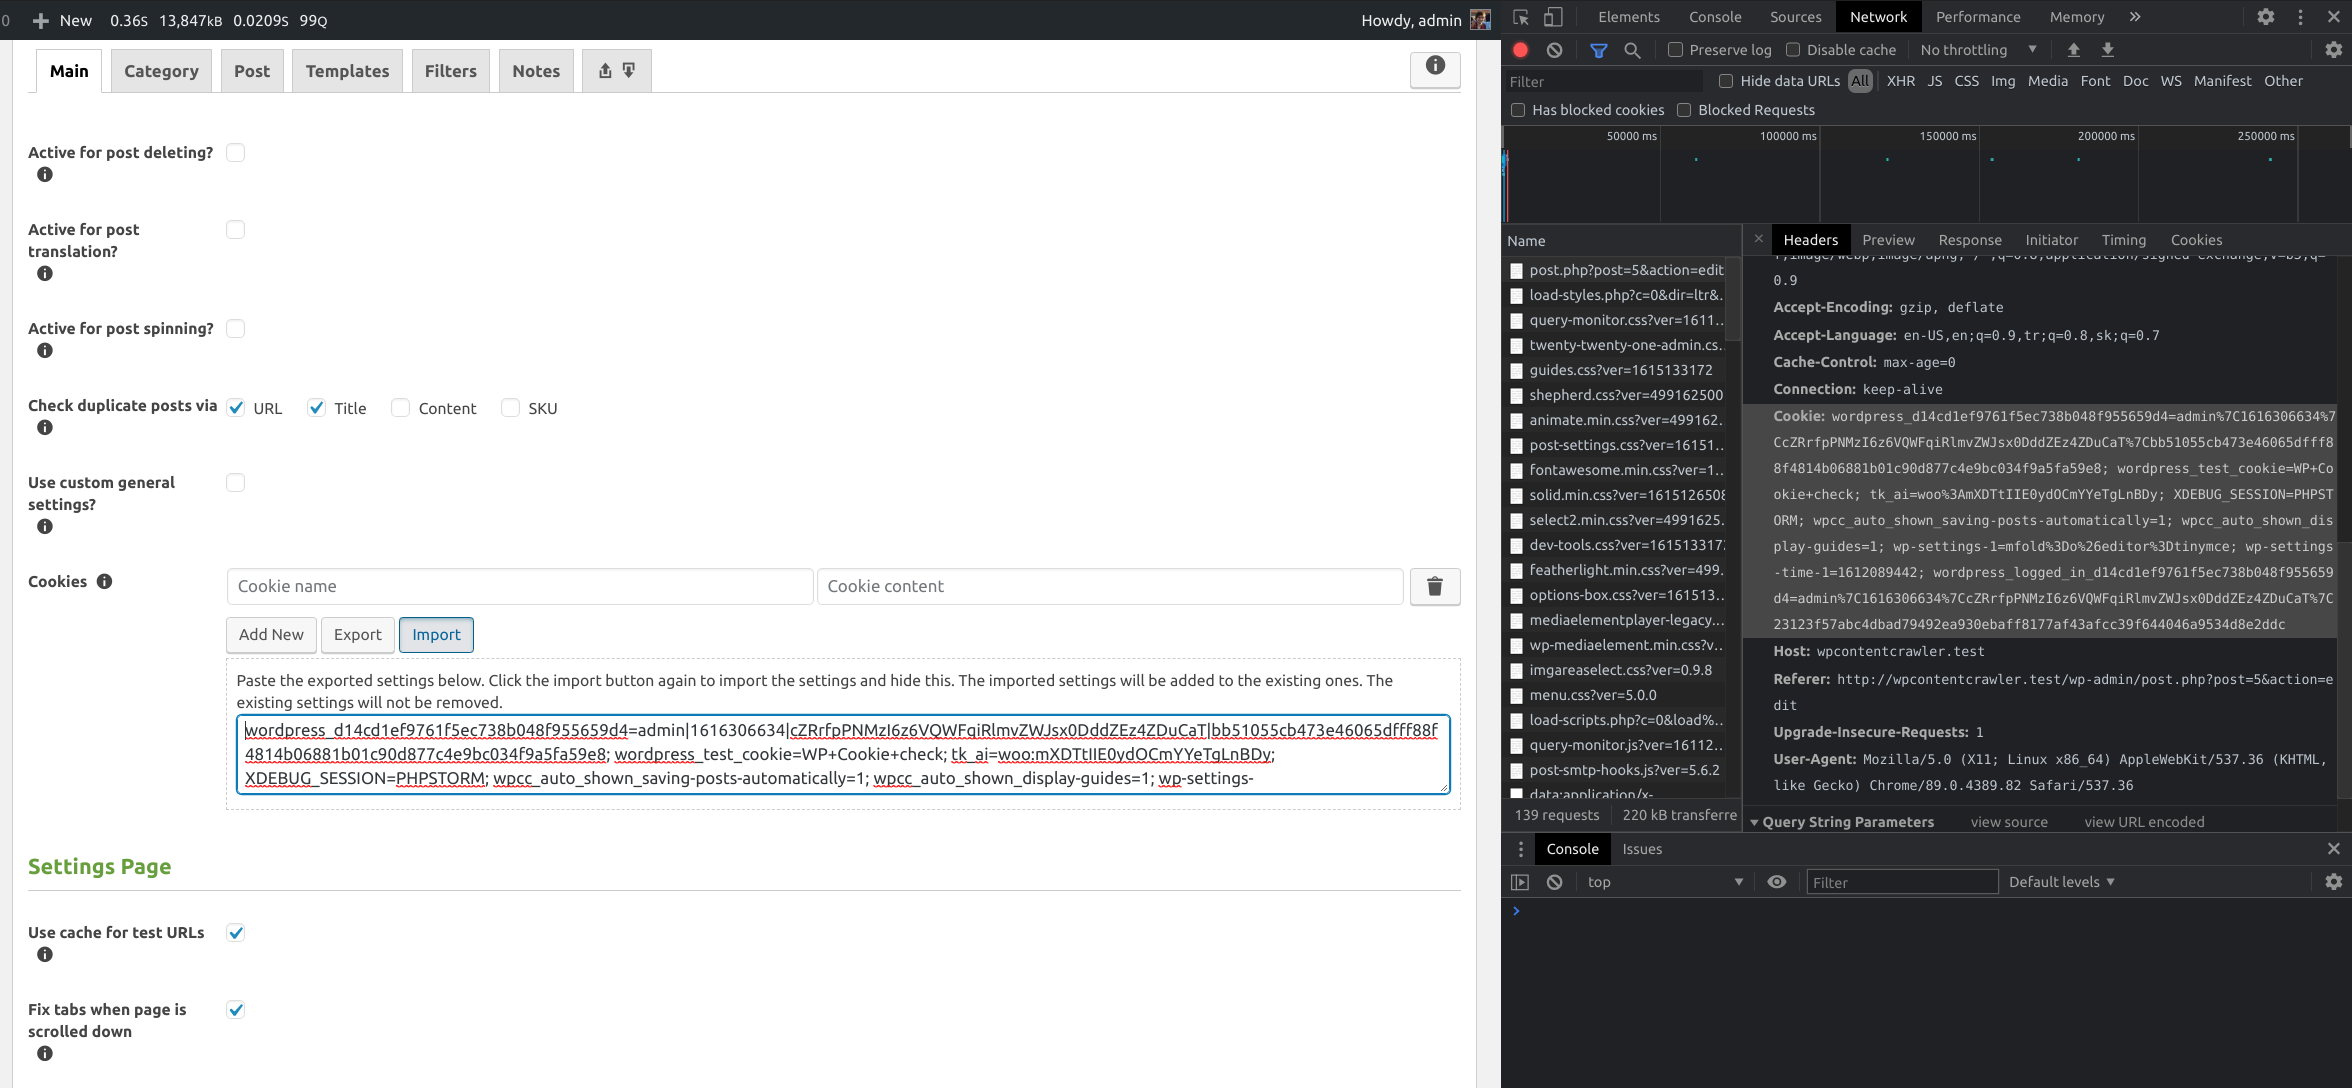
- Open the Developer Tools [2] of your browser when viewing the site whose cookies you want as shown in Fig. 6.7
- Go to the Network tab of the Developer Tools
- Refresh the current browser tab
- In the Network of the Developer Tools, you will see a list of requests as shown in Fig. 6.7. Click to the one at the top. A window will be opened next to it. Go to Headers tab as shown in Fig. 6.7.
- In the Headers tab, find the header named as Cookie, right click to it, and copy its value.
- Go to the Cookies setting of the plugin, click its button, and paste the text you copied into the input shown under the button as shown in Fig. 6.7
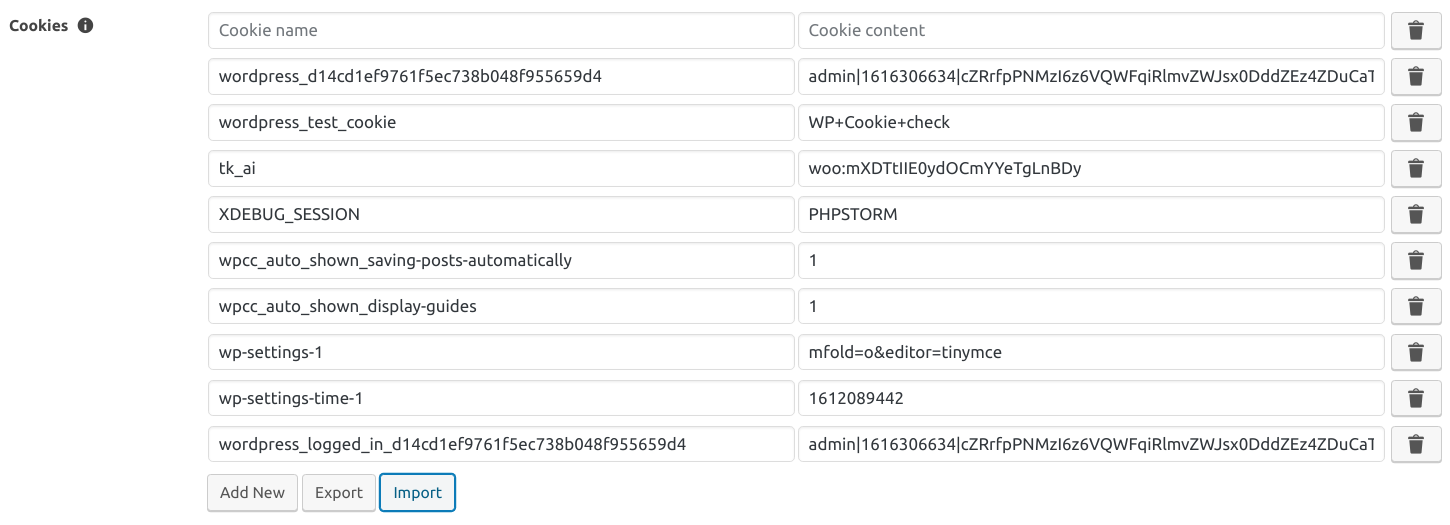
- Click to the again. The cookies will be imported as shown in Fig. 6.8. If the setting has other cookies, they will not be removed.
- Optionally, remove the cookies that you do not want from the Cookies setting.

Fig. 6.7 Copying all cookies from the Network tab of the developer tools of Chrome browser and pasting them into the Import area. Open the image in a new tab to see it bigger.

Fig. 6.8 Cookies imported after button is clicked
Footnotes
| [1] | https://developer.mozilla.org/en-US/docs/Web/HTTP/Cookies |
| [2] | https://developers.google.com/web/tools/chrome-devtools#open |

