12.9.1. OpenAI GPT Short Code
Important
For the [openai-gpt] short code to work, you have to enter a valid value for
General Settings Page > APIs Tab > OpenAI Section >
Secret Key setting.
How to use the OpenAI GPT short code
To add a text that is generated via OpenAI API into a template, follow these steps:
- Click an button to open the short code creator
- Configure the options under the Short Code Options Section
- Click the button in the Short Code Section
- Close the creator by clicking outside or hitting the
Esckey on your keyboard - Paste the copied short code into the template.
[openai-gpt] short code is used to insert a text that is generated via OpenAI API. The short code
is created via OpenAI GPT Short Code Creator. The creator is opened by clicking to an
button. This button is available above the text inputs that support the usage of
the [openai-gpt]. A few places where the button exists can be seen in
Fig. 12.30.
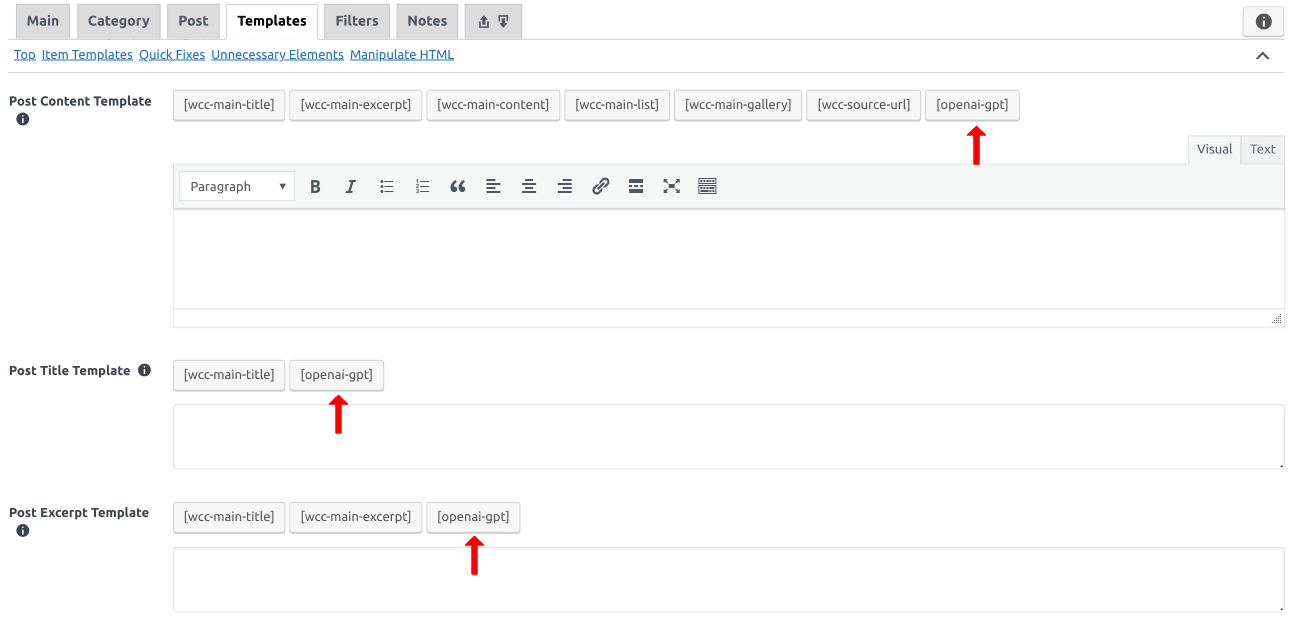
Fig. 12.30 Buttons that are used to open an OpenAI GPT short code creator dialog. Open the image in a new tab to see it bigger.
When an button is clicked, the short code creator is opened. The creator dialog can be seen in Fig. 12.31.
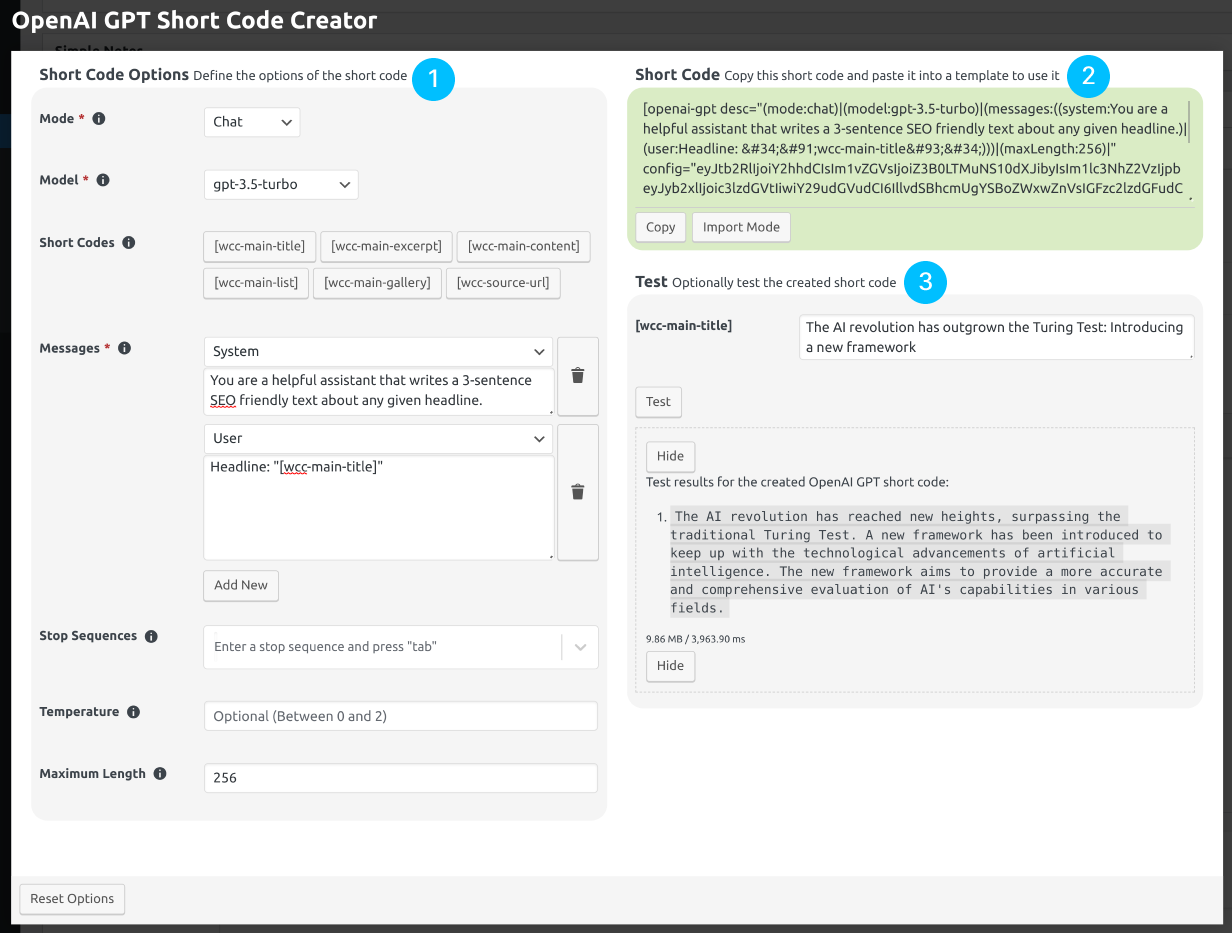
Fig. 12.31 The short code creator. The numbers show the sections of the creator. Open the image in a new tab to see it bigger.
The short code creator dialog is made up of three sections, as shown in Fig. 12.31. What each section is used for is as follows, where the numbers match the numbers on Fig. 12.31:
| (1) Short Code Options Section: | |
|---|---|
| Used to configure the options of the short code. | |
| (2) Short Code Section: | |
| Used to copy the created short code. The created short code stores the options configured in the Short Code Options section. This section is also used to import a previously generated short code, to fill the options of the creator dialog quickly, when you want to change the options of a previously created short code. | |
| (3) Test Section: | |
| Used to test the created short code. If the created short code has other short codes in it, an input for each used short code is shown in this section, so that you can execute a complete test where the values of the other short codes are defined by you. After filling the inputs, click the button to test the short code. | |
12.9.1.1. Short Code Options Section
The options shown in this section differ according to the Mode option’s value.
Tip
You can find many prompt examples on OpenAI’s Examples page.
12.9.1.1.1. Chat Mode
This mode is enabled by selecting Chat for the Mode option. In this mode, a text is
generated by continuing a chat conversation, as it is done in OpenAI ChatGPT. The options available
for this mode are as follows:
| Model: | The AI model that will be used to generate the next message in the conversation. Select a model to carry out the task. The pricing and capabilities of the models differ. You can learn more about the models by visiting the pricing page. |
|---|---|
| Short Codes: | The short codes that can be used in the text values. You can click the buttons to copy the short codes. Then, you can paste them anywhere in the text to include them. |
| Messages: | The chat messages that will be used by the model to generate a response. Each message
has a role and a content. You define a conversation, and the model generates the next
message in the conversation. System role is used to configure how the AI model will
behave. User role is used to define the messages sent by a user. Assistant role
is used to define the messages sent by the AI model. You can click the
button to add new messages and the button to delete a message. |
| Stop Sequences: | Up to 4 sequences where the API will stop generating further tokens. The returned text will not contain the stop sequence. |
| Response format: | |
The format that the model must output. You must still instruct the model to output in the specified
format when the format is different from Text. Also, the selected model must support the selected
format. |
|
| Temperature: | Controls randomness. As the temperature approaches to zero, the model will become deterministic and repetitive. Defaults to 1. |
| Maximum Length: | The maximum number of tokens to generate. If this is not defined, it will be automatically calculated to keep it within the maximum context length of the selected model by considering the length of the prompt as well. |
An example configuration for this mode can be seen in Fig. 12.31.
12.9.1.1.1.1. Prompt chaining in the chat mode
You can use [model-response] short code anywhere in a chat message’s content to include the model response up until
that point in the chat, which enables prompt chaining [1]. When there is a [model-response] short
code, the plugin creates a prompt up until that point, retrieves the response from the model, and then puts the response
in place of the [model-response] short code. This is done for all the [model-response] short codes.
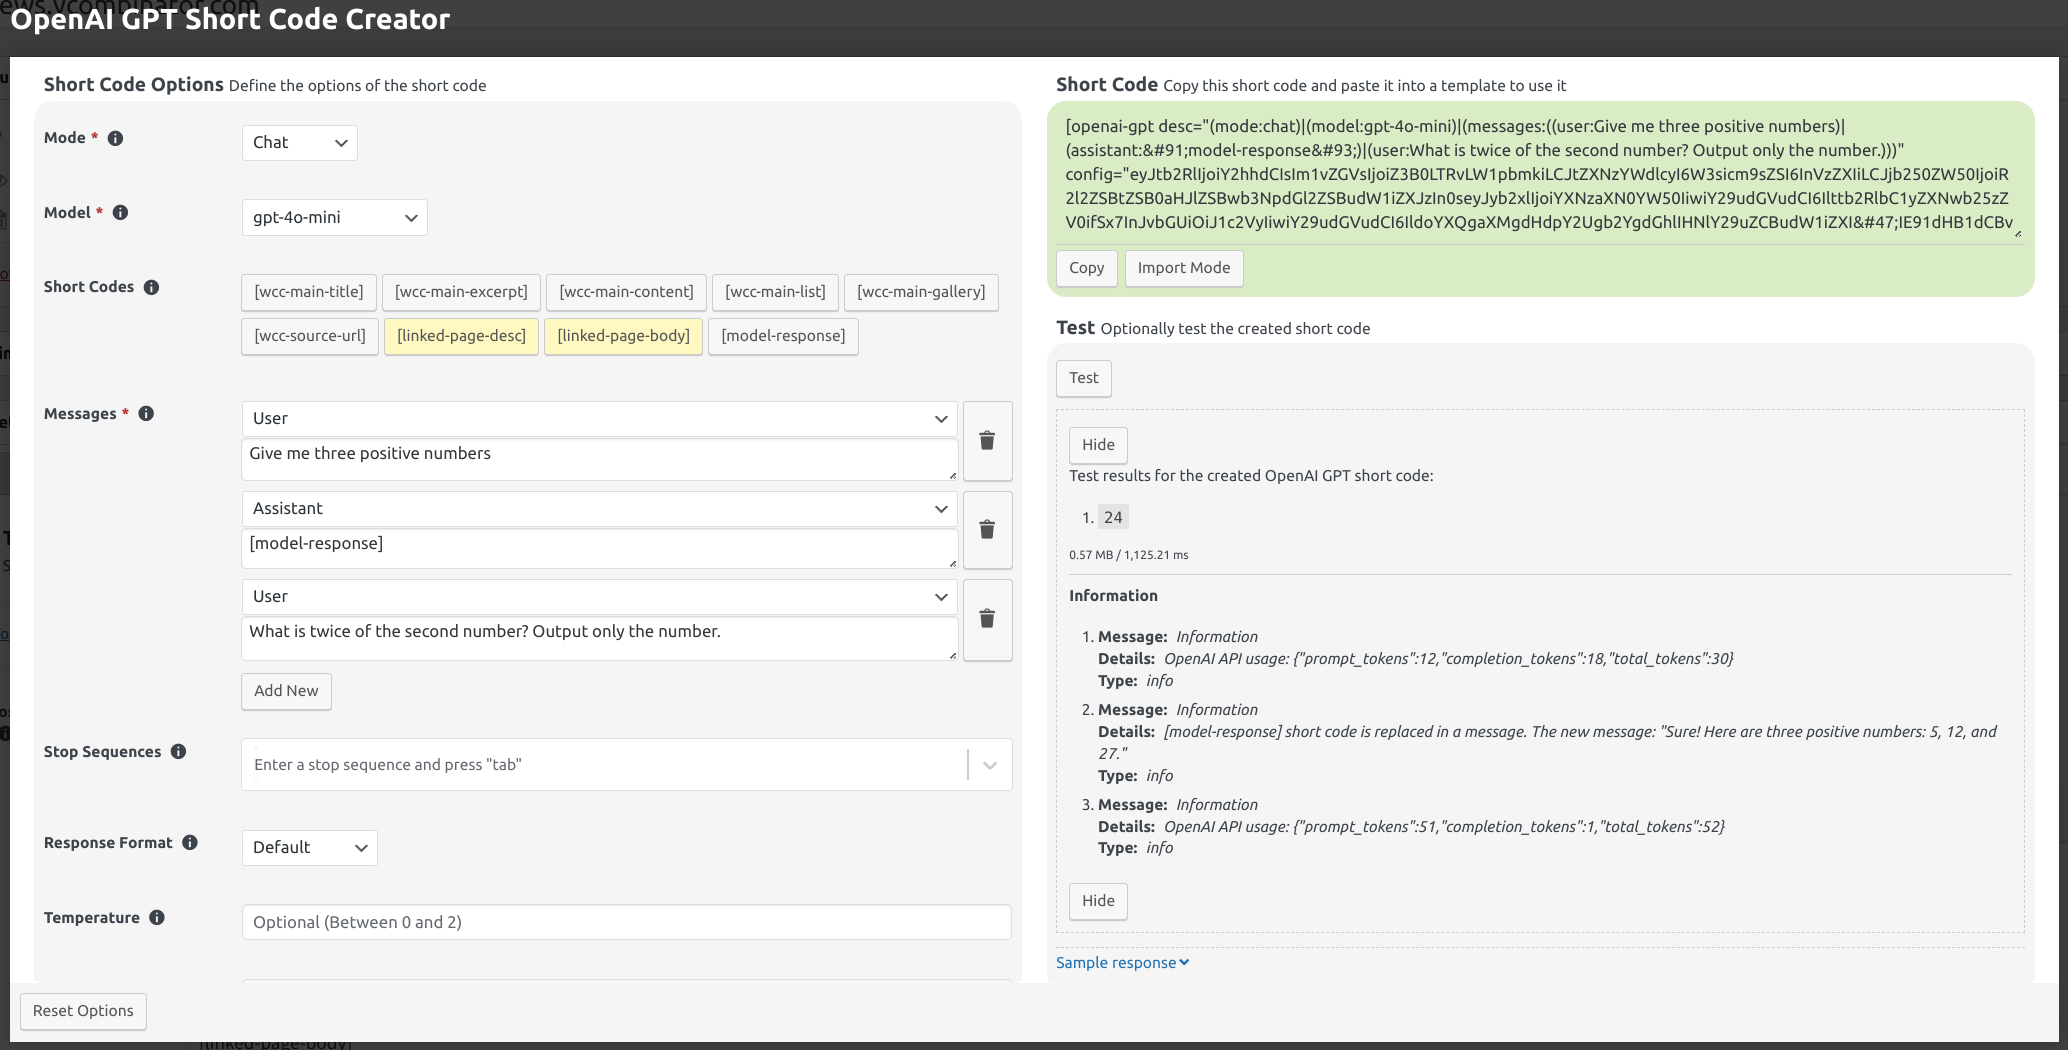
Fig. 12.32 Prompt chaining example via [model-response] short code. Open the image in a new tab to see it bigger.
In the example shown in Fig. 12.32, the model is asked to output
three numbers first and then to multiply the second number by 2. The response of the first prompt executed up until the
[model-response] short code is Sure! Here are three positive numbers: 5, 12, and 27., as it can be seen in the
information messages. The plugin replaces the [model-response] short code with that result and then executes the
second prompt, to which the model responds with 24, which is twice of the second number, 12. Because there are no
more [model-response] short codes in the chat message contents, the retrieved response is used as the result of the
entire [openai-gpt] short code.
Please note that, for every [model-response] short code, the plugin creates a prompt up until that point and makes
an API request with that prompt. If you use 5 [model-response] short codes, the plugin will make 6 requests in total
to retrieve the result, 5 requests to get the value of the used [model-response] short codes and 1 request to execute
the entire prompt that is free of [model-response] short codes.
Another thing to note is that the plugin creates a new prompt starting from the very first message for every request.
For example, if you use [model-response] in the 3rd message, the plugin creates and executes a prompt that contains
the first 2 messages and the part of the message until [model-response] short code in the 3rd message. Then, if there
is a 4th message, the second request will contain all the 4 messages, where the [model-response] short code in the
3rd message is replaced with the model’s response. So, because the same messages will be sent to the model multiple
times, this will result in increased token usage. You can observe the token usage in the information messages shown
for the test, as shown in Fig. 12.32. The total token usage for
in that example is \(30 + 52 = 82\).
12.9.1.1.2. Complete Mode
This mode is enabled by selecting Complete for the Mode option. In this mode, you enter a
prompt that tells the model what to do. Then, the model generates a response according to your
prompt. The options available for this mode are as follows:
| Model: | The AI model that will be used to generate a response for your prompt. Select a model to carry out the task. The pricing and capabilities of the models differ. You can learn more about the models by visiting the pricing page. |
|---|---|
| Short Codes: | The short codes that can be used in the text values. You can click the buttons to copy the short codes. Then, you can paste them anywhere in the text to include them. |
| Prompt: | Enter a text that describes what the model should do. You can learn the best practices for creating a prompt from OpenAI’s Completion docs. |
| Stop Sequences: | Up to 4 sequences where the API will stop generating further tokens. The returned text will not contain the stop sequence. |
| Temperature: | Controls randomness. As the temperature approaches to zero, the model will become deterministic and repetitive. Defaults to 0.7. |
| Maximum Length: | The maximum number of tokens to generate. If this is not defined, it will be automatically calculated to keep it within the maximum context length of the selected model by considering the length of the prompt as well. |
An example for this mode can be seen in Fig. 12.33.
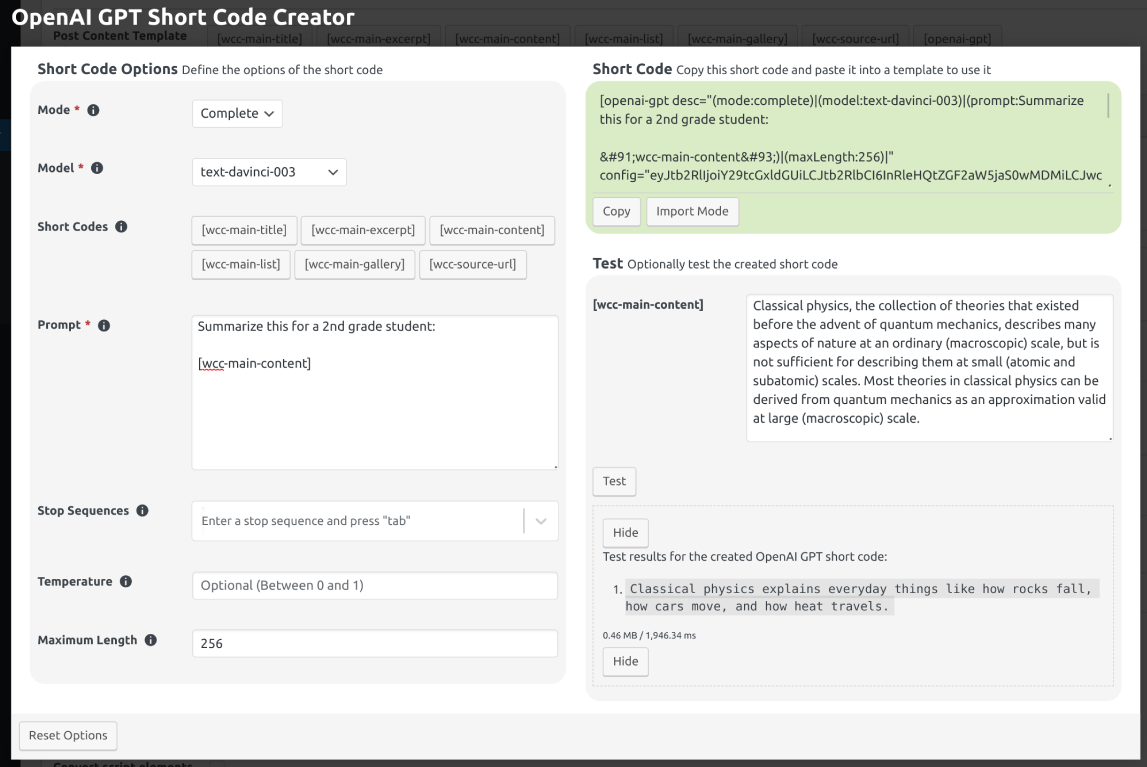
Fig. 12.33 An example for the Complete mode. Open the image in a new tab to see it bigger.
12.9.1.1.3. Insert Mode
This mode is enabled by selecting Insert for the Mode option. In this mode, you enter a
prompt that tells the model what to do and add [insert] within the prompt. Then, the model
generates a response that can be used in place of [insert]. The options available for this mode
are as follows:
| Model: | The AI model that will be used to generate a response for your prompt. Select a model to carry out the task. The pricing and capabilities of the models differ. You can learn more about the models by visiting the pricing page. |
|---|---|
| Short Codes: | The short codes that can be used in the text values. You can click the buttons to copy the short codes. Then, you can paste them anywhere in the text to include them. |
| Prompt: | Enter a text and use [insert] to indicate where the model should insert text. You can
learn the best practices for creating a prompt from OpenAI’s Completion docs. |
| Stop Sequences: | Up to 4 sequences where the API will stop generating further tokens. The returned text will not contain the stop sequence. |
| Temperature: | Controls randomness. As the temperature approaches to zero, the model will become deterministic and repetitive. Defaults to 0.7. |
| Maximum Length: | The maximum number of tokens to generate. If this is not defined, it will be automatically calculated to keep it within the maximum context length of the selected model by considering the length of the prompt as well. |
An example for this mode can be seen in Fig. 12.34.
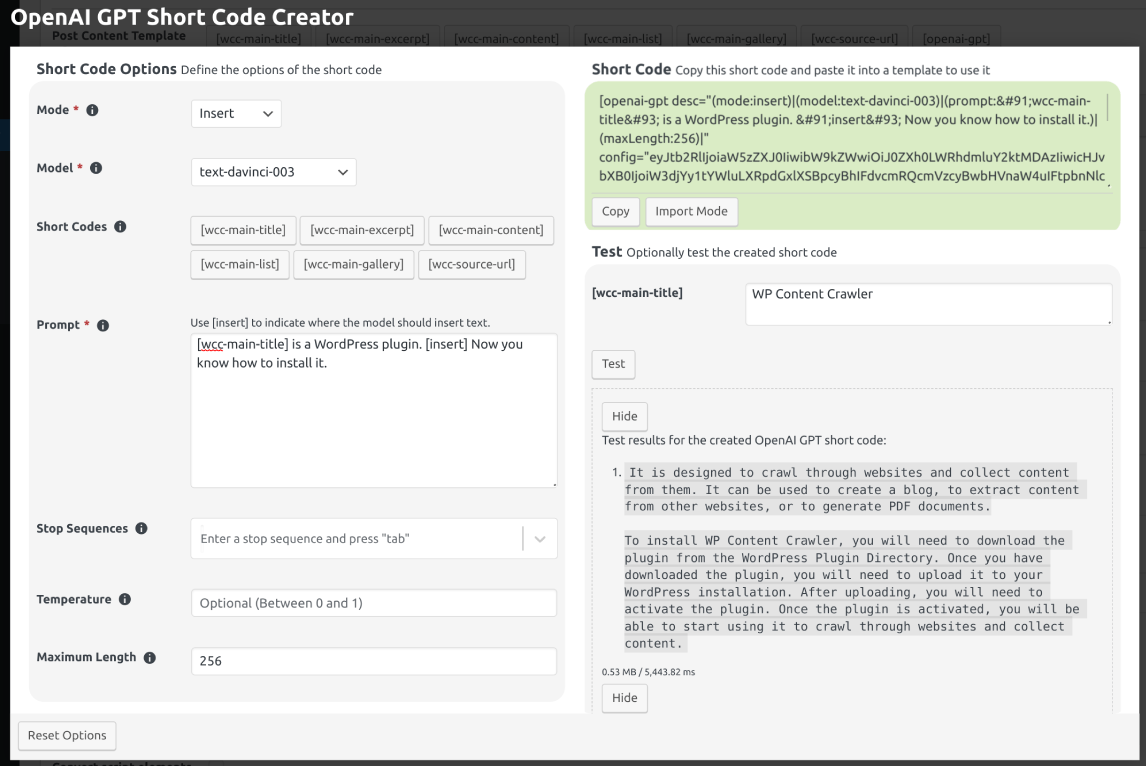
Fig. 12.34 An example for the Insert mode. Open the image in a new tab to see it bigger.
12.9.1.1.4. Edit Mode
This mode is enabled by selecting Edit for the Mode option. In this mode, you enter an input
text and instruct the selected model on how to change the input text. Then, the model changes the
input text according to your instructions. The options available for this mode are as follows:
| Model: | The AI model that will be used to modify the input text according to the instructions. Select a model to carry out the task. The pricing and capabilities of the models differ. You can learn more about the models by visiting the pricing page. |
|---|---|
| Short Codes: | The short codes that can be used in the text values. You can click the buttons to copy the short codes. Then, you can paste them anywhere in the text to include them. |
| Input: | The input text to use as a starting point. |
| Instructions: | The instructions that tell the model how to edit the input. |
| Temperature: | Controls randomness. As the temperature approaches to zero, the model will become deterministic and repetitive. Defaults to 0.7. |
An example for this mode can be seen in Fig. 12.35.
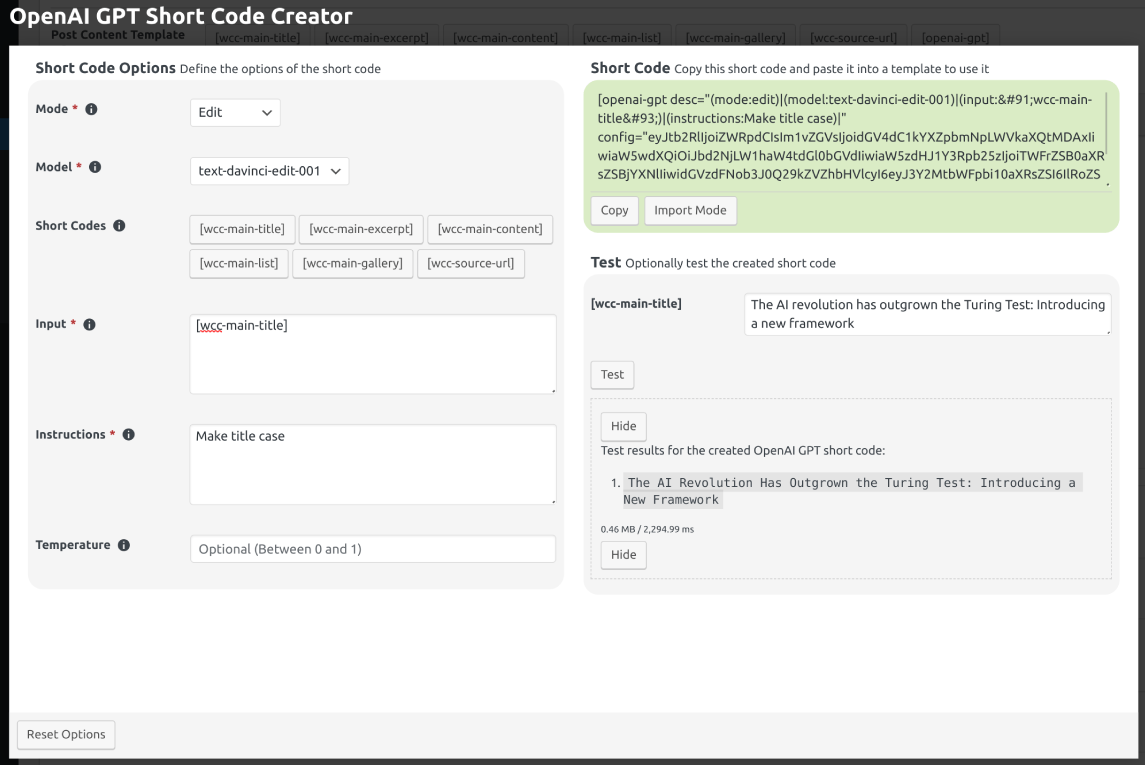
Fig. 12.35 An example for the Edit mode. Open the image in a new tab to see it bigger.
12.9.1.2. Short Code Section
This section is used to copy the generated short code or import a previously generated short code. You can see an example generated short code in Fig. 12.36.
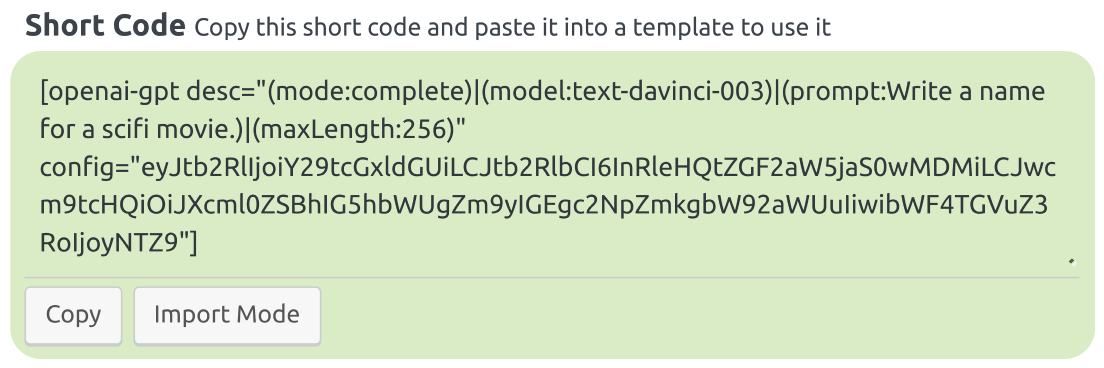
Fig. 12.36 The Short Code section in the non-import mode.
To copy the generated short code, click the button. If you want to import a previously generated short code, do the following:
- Click the button to enable the import mode. This mode is shown in Fig. 12.37.
- Paste the previously generated short code into the text area.
- Click the button. This action disables the import mode and fills the options by extracting their values from the provided short code.
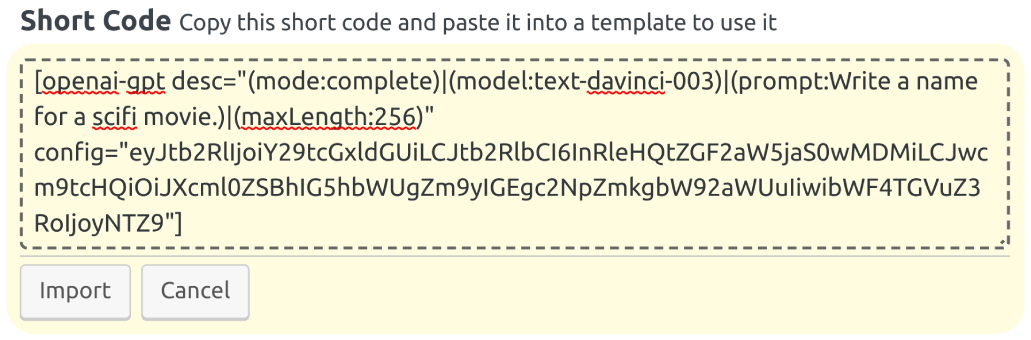
Fig. 12.37 The Short Code section in the import mode. Open the image in a new tab to see it bigger.
12.9.1.3. Test Section
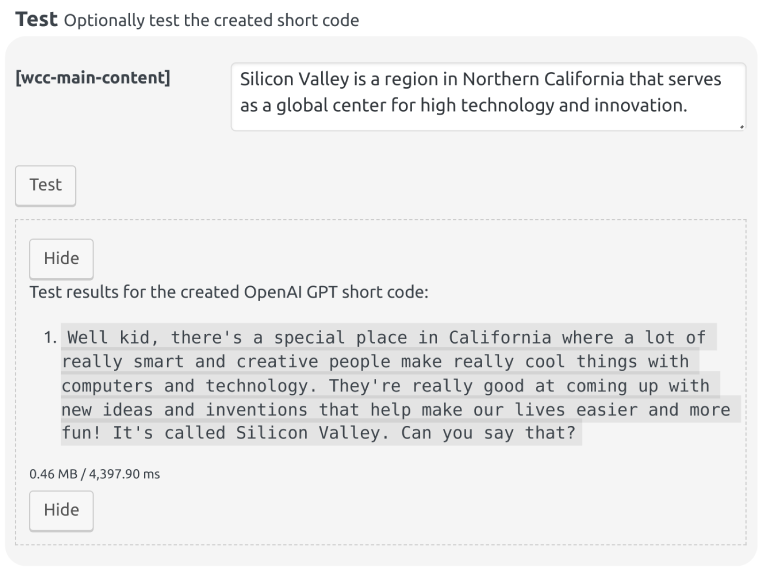
Fig. 12.38 The Test section. Open the image in a new tab to see it bigger.
Used to test the created short code. If the created short code has other short codes in it, an input for each used short code is shown in this section, so that you can execute a complete test where the values of the other short codes are defined by you. After filling the inputs, click the button to test the short code.
Other examples of this can be seen in Fig. 12.31, Fig. 12.33, Fig. 12.34, and Fig. 12.35.
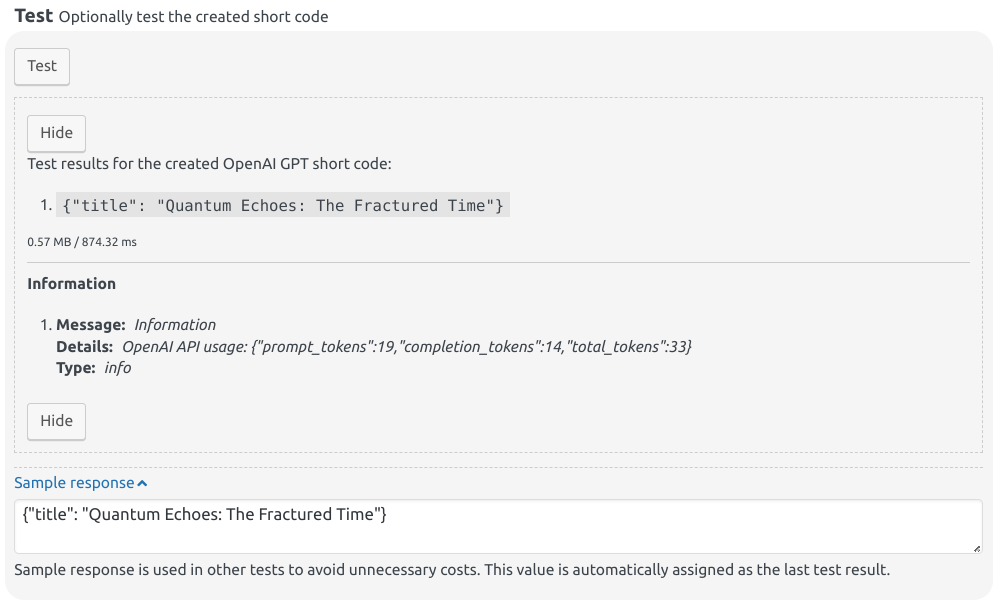
Fig. 12.39 The sample response option. Open the image in a new tab to see it bigger.
This section also contains a “Sample response” option that can be used to define a sample response, as shown in Fig. 12.39. The sample response is used in other tests to avoid unnecessary costs. This value is automatically assigned as the last test result, which is retrieved via the button. You can also manually define it, but please keep in mind that the next test result will override it.
Footnotes
| [1] | https://www.promptingguide.ai/techniques/prompt_chaining |