2.1. Crawling your first site
What you will learn in this tutorial
- Creating a site
- Configuring category and post settings
- Using Visual Inspector to find CSS selectors easily
- Testing the CSS selectors in the site settings page
- Testing your category and post settings by using Tester Page
- Using Manual Crawling Tool to crawl a post manually
- Enabling scheduling to automatically crawl posts from the target site
- Keeping track of the automatically-crawled sites in Dashboard Page.
After successfully completing this tutorial, you will have a good understanding of the plugin’s basic features. You will know the procedure to follow when creating a new site by making sure that your settings are correctly configured such that the probability of facing unintended consequences will be reduced greatly.
Important
Please keep in mind that source codes of the web sites can change. Therefore, the CSS selectors used in this tutorial might not be valid at the time you read this tutorial. Instead of using the exact CSS selectors used in this tutorial, you should follow the steps of finding those CSS selectors.
A video showing the steps in this tutorial
The video below shows the steps explained in this page. The configurations finish in the first 3.7 minutes. In the rest of the video, the dashboard page is observed. To actually learn why and how these steps are done, please read the detailed explanations in the following part of this page.
Please note that the video and the explanations below are not exactly the same. Some things are different in the video, such as the pages crawled from the target site. This is because the video was prepared a few weeks later than this page’s completion date.
In this tutorial, you will learn how to crawl your first site. The site we will crawl is
TechCrunch. Let’s first create a new site. From your admin panel’s
sidebar, click Content Crawler > Add New.
Let’s give the site a name so that we can easily find it in Site Listing Page. Enter
TechCrunch into the input that says Enter site name here as it is shown in
Fig. 2.1.
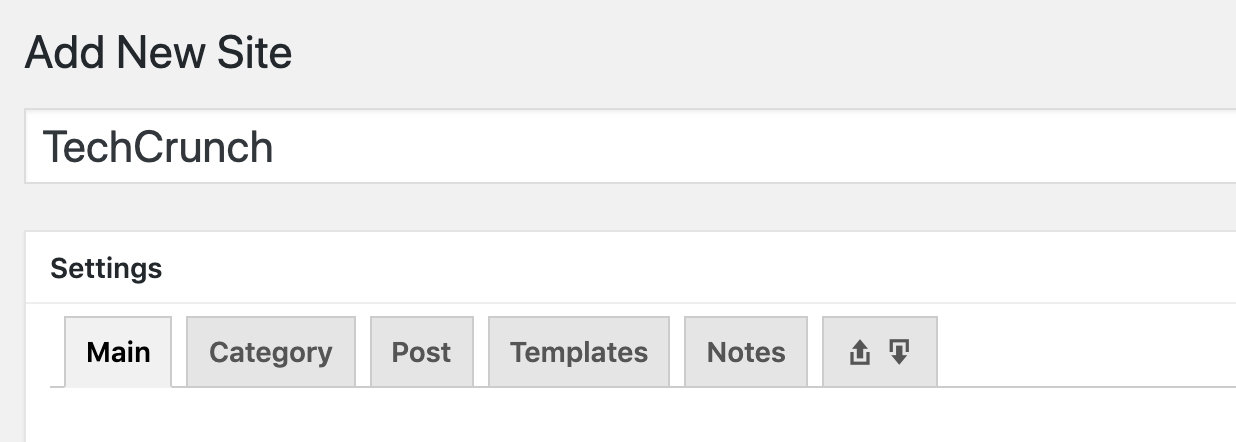
Fig. 2.1 Site name input
Next, we need to fill Main > Site URL setting (Site URL) because it is one of the
settings that is mandatory to fill. As it is explained in Creating a New Site, we should
enter the full URL of the site’s main page. Let’s enter https://techcrunch.com/ as it shown in
Fig. 2.2.

Fig. 2.2 Site URL
2.1.1. Collecting post URLs
Now, we will configure Category settings (Category Tab). The purpose of category
settings is to instruct the plugin to find URLs of the posts we want to save. It is called
category settings because categories in web sites contain links to posts. Categories are
basically a collection of post URLs. Hence, we will tell the plugin in what category pages it
should collect post URLs.
For this example, let’s make the plugin collect post URLs from the main page of TechCrunch and
from Apps category. Let’s go to Category > Category URLs setting (Category URLs)
and enter the first URL. Since we want to collect post URLs from the main page, we just enter the
main page’s URL, which is https://techcrunch.com/, as is shown in
Fig. 2.3.

Fig. 2.3 Entering the main page URL as a category URL
As you might have already noticed, there is a select input next to the URL input in the
Category URLs setting, which currently shows Uncategorized. It shows the available post
categories in your site. When you select a category in this select input, the URLs collected from
the category page will be saved as posts into that category. In my site, I have already created a
category named as Technology News. I want to save the posts in the main page of the target
site, TechCrunch, into Technology News. Hence, I select this category in the select input as
shown in Fig. 2.4.

Fig. 2.4 Selecting the category into which I want the posts collected from target category URL to be saved
Let’s now add a new category URL. Click to button to add a new input group. The
second category from which we want to crawl posts was Apps category. Let’s copy its URL from
the target site (Fig. 2.5) and paste it into the URL input of the
newly added input group (Fig. 2.6). I also selected Apps category
that I previously created in my site so that the posts from Apps category of TechCrunch will
be saved into Apps category of my site.
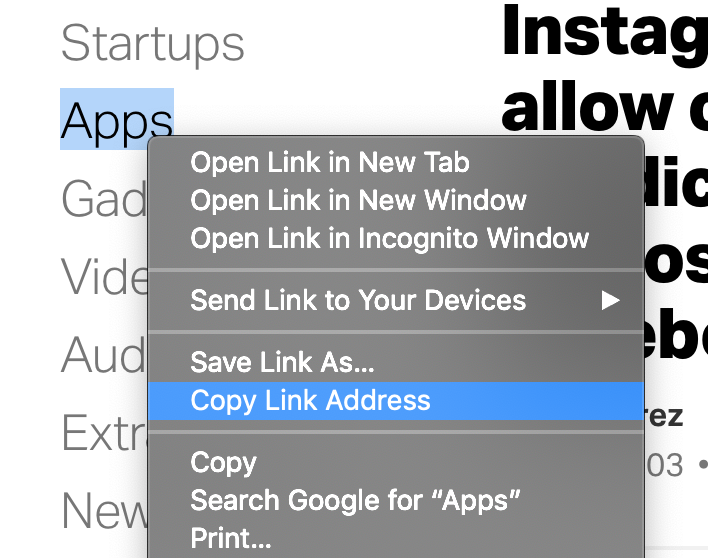
Fig. 2.5 Copying the URL of Apps category
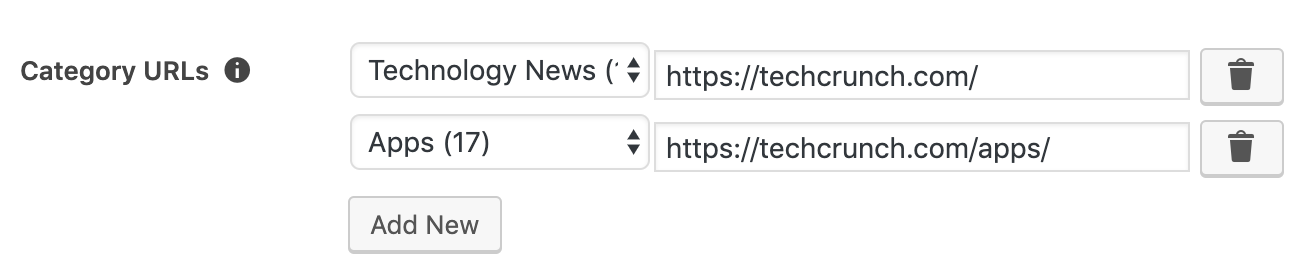
Fig. 2.6 Adding Apps category into Category > Category URLs setting
Now that we defined the category URLs from which we want to collect post URLs, let’s tell the
plugin how to find post URLs in these category pages. Paste the URL of Apps category into
Category > Test Category URL input (Fig. 2.7,
Test Category URL). From now on, the test buttons existing under Category Tab will
use this URL to test CSS selectors.

Fig. 2.7 Entering the test category URL
To find CSS selectors for the post URLs, click button of
Category Post URL Selectors setting. This button will open Visual Inspector.
Because we already entered the test category URL, the visual inspector will load that URL
automatically. When you opened the visual inspector for Category Post URL Selectors, it is
automatically configured to find similar a elements. Although it should already be
activated, make sure Toggle hover select () is active. Now, click
one of the titles shown in the visual inspector. As soon as you do this, the visual inspector
will find a CSS selector that matches all the post URLs as it is shown in
Fig. 2.8.
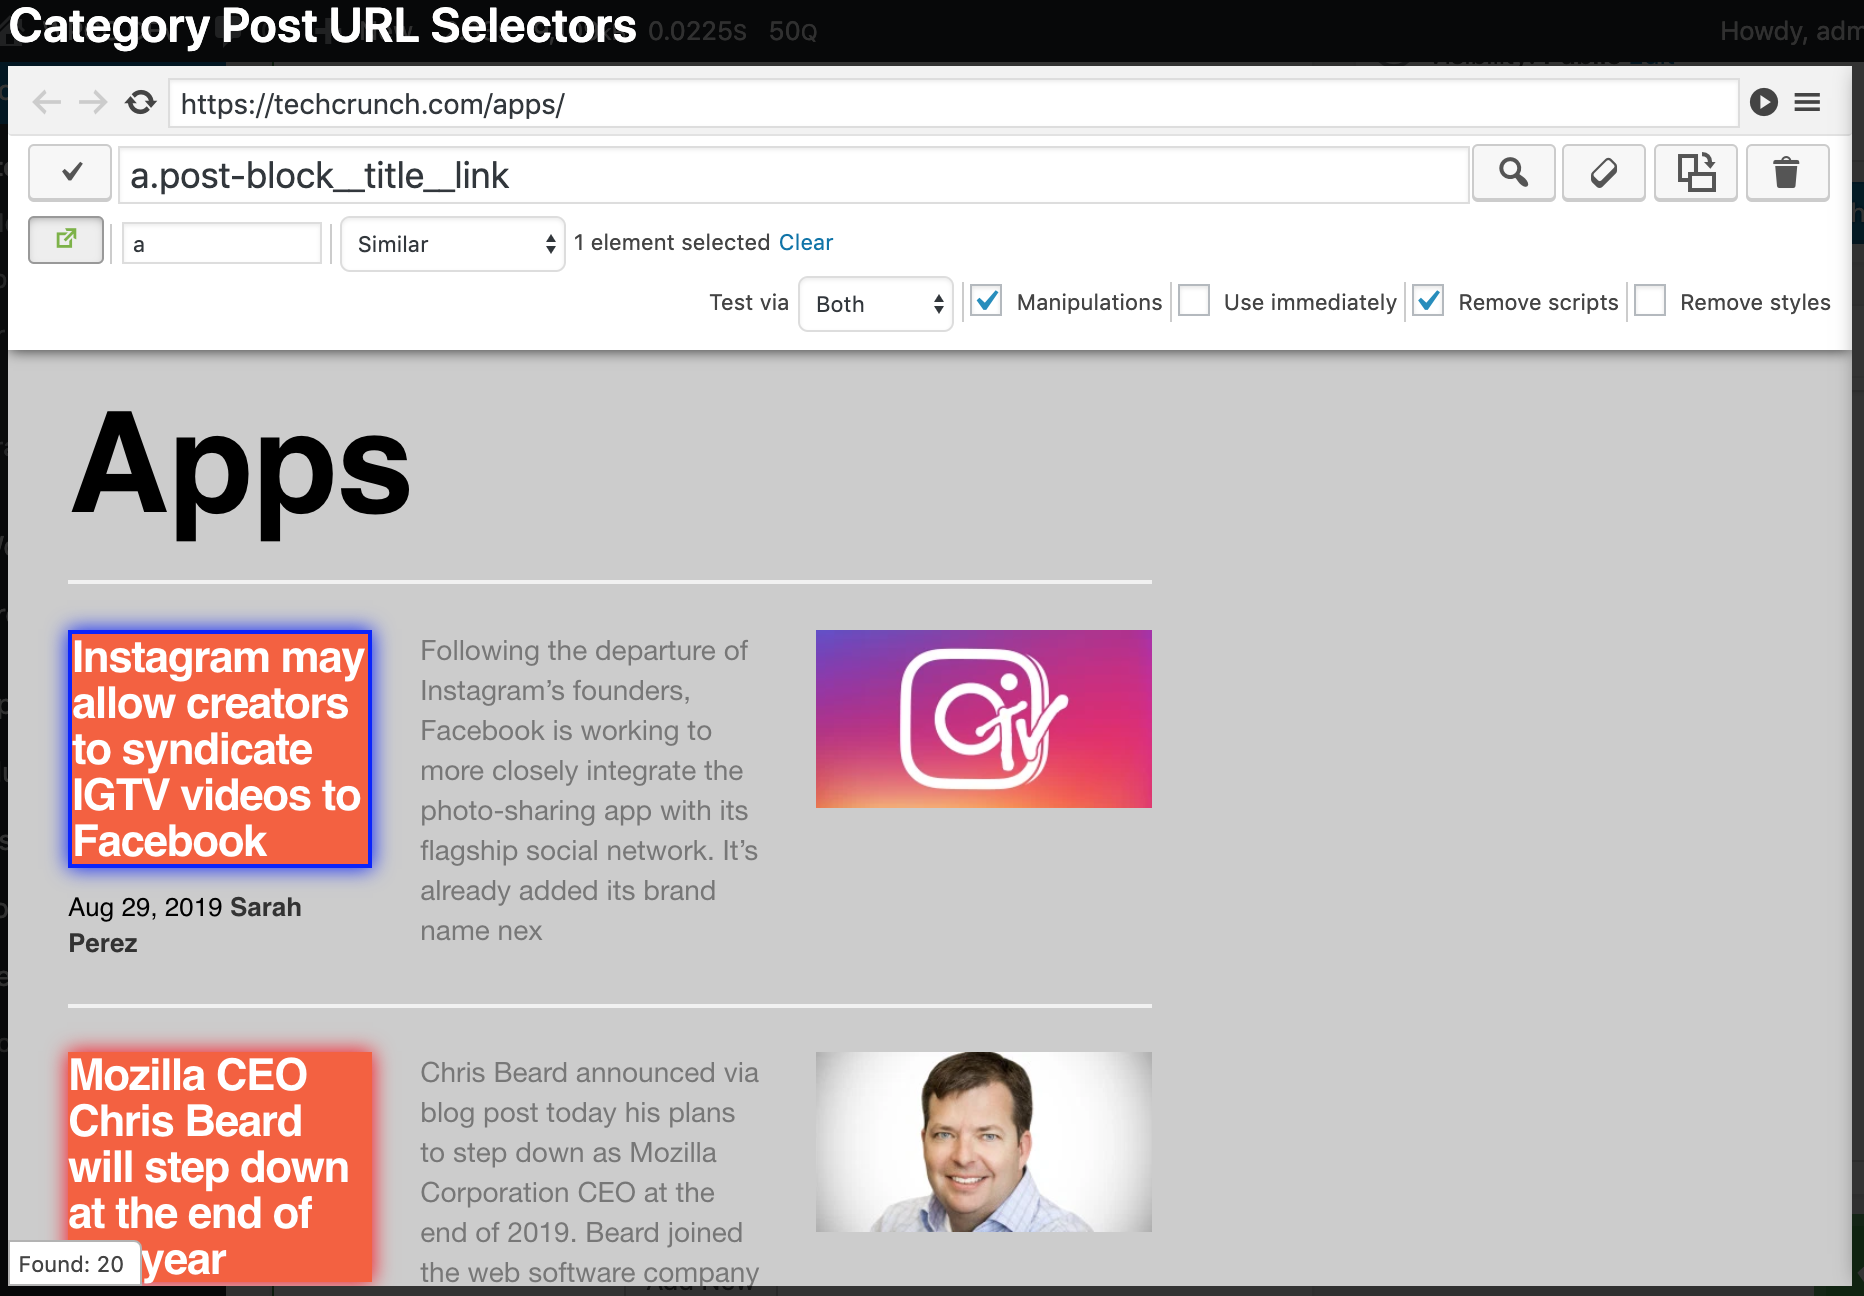
Fig. 2.8 Clicking a title element (highlighted with a blue border) to find all 20 post URLs in the
Apps page of TechCrunch
Now, click to Use CSS selector button () to copy the found CSS selector into the CSS selector input of Category Post URL Selectors setting. You should see that the CSS selector is copied as it is shown in Fig. 2.9.

Fig. 2.9 Found CSS selector copied into the CSS selector input of Category Post URL Selectors
setting.
The plugin allows you to test every CSS selector entered into a setting’s CSS selector input by
clicking to button. Now, let’s click to this button to test if our CSS selector can
find post URLs in the Apps page. You should see the test results as it is shown
in Fig. 2.10. As you can see, there are post URLs displayed in
the test results. You can copy one of the URLs and open it in a new tab to make sure the URL is
correct.
Tip
In Category Tab, the plugin tests the CSS selector by using the URL defined in Test Category URL setting.
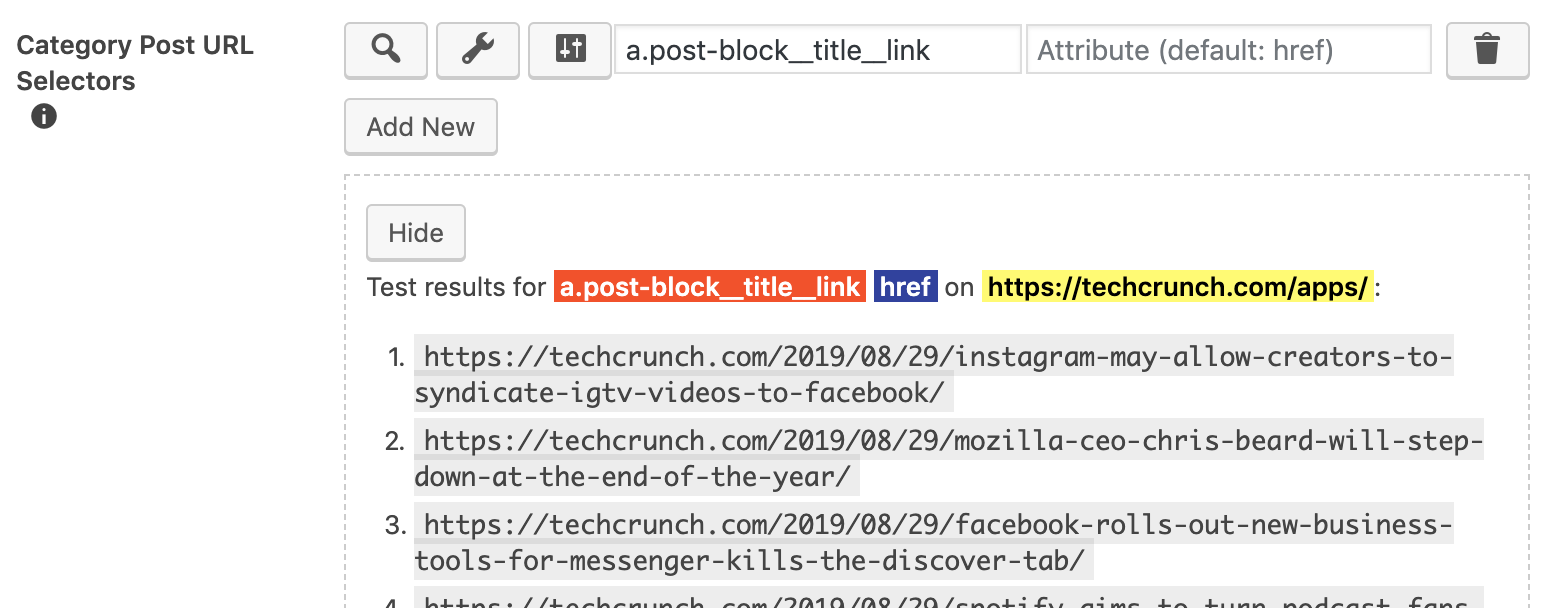
Fig. 2.10 Testing the category URL selector
We have finished configuring the category settings. Click Publish button to save the site
settings.
Important
If you do not publish the site, it will not be automatically crawled. In other words, make
sure the site’s status is not draft.
The last and the most important step is to test your settings. The plugin has a page named as Tester Page. This page is used to test your site settings and make sure everything is in order before enabling your site settings for automatic crawling. Now, let’s quickly test our category settings by using Tester Page.
From your admin panel’s sidebar, click Content Crawler > Tester. This will open
Tester Page. Configure the inputs of this page as follows:
| Site: | Select the site named as TechCrunch |
|---|---|
| Test type: | Category page |
| Test URL: | Leave the input empty and select https://techcrunch.com/apps/ from the select option. |
Now, click to button. After they are loaded, the results should be similar to the ones shown in Fig. 2.11. If there are no results, it means that your category page settings cannot find post URLs and you should fix your settings. If the results show the URLs of the posts you want to save, then your category settings are properly configured.
Finally, let’s test the main page as well. As it is shown in Fig. 2.12, post URLs are found in the main page of TechCrunch. This means our category settings are properly configured.
Tip
Click one or two of the URLs shown in the results to make sure the URLs are correct. In other words, make sure that the URLs exist in the target site and that they show the page you want.
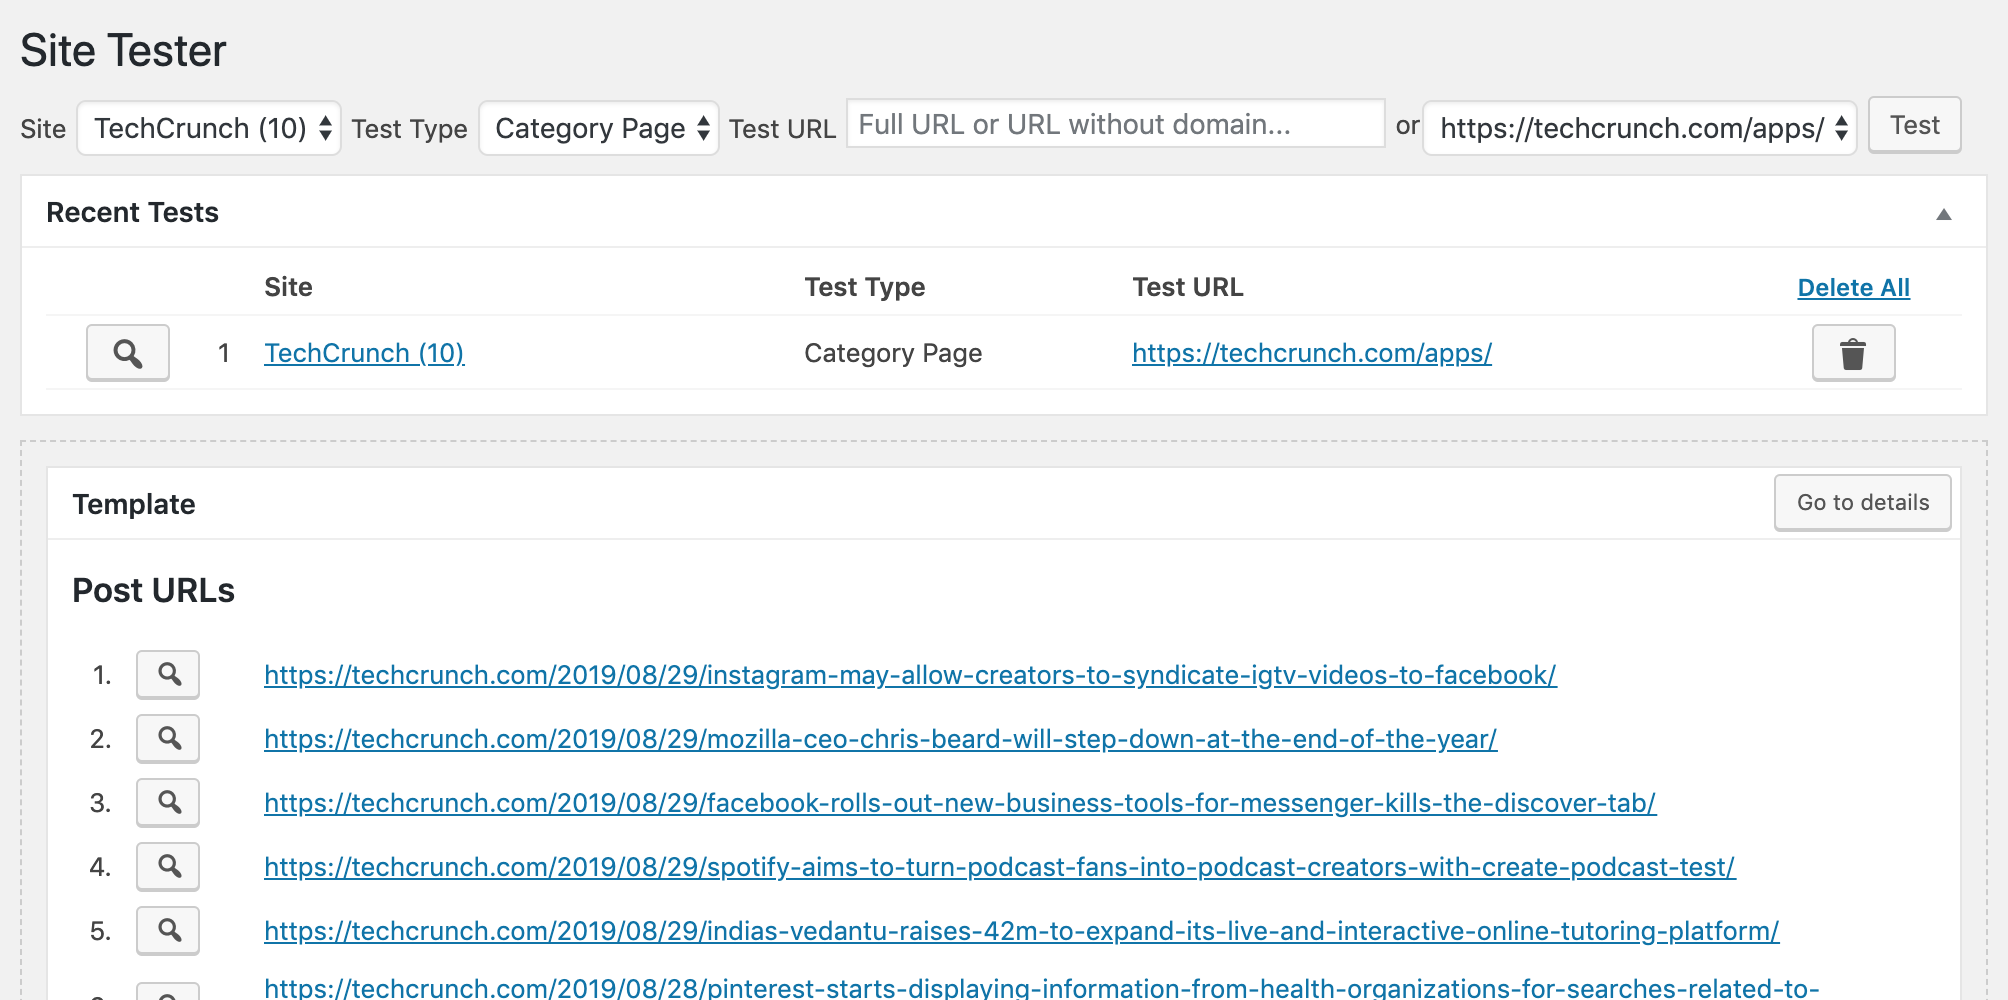
Fig. 2.11 Test results for the Apps category of TechCrunch
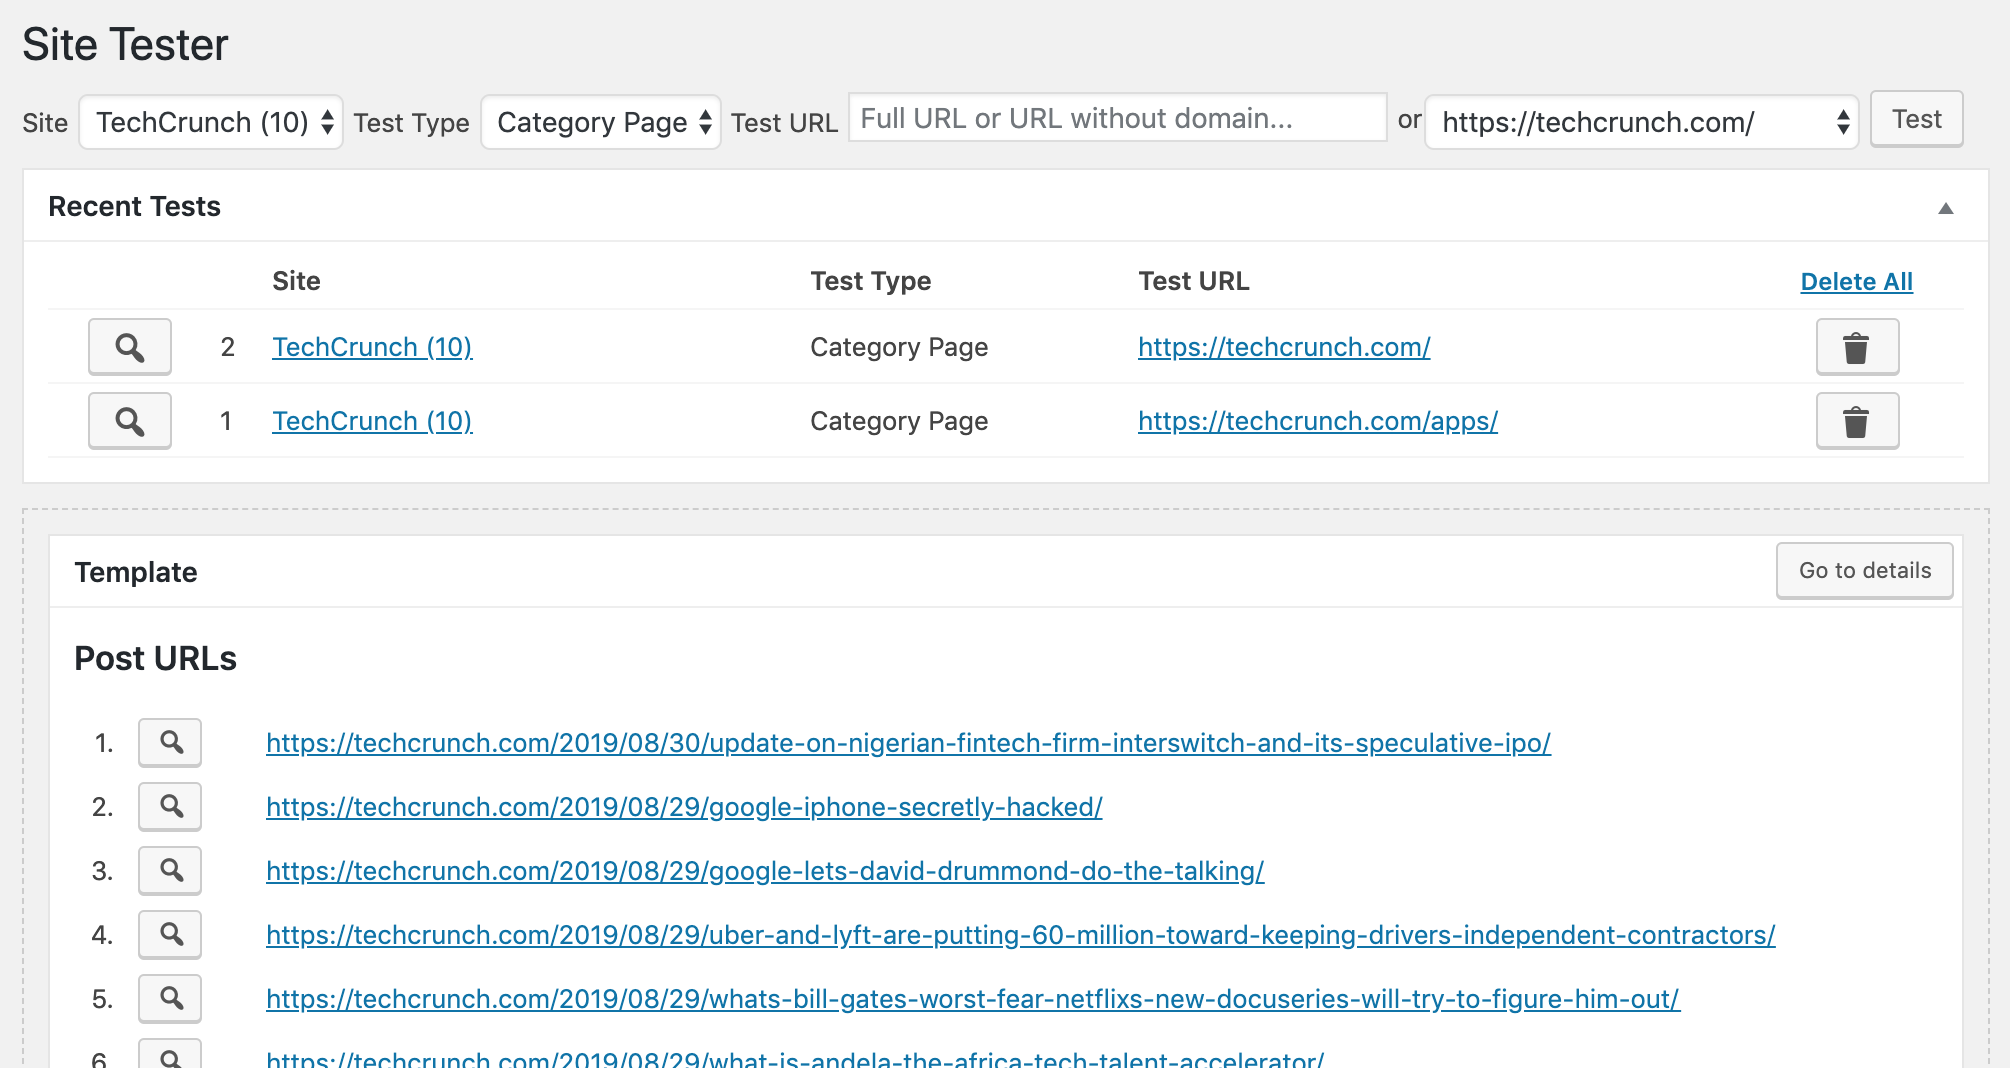
Fig. 2.12 Test results for the main page of TechCrunch
What we have done so far
- We created a site and configured it to collect post URLs from two categories
- We tested the settings by using Tester Page and made sure that the settings are correctly configured to find the URLs of the posts we want from the target category pages
2.1.2. Configuring what information should be retrieved from post pages
The plugin is currently able to find URLs of the posts from the two categories we have entered into Category URLs setting. Now, it is time to tell the plugin how to find post details, such as post title and post content.
In the sidebar of your admin panel, click Content Crawler > All Sites and click
TechCrunch to open its settings.
Although the plugin has many settings, we do not have to fill each and every setting. Currently, we are interested in saving only the title and the content of the post. Hence, configuring these settings is enough.
First of all, we need a post URL that we will use to configure the settings. Let’s copy the first
URL shown in the results of the Apps category’s test
(Fig. 2.11) and paste it into Post > Test Post URL setting
(Test Post URL) as it is shown in Fig. 2.13. The plugin will use this
post URL when testing the CSS selectors under Post Tab and, for some cases, under
Templates Tab as well.
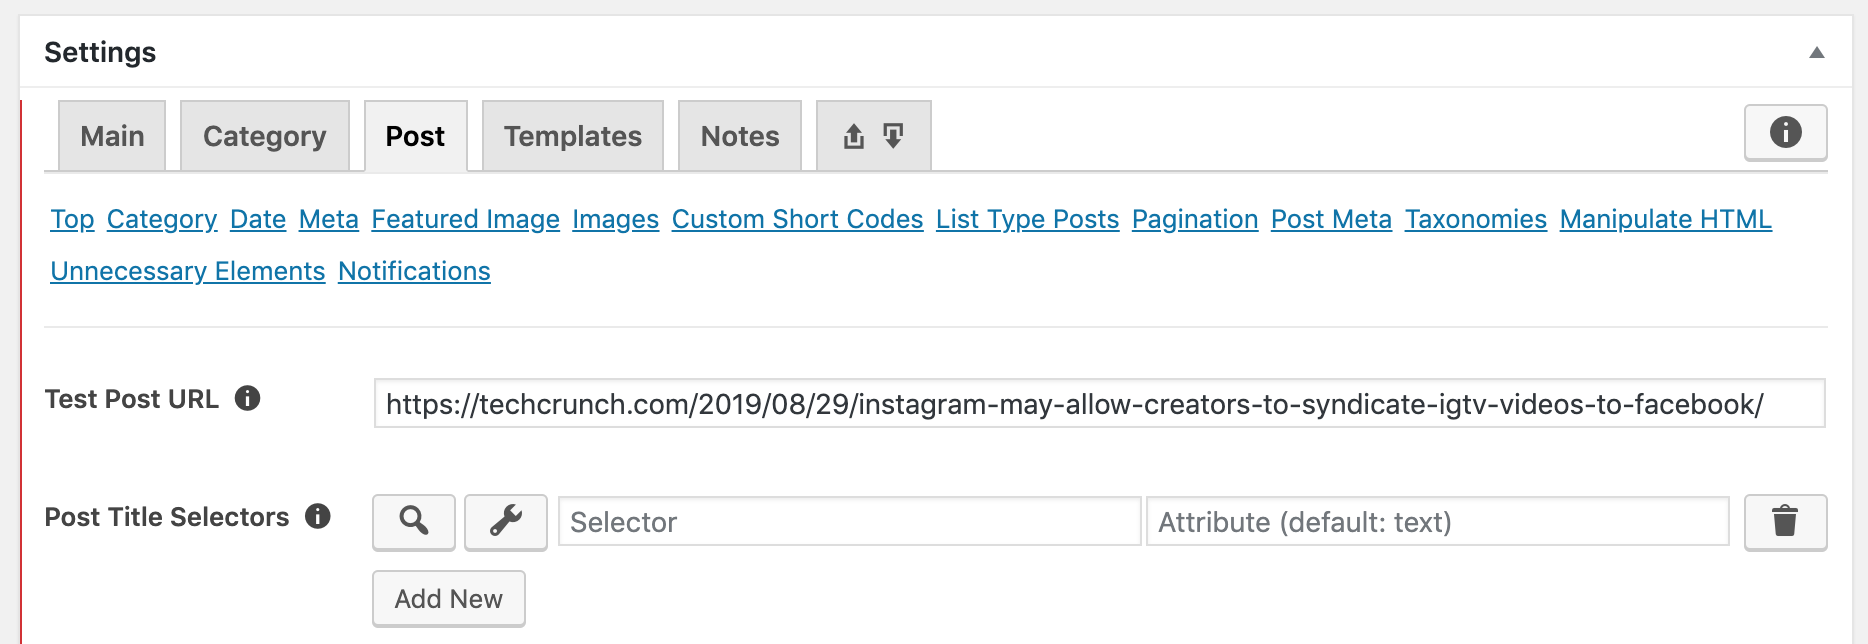
Fig. 2.13 URL of a post from the target web page is entered into Test Post URL setting.
Let’s find the CSS selector for the post title so that the plugin can find it and save it when
creating a post. As we did when finding a CSS selector for Category Post URL Selectors, we
will use Visual Inspector again. Click to button of Post > Post Title
Selectors setting (Post Title Selectors). This will open Visual Inspector and
immediately load the Test Post URL.
Note
The visual inspector will load Test Post URL only if there was not a URL loaded in
the visual inspector. If the test post URL is not loaded, you can enter a test post URL into
Address bar and hit the enter key in your keyboard to load the URL.
The visual inspector will be automatically configured to find a unique element (See:
Selection behavior), because there must be only one post title. Now, click to the title of
the post as it is shown in Fig. 2.14. The visual
inspector will find a unique CSS selector that finds the post title in the target post page and
display it in CSS selector input.
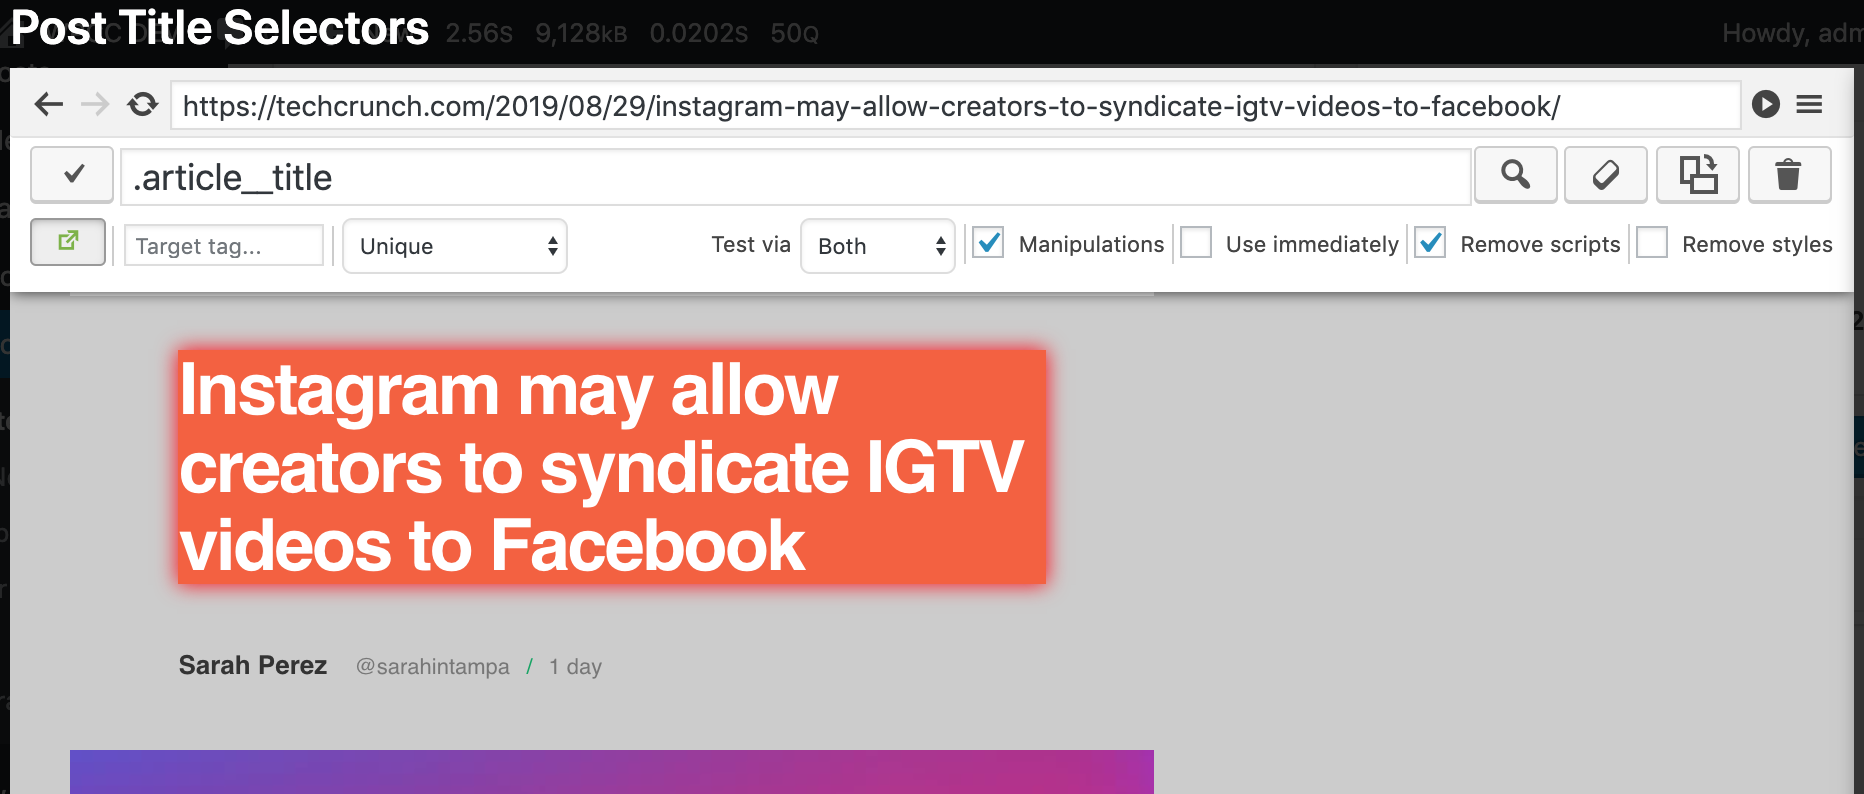
Fig. 2.14 Clicking to the title in the visual inspector to find its CSS selector
Now, click to Use CSS selector button () to copy the found CSS selector into the CSS selector input of Post Title Selectors setting. You should see that the CSS selector is copied as it is shown in Fig. 2.15. Click to the button to test the CSS selector. You should see the post title in the test results as shown in Fig. 2.15.
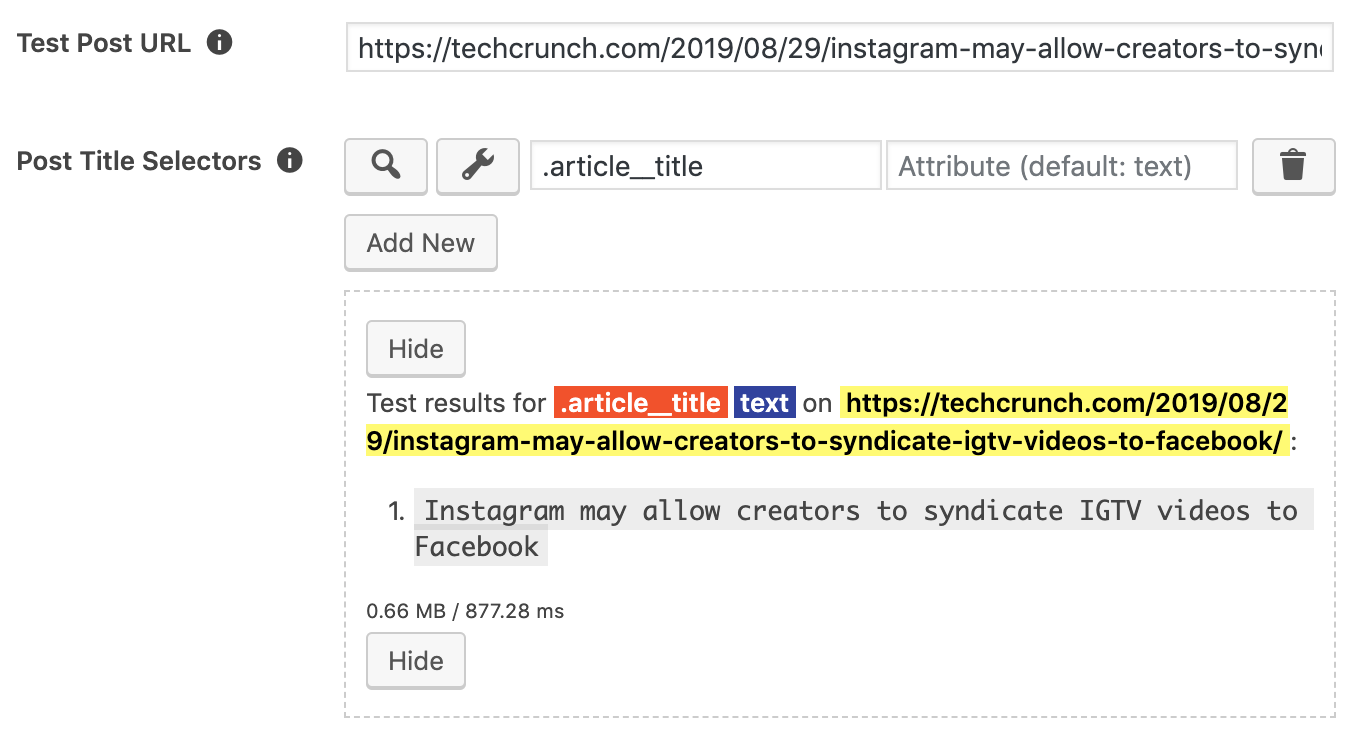
Fig. 2.15 Found CSS selector copied into the CSS selector input of Post Title Selectors setting. The selector is tested by clicking to button.
Now, let’s tell the plugin to save the post’s content. Go to Post > Post Content Selectors
(Post Content Selectors) and click to its button to open the visual
inspector. The visual inspector is automatically configured to find an element that contains
the selected element (See: Selection behavior). Click to a paragraph of the post content
as it is shown in Fig. 2.16. The visual inspector
will find a CSS selector for the element containing the clicked paragraph and highlight the
elements matching the found CSS selector. If the highlighted element does not contain all of the
post content, you can click to another paragraph as well. When you do that, the visual inspector
will find a CSS selector that matches the element containing the two selected paragraphs. After
you are happy with the results, click button to copy the CSS selector into the
CSS selector input of Post Content Selectors setting as it is shown in
Fig. 2.17. You can click to button to test the CSS
selector and make sure the results are as you expect.
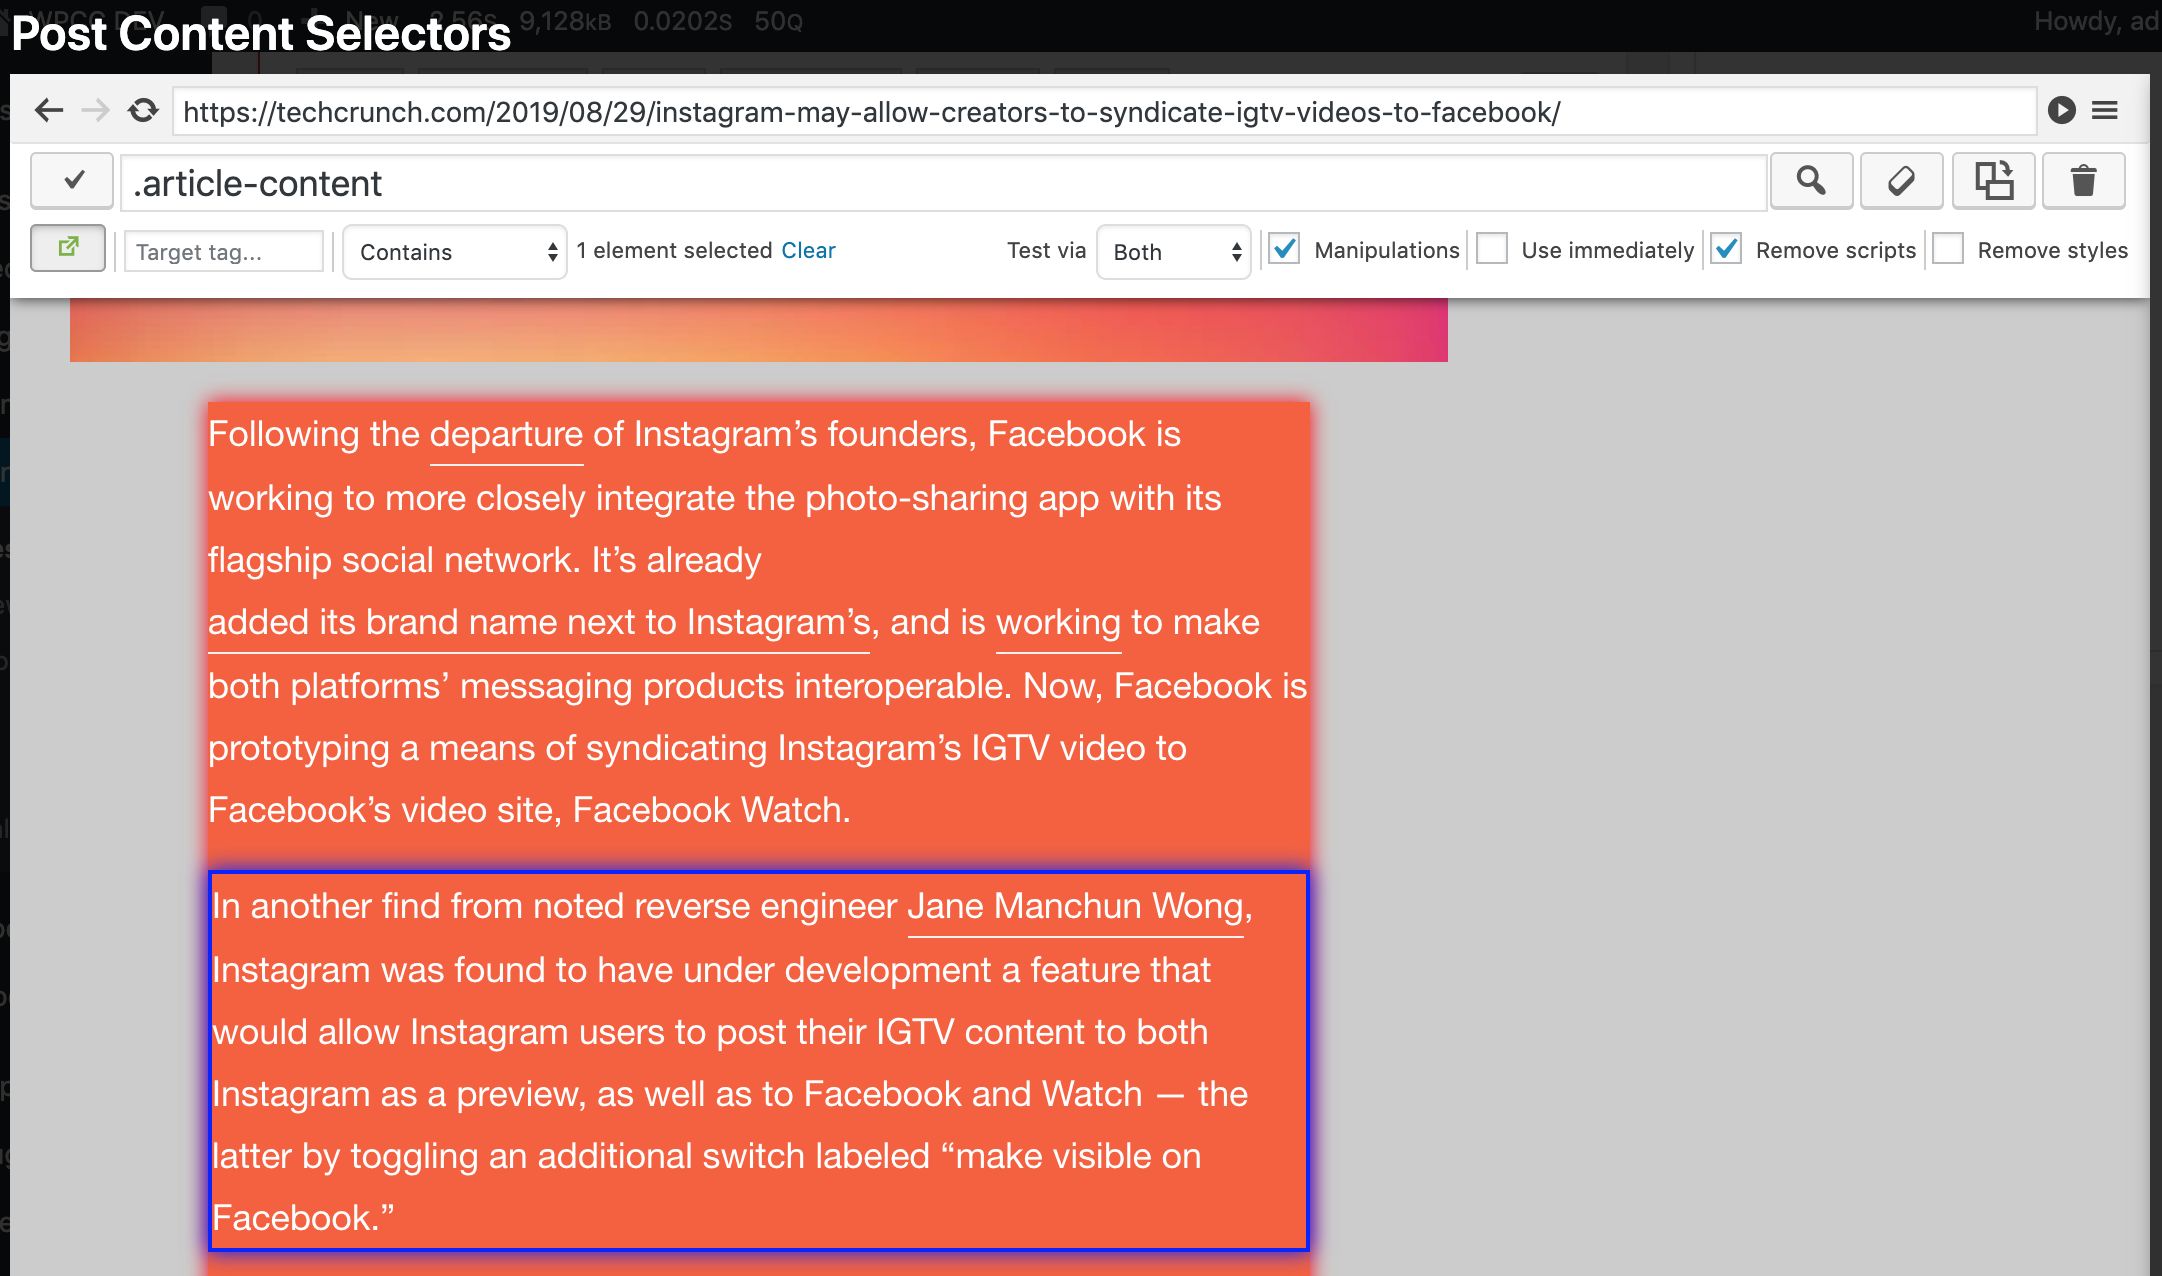
Fig. 2.16 Clicking to a paragraph (highlighted with a blue frame) in the post content to find a CSS selector for its parent element.
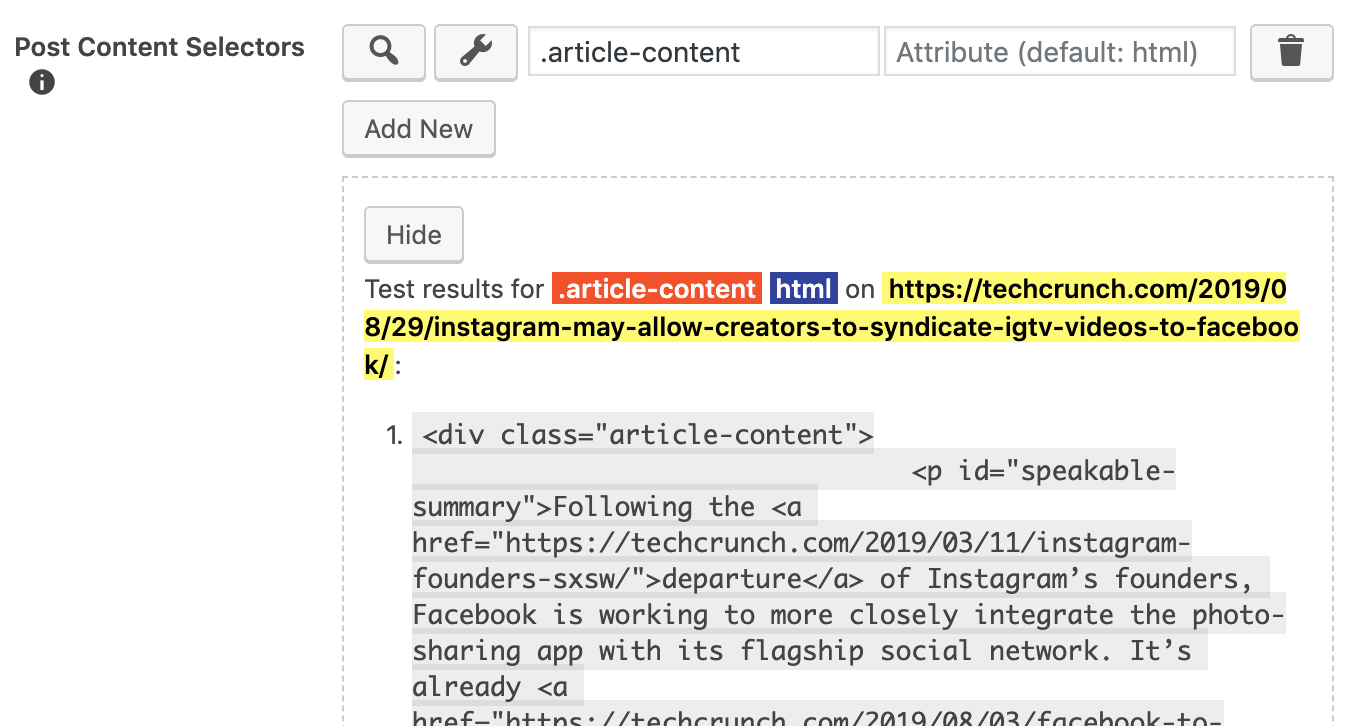
Fig. 2.17 Testing the CSS selector that should match the post content.
The last thing to do when creating post settings is to make sure you prevent script elements
from ending up in your post’s content. This is important because adding unknown JavaScript code
to your web site makes your web site vulnerable in terms of security. It is quite easy to prevent
script elements. Go to Post > Unnecessary Elements > Unnecessary Element Selectors
(Unnecessary Element Selectors) and enter script as shown in
Fig. 2.18. This will remove all script elements from the
target page’s source code.
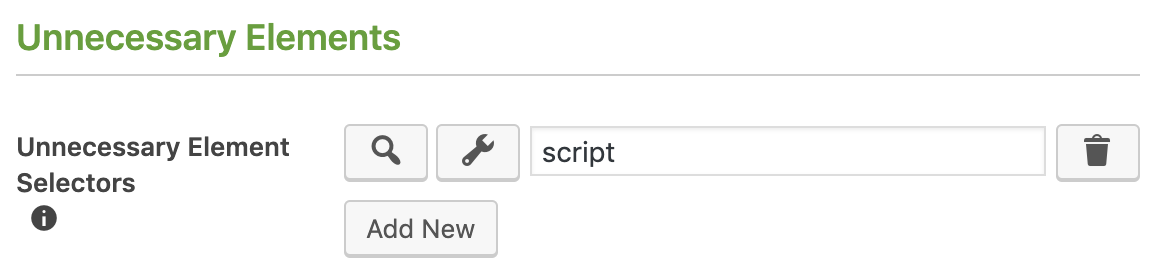
Fig. 2.18 Removing script elements
That’s it. Save the settings (See: Saving The Settings) and, from the sidebar of your admin
panel, click Content Crawler > Tester to make sure that the settings are properly configured.
In Tester Page, configure the inputs as follows:
| Site: | Select the site named as TechCrunch |
|---|---|
| Test type: | Post page |
| Test URL: | Enter the URL we entered into the Test Post URL setting |
Click to button to test your post page configuration. You should see a result that is similar to the results shown in Fig. 2.19. In Template Section of the results, the post content is shown. The post title is shown in Details Section. The results show that we have successfully configured the post page settings to retrieve the post content and the post title.
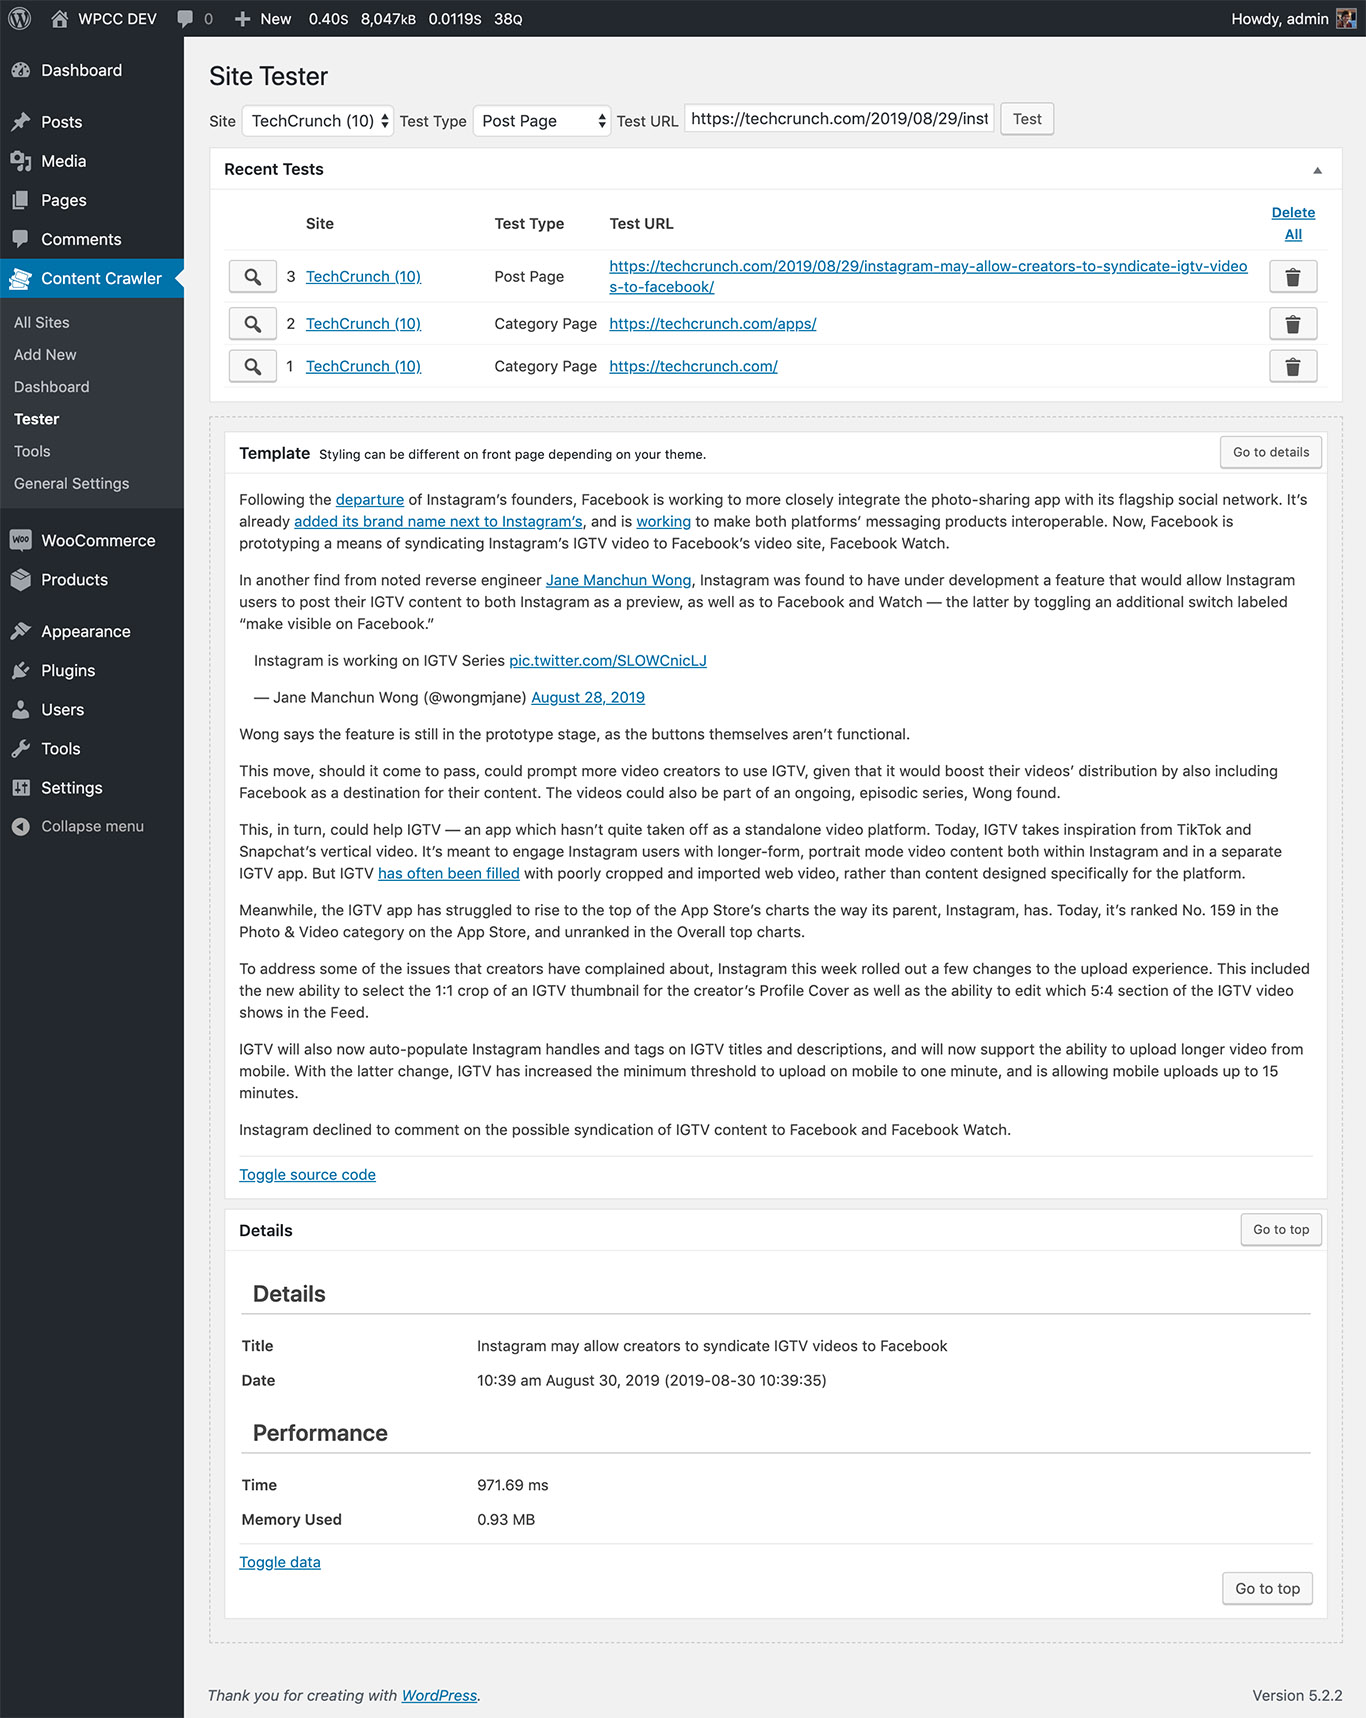
Fig. 2.19 Results of the post page test
2.1.3. Saving a test post
Now that we have configured the post page settings and made sure that they were properly configured by testing them by using Tester Page, we are ready to save a post. We will use Manual Crawling Tool.
Note
This is the last step before enabling the automatic crawling, i.e. scheduling.
In your admin panel’s sidebar, click Content Crawler > Tools
(Tools Page). Make sure Manual Crawling tab is active. This is the
manual crawling tool. It can save one or many posts when their URLs are given to it. Configure
the settings of this tool as follows:
| Site: | Select TechCrunch |
|---|---|
| Category: | Select Apps category. If this category is not available in your site, you can
leave the default category displayed in the select input. |
| Post URLs: | Paste the Test Post URL we used when configuring the settings under Post Tab. |
After setting these values, click Crawl Now button. As soon as you click this button, the
tool will start crawling the URL you entered into Post URLs field. In a few seconds, the
crawling should be finished. You should see the results as it is shown in
Fig. 2.20.
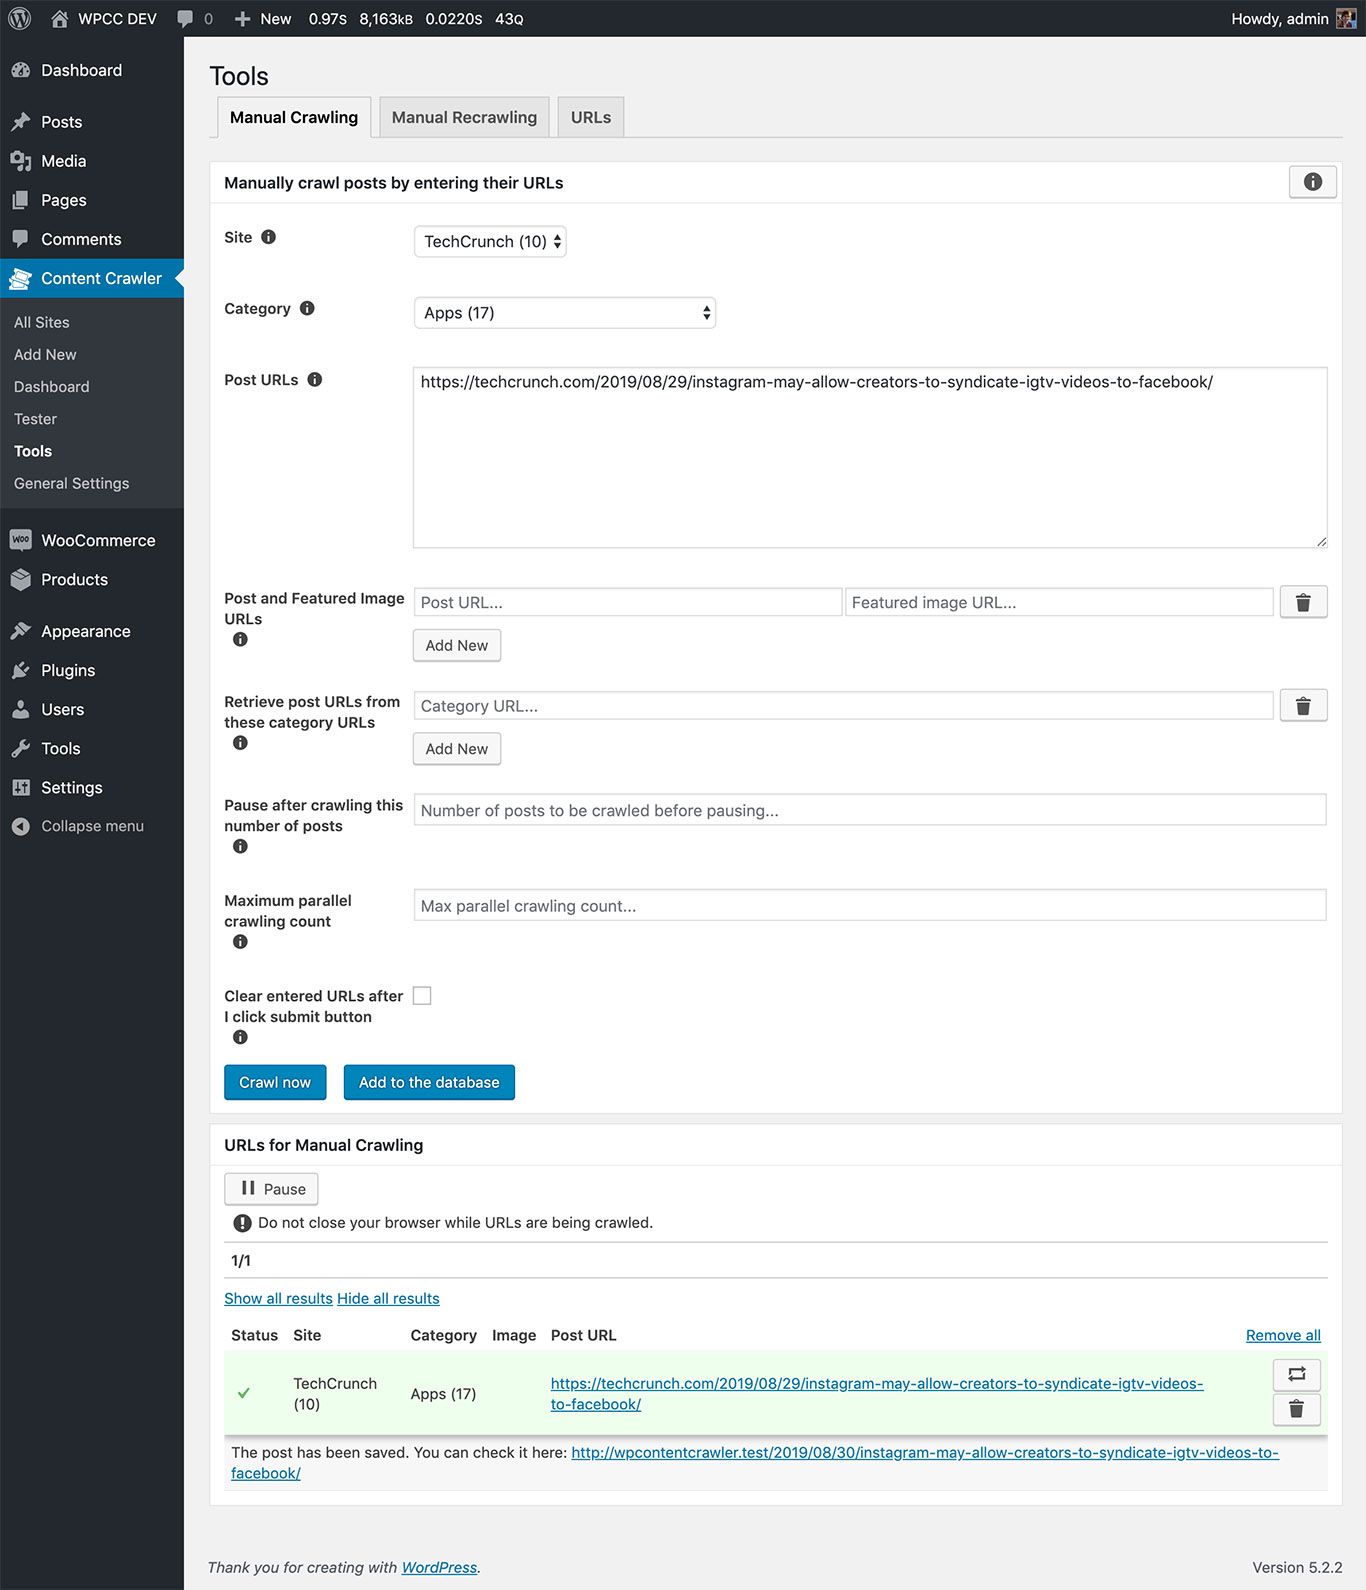
Fig. 2.20 Manual Crawling Tool with its settings configured. The crawling results are displayed at the bottom of the page.
The results of the crawling is displayed at the bottom part of the page. Let’s check out the post saved into our site. Its URL is shown in the crawling results. You can directly click it to open the post in a new tab. You can see the manually crawled post in Fig. 2.21.
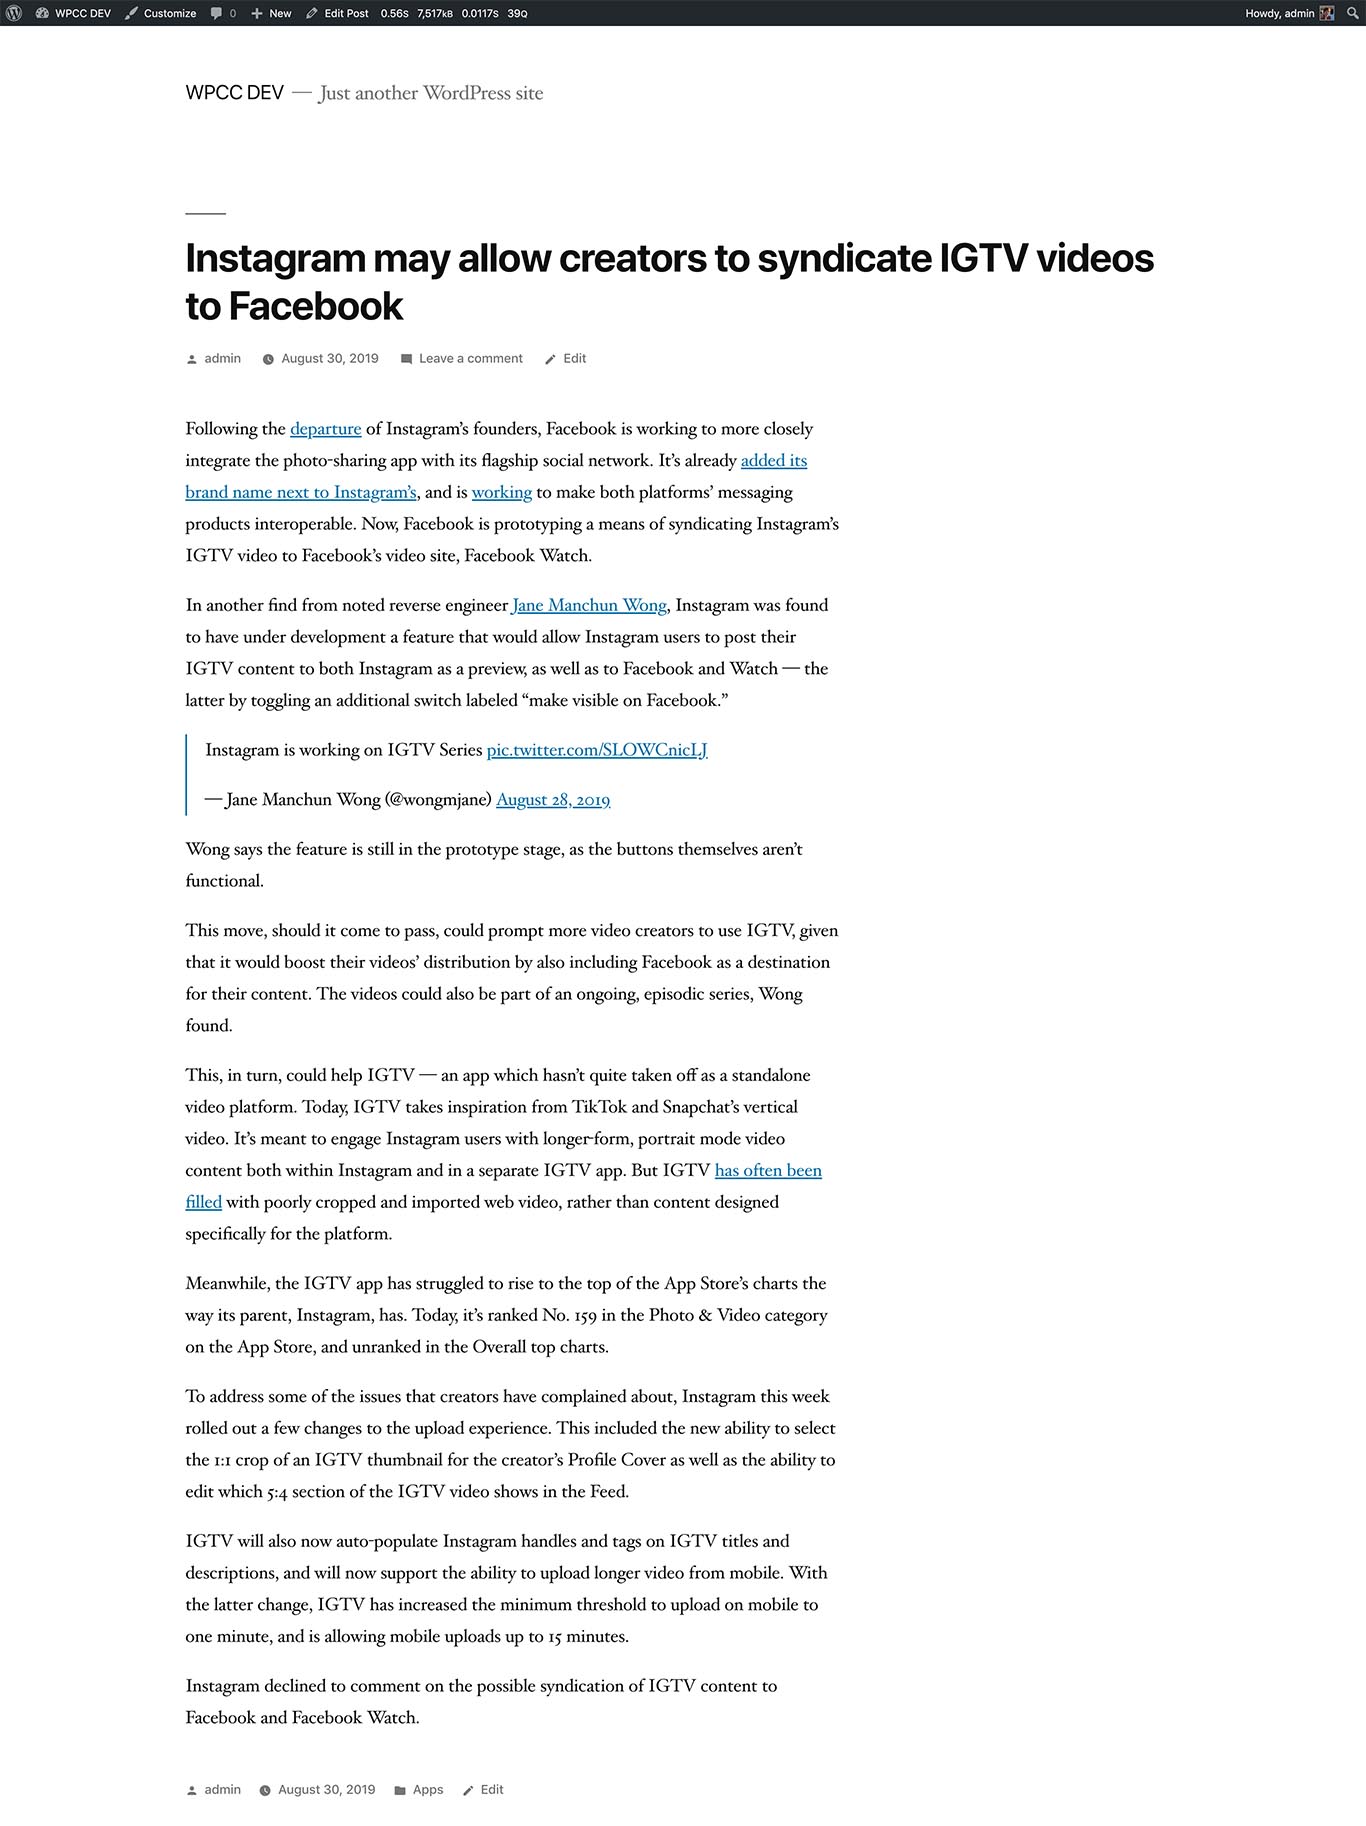
Fig. 2.21 The post crawled by using Manual Crawling Tool.
After you observe the manually crawled post and you are happy with the results, it is now time to
enable automatic crawling, i.e. scheduling.
2.1.4. Enabling automatic crawling
Automatic crawling, in other words, scheduling must be enabled in
General Settings Page of the plugin and in Site Settings Page. If the scheduling is
disabled in General Settings Page, no site will be crawled automatically even if the
scheduling is activated in Site Settings Page. So, let’s first enable the scheduling from
the general settings of the plugin.
In your admin panel’s sidebar, click Content Crawler > General Settings and make sure
Scheduling Tab is enabled in the opened page. Next, check Scheduling > Scheduling is
active checkbox (Scheduling is active?). When you do that, two additional settings
become visible:
- Post URL Collection Interval: Select a time interval for URL collection. For example, if
you select
Every 5 minutes, the plugin will crawl a page of a category page defined inCategory > Category URLssetting every 5 minutes to find new post URLs and save them to your database. The post URLs saved in your database are referred to asqueue, meaning the post URLs waiting to be saved. - Post Crawl Interval: Select a time interval for post crawling. For example, if you
select
Every minute, the plugin will crawl the oldest post URL in the queue and save it in your site as a new post.
Let’s select Every 5 minutes for Post URL Collection Interval and Every minute for
Post Crawl Interval. Next, click Save Changes button to save the general settings.
After saving the changes, you should see the page as shown in
Fig. 2.22.
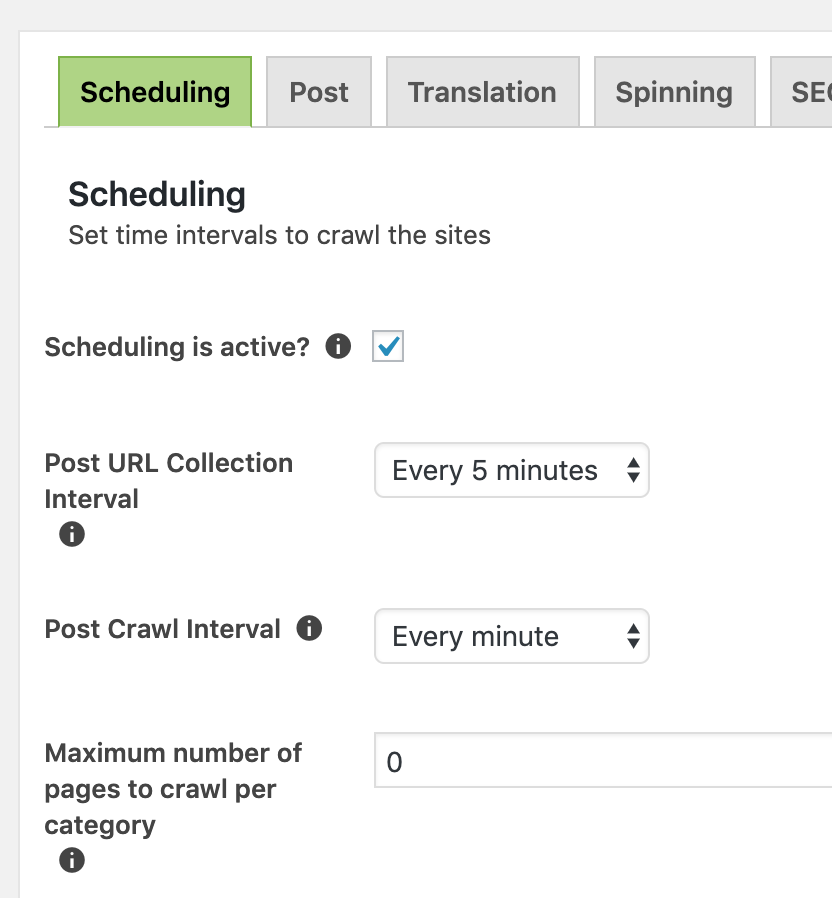
Fig. 2.22 Scheduling is enabled in General Settings Page and changes are saved.
Let’s enable the scheduling in Site Settings Page as well. In your admin panel’s sidebar,
click Content Crawler > All Sites and click to TechCrunch when the page is loaded. Now,
check Main > Active for scheduling setting (Fig. 2.23,
Active for scheduling?) and save the settings (See: Saving The Settings).
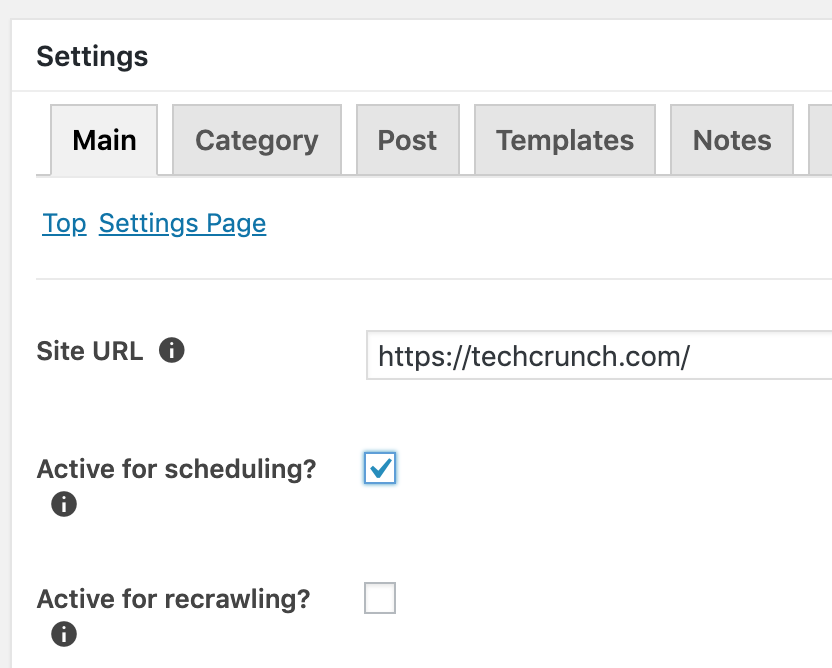
Fig. 2.23 Scheduling is enabled in the Site Settings of TechCrunch.
Now, from the sidebar of your admin panel, click Content Crawler > Dashboard
(Dashboard Page). You should see TechCrunch in
Active Sites Section. This means that you have successfully enabled the
scheduling. After a few minutes, you should see there are a few URLs in the queue and a few posts
have been saved, as it is shown in Fig. 2.24.
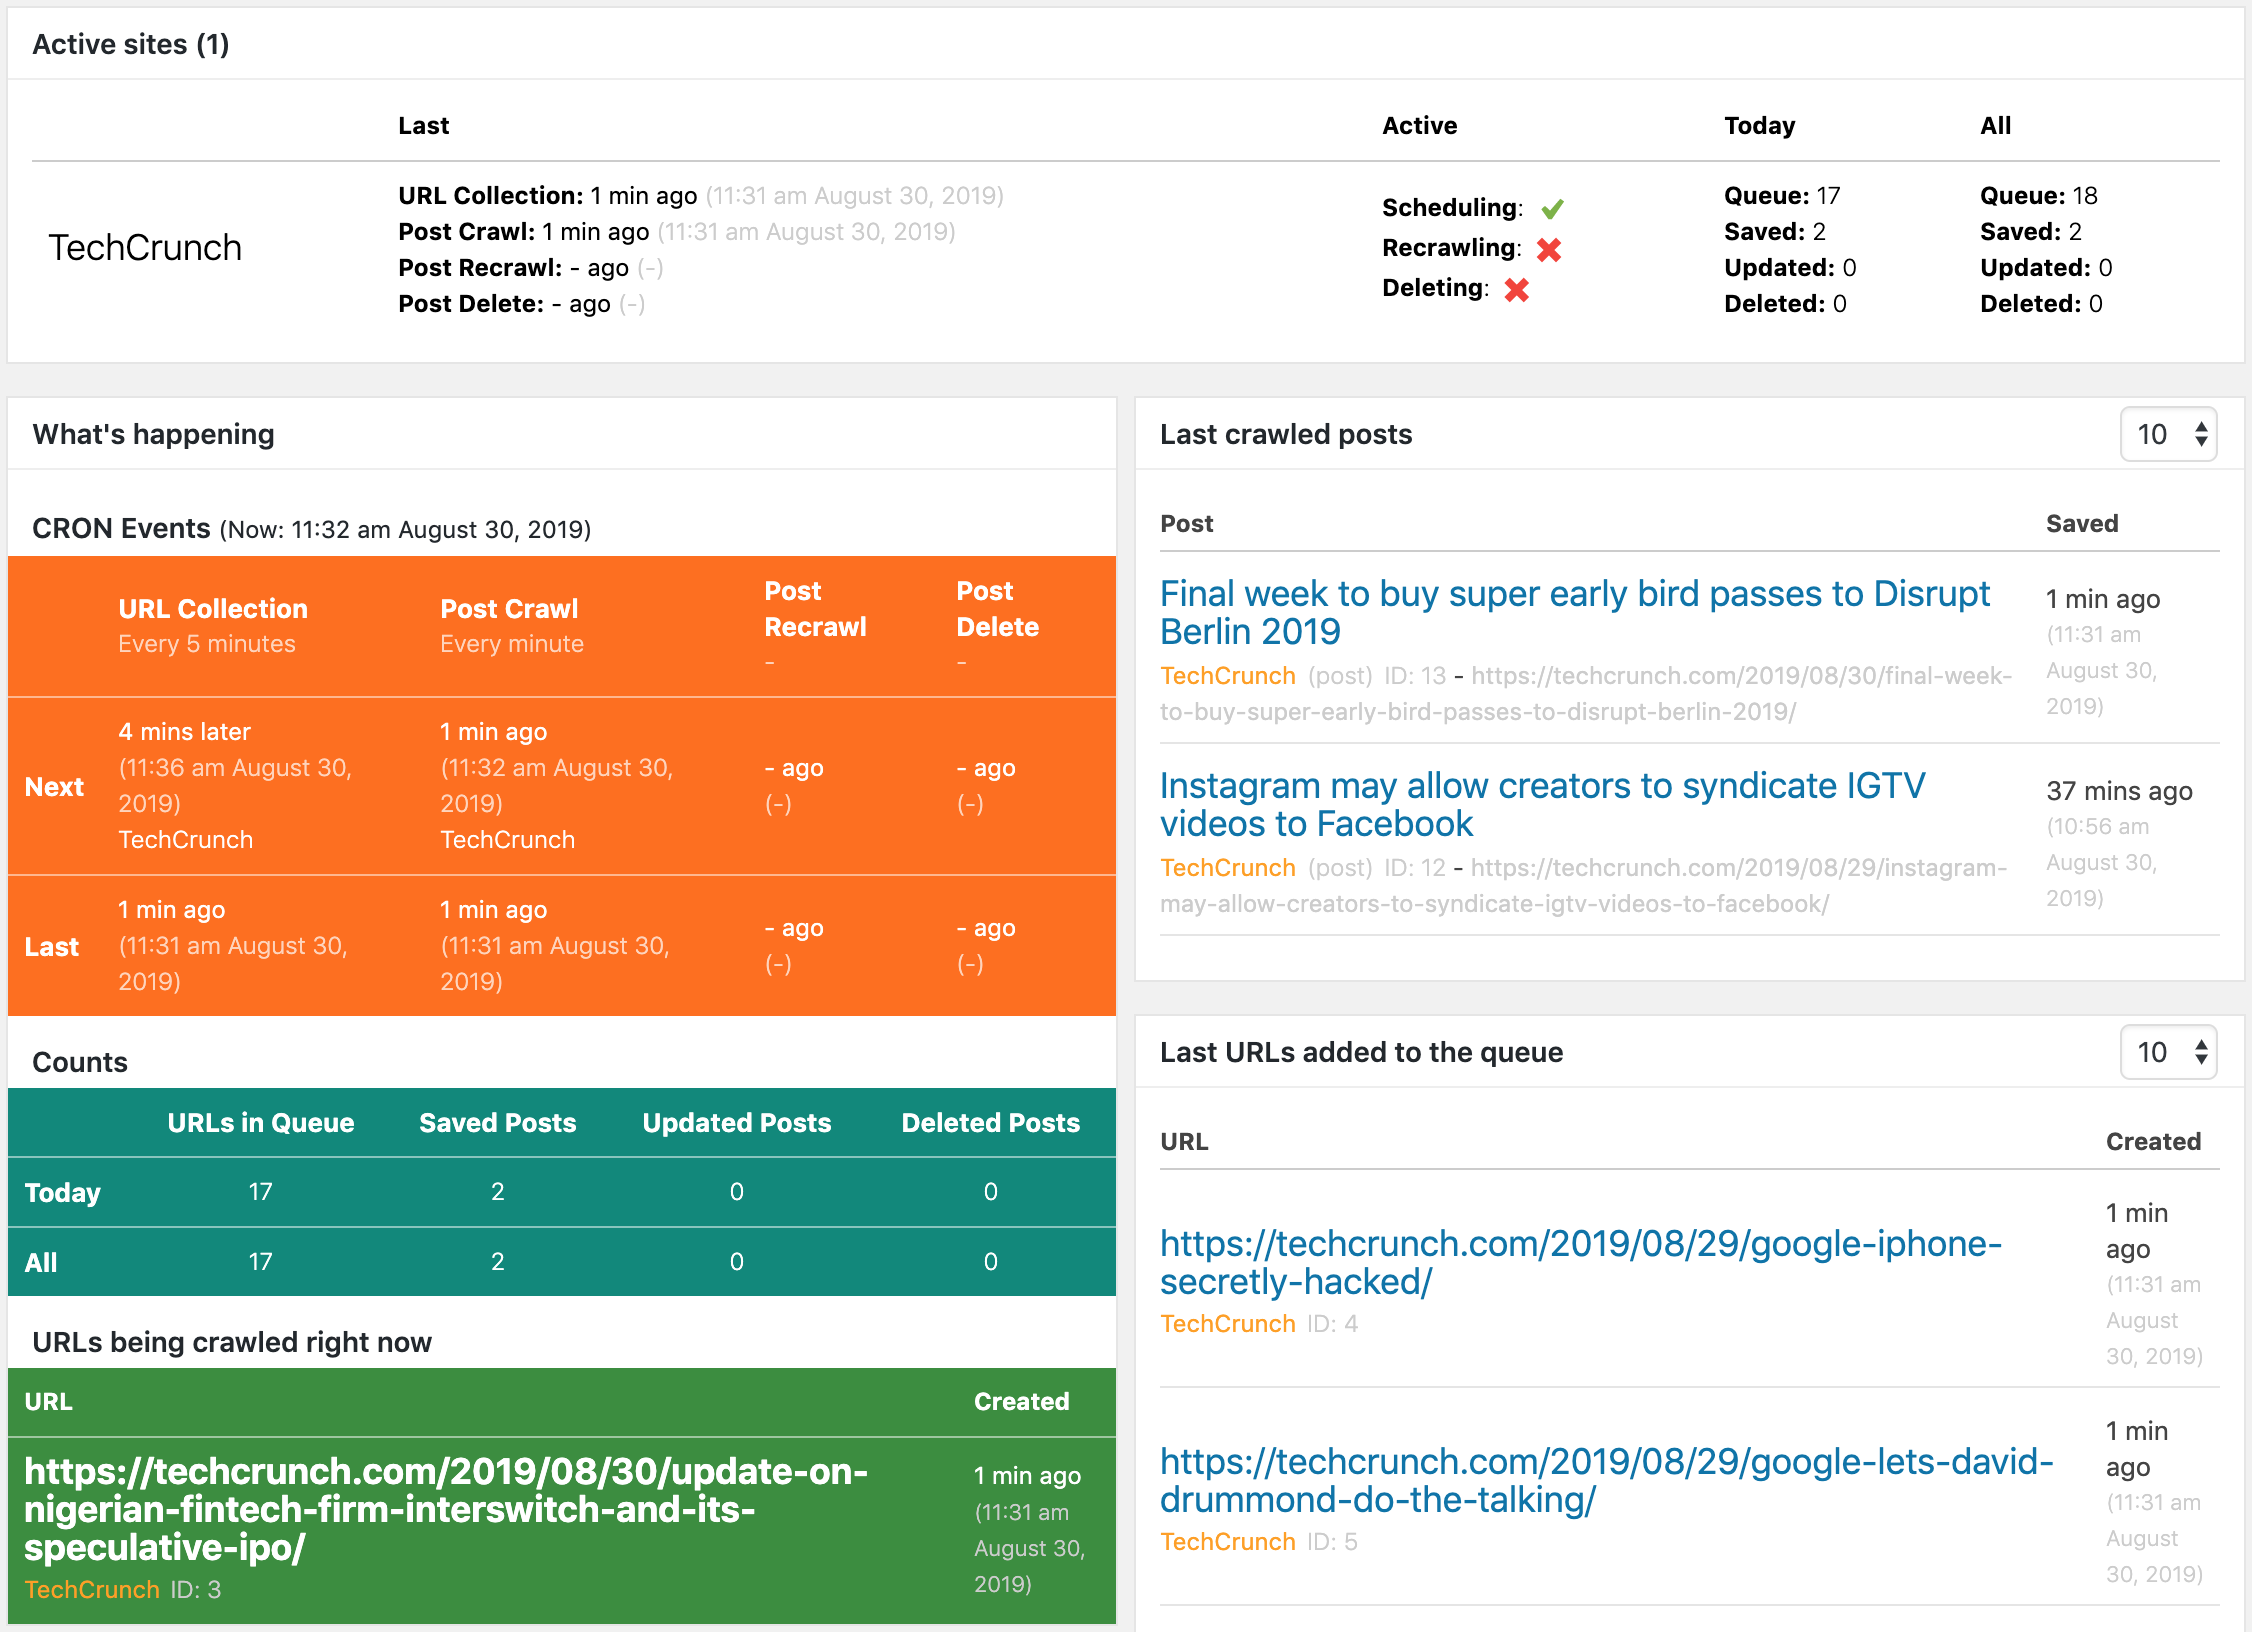
Fig. 2.24 Dashboard Page after enabling the scheduling and waiting for a few minutes
As long as the scheduling is active, the plugin will keep collecting new post URLs and saving the posts into your site.
Congratulations, you have successfully finished the quick start guide. You now know all the basics of the plugin. You know how to create a site, how to configure category and post settings, how to use the visual inspector, how to test the CSS selectors in the site settings page, how to test your category and post settings by using the Tester page, how to use the manual crawling tool to crawl a post manually, how to enable scheduling to automatically crawl posts from the target site, and how to keep track of the active sites in the Dashboard page.
You can check out the other sections of the documentation to learn more about the plugin’s features and how to use them.